This post contains affiliate links. Which means I will make a commission at no extra cost to you should you click through and make a purchase. Read the full disclosure here.
Pinterest can be a massive traffic source for bloggers when leveraged correctly. And one of the ways you might want to boost your blog’s connection with Pinterest. Is by adding a Pinterest Pin It button to your WordPress blog.
But before we get into how to add a Pin It button to your blog. Let’s first go over the different types of Pinterest buttons. To ensure you understand the differences between them. As there are a few variations.
Oh and if you currently have problems with your Pinterest button not working as expected. Then take a look here for some solutions that might help.
- What Is A Pinterest Pin It Button?
- Why Is Using A Pinterest Pin It Button Important For Your Blog?
- How Do I Add A Pinterest Pin It Button To My WordPress Blog?
- How To Add A Pinterest Pin It Button Without A WordPress Plugin
- How To Use A Custom Pin It Button On Your WordPress Blog
- How To Add Pinterest Pin It Buttons To Your Blog & Customize Them To Your Needs
What Is A Pinterest Pin It Button?
So firstly, the Pin It button this blog post is focusing on. Is the one that appears when hovering your mouse over any image in your blog post. When this button appears you can click on it to pin that particular image to Pinterest.
Other variations of a Pinterest button can include the browser extension. That can be clicked to prompt a user with a selection of available images to pin from a page.
As well, as the social sharing button. Which is often at the top or bottom of a blog post. Including this one, you are reading right now. So you’ll notice there are sharing buttons for Pinterest, Twitter and Facebook. Near the top and bottom
If you are looking for an option to let users pin your blog post. With the option to select an image from a range of several choices. Then you’ll want to start here.
It is worth noting that if you use Tailwind. It also has its own browser extension that works very much like the browser Pin It button. Letting you schedule content straight to your Tailwind scheduler. Which is one of the many time-saving features Tailwind has to offer.
If you haven’t signed up for it yet. Then consider getting a free trial for it here. Which will let you schedule 100 pins for free. And get you setup for free access to Tailwind Communities too (previously known as Tailwind Tribes).
Now, with all these different tools. That could be considered Pinterest Pin It buttons. Keep in mind that this blog post is focusing on how to add the Pinterest Pin It button. When hovering over your images.
📌 In a rush? Pin this post to your Pinterest or Blogging board to read it later! 📌

Why Is Using A Pinterest Pin It Button Important For Your Blog?
Adding a Pinterest Pin It button to your WordPress blog. Is an important way to boost its
By giving your readers more ways to share your content on this powerful platform. The more chances you will have of being shared and found on Pinterest. Which will only help you to get more eyes on your
Adding this button isn’t the only way to integrate WordPress with Pinterest features though. You can also consider other features like:
- Profile widget
- Board widget
- Follow buttons
- Social sharing buttons
- Embedded pins
- Hiding Pinterest pins
- Pinterest descriptions that don’t use alt text
- MiloTree popup
How Do I Add A Pinterest Pin It Button To My WordPress Blog?
Okay, so how can you add a Pin It button your blog exactly?
Well, depending on your needs or preferences. There are a couple of different ways. That I will go over with you below. I’ve also made sure to include both with and without plugin options.
Let’s start with how to add a Pin It button to WordPress with a plugin.
How To Add A Pinterest Pin It Button With The jQuery Pin It Button For Images Plugin
Log in to your WordPress dashboard.
Go to Plugins > Add New
Search for the jQuery Pin It Button For Images Plugin
The below option should be available:

Click Install Now > Activate when ready.
You’ll then be directed to their welcome page like this:

Adjusting The Selection Settings For The jQuery Plugin
Go to Settings > jQuery Pin It Button For Images Lite from the sidebar menu.
The first section that opens is the Selection tab at the top. I suggest leaving most of these settings as the default unless you know what you are doing. The only section I would suggest reviewing is the Which pages the Pinterest button should be shown. As by default, it will show on a lot of pages.
For example, most of the images outside of my posts and pages are square. Meaning they aren’t really optimized for Pinterest. So I opted to change Show on from this:

To this:


If you make any changes, make sure to click Save Changes at the bottom.
Visual Settings For Your Pinterest Button
Next on the Visual tab. Under Description Source. You’ll need to tick your preferred options and order of priority for the Pinterest button to pull a pin description. I recommend having it setup like this:

Because you absolutely should be using the data-pin-description attribute. To write descriptions for your pins and not your alt text. Your alt text should be used for describing your image visually only!
Next, under Pin Image. Here you can also choose a pin icon that will appear when a mouse hovers over your images. There are no right or wrong options for this. So play around with it to get your preferred style. Or if you would like to use a custom icon. I’ve also covered how to do this near the end of this guide.

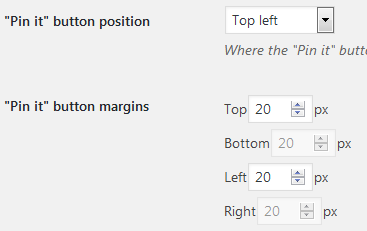
Further down is also the option to set the Pin It button position. As well as margins. Depending on your images, theme and preferences. You may need to play around with these settings too.
That’s all for this screen. So again, if you made any changes, remember to click Save Changes!
The rest of the tabs involve advanced settings, you shouldn’t really change. Documentation and support. So that’s pretty much all you need to do to get everything
There are a few other options you can change depending on your preferences. But I have left them out as they usually require the Pro version of this WordPress plugin.
Also, it is worth noting that although this Pinterest button works on mobile. It’s not very user-intuitive since you have to click on the image for the icon to appear on the free version.
Pros Of Using The jQuery Pin It Button For Images WordPress Plugin
- Free to use for the basic settings
- Options to help select or ignore images when adding the Pinterest button
- Easily use a custom pin it icon
- Option to disable the Pin It button from appearing on small images
Cons Of Using The jQuery Pin It Button For Images WordPress Plugin
- Several features are locked behind
Pro version. Including more mobile-friendly options. But, if you are going to pay for a Pinterest plugin. Then the WP Tasty Pins plugin is a far more worthy choice. - Seems to ignore the nopin=”nopin” attribute.
- Can be a little tricky to get it to do exactly what you want
- Doesn’t overwrite the additional Pin It buttons generated by the browser extension. So you may see two Pin
I t buttons on your images.
How To Add A Pinterest Pin It Button Without A WordPress Plugin
Okay, so what if you don’t want to use a WordPress plugin?
Well, firstly, the jQuery Pin It Button For Images WordPress plugin. Is a versatile and lightweight option. That shouldn’t slow down your blog. The WP Tasty Pins plugin is also another option. Which just makes everything Pinterest related just.so.easy.
Personally, I don’t see any reason not to use these WordPress plugins. But just in case you decide you don’t want to. Or for some reason, they won’t work with your theme or blog. Then you can use this method to add a Pinterest Pin It button without a WordPress plugin.
Just keep in mind this is slightly more difficult to setup. And will require copying and pasting some code into your Theme’s function.php files.
Which, reminds me. Now is the perfect time to think about backing up your blog if you haven’t done so already.
How To Use The Pinterest Widget Builder To Add A Pinterest Button
So, to use this method. You need to go to the Pinterest Widget Builder.
You should find yourself on the Save Button tab at the top. If not then make sure to click on it. The page should look like this:

Under Button Type select Image hover. This will set the button to only appear when the mouse is hovering over it.
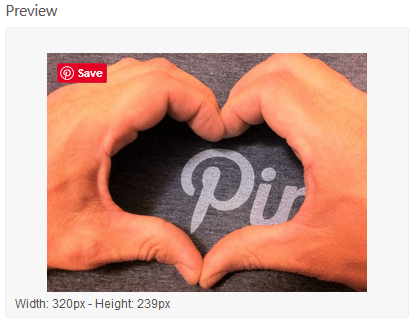
By default the Pinterest Pin It button looks like this:
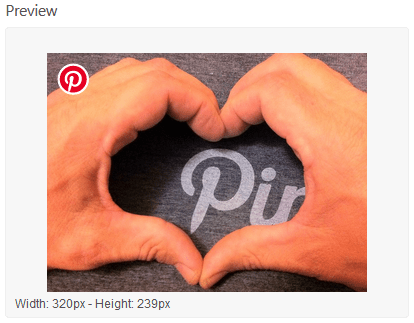
But if you tick the Round button it will look like this:
And if you then tick the Large option. It will change to this Pinterest Pin It button:
Select the combination of options that you prefer. And then below copy the code that Pinterest gives you. You will need this to paste it into your WordPress blog’s header or footer.

Login to your WordPress dashboard
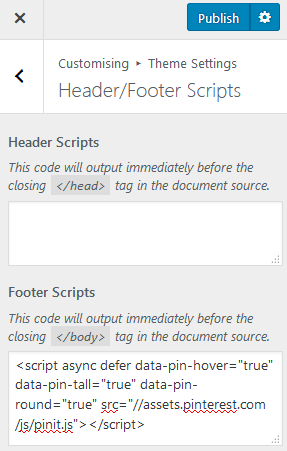
Go to Appearance > Customize > Theme Settings > Header/Footer Scripts
Paste the code into your Footer Script section, like this:
Publish your changes once done.
Note: The options may vary depending on your Theme. If for some reason you do not have this option. Then try 1 of the 5 different methods to add code to your WordPress header.
Pros Of Using The Official Pinterest Button From The Widget Builder
- No need to worry about another WordPress plugin. That might potentially slow down your blog. Lead to security issues or cause conflicts that break your blog.
- The button is supported by Pinterest. So you can be sure it is following their best practices. And you can even send them a support ticket for it. If you find yourself stuck.
Cons Of Using The Official Pinterest Button From The Widget Builder
- Limited customization
- No easy option to use a custom image
- Requires copying and pasting code into your WordPress files.
- Adds a hover button to all images regardless of size
How To Use A Custom Pin It Button On Your WordPress Blog
Now, depending on your preferences you might want to add a custom Pinterest button to fit more in with your branding. Personally, I prefer to stick to the Pinterest recommended button and
But for those of you who would like to make the Pinterest Pin It button more styled to the rest of your blog. This section is just for you 😉
Using a Custom Pin It Button With The jQuery Pin It Button For Images Plugin
To begin with, if you want to add a custom Pin it button. You will largely be restricted to using the jQuery Pin It Button For Images Plugin. As it is the simplest way to add a custom Pin It button.
Next, you’ll need to make sure you’ve got the jQuery Pin It Button installed. As explained before.
Once it’s installed the next step is to create your custom Pin It button. In your software of choice like Canva, GIMP, Photoshop or Illustrator.
The Pin It button can be any size you want. But I would try to keep it small and square to start with. Something like 100×100 px is probably a good place to start.
Once you’ve created your image. Make sure it is saved as a PNG file with a transparent background. And then upload it to your WordPress Media Library.
Now, you’ll want to go into the WordPress dashboard. And from the main side menu go into Settings > jQuery Pin It Button For Images Plugin Lite > Visual
Then in the section for Pin Image set the Mode to Custom.
Click Upload an image using media library.
Select your image.
Then click the Use as “pin it” button.
A preview of your icon should appear. Check the height and width are also set correctly. These should be the same dimensions of the image you created.
You can then click the Save changes. And go view the changed icon on your blog. To make sure it is working as expected.
Resources For Pre-Made Custom Pinterest Buttons
Oh, and if you don’t like any of the Pinterest Pin It buttons provided by the jQuery Pin It Button For Images Plugin. But also don’t feel like being creative. Or like me, you struggle at picking colors that work well together.
Then, here are some free options I’ve discovered that you can try instead for a custom Pinterest Pin It button.
- Circular Pinterest icon in several different
colors – yellow, peach, teal, rose, blue - 50+ custom buttons ranging from hearts, rectangles and circles in a range of
colors - Simple block
color buttons from Apple Cart Lane - A range of shapes and
colors from Blog Clarity
How To Add Pinterest Pin It Buttons To Your Blog & Customize Them To Your Needs
Both the jQuery Pin It Button For Images Plugin and the official Pinterest Pin It button using the Widget Builder. Are practical options you can use to add a Pin It button to your WordPress blog. Regardless of what theme or framework you might be using.
Whilst both are an option. The jQuery Pin It Button For Images Plugin is a far more flexible option. As it offers many customization options. So you can carefully control how and where the Pin It button appears. Including the option to use your own custom Pin It button icon too.
But all the different options do make this WordPress plugin a little bit more complex to setup. If you have specific requirements. Unless you want a Pin It buttons on every image on your blog. Which is unlikely since only tall images are optimized to work well on Pinterest.
Which Pinterest Pin It button will you choose? Do you prefer to keep things simple and use the official Pin It button? Or do you prefer the jQuery Pin It Button For Images Plugin instead?
📌 Enjoyed this post? Then pin this post to your best Pinterest or Blogging tips board! 📌


This was helpful, thank you!
You’re welcome!
Hey, I just have a question that the jquery plugin can work with a social sharing plugin (social warfare)? and How the jquery plugin will use pin description? I mean From where and how it will take the Pin descriptions?
Hey Harsha,
The jquery plugin should be able to work with social warfare, I was using both for awhile until switching to WP Tasty Pins.
If you go to the jquery plugin settings under the visual tab > description source you can enable data-pin-description.
Once you have this enabled you can set your pin description by adding the data-pin-description=”” to the HTML code of your pin image. I recommend checking this guide here for more details on using it.
I hope this helps to clarify things 🙂