This post contains affiliate links. Which means I will make a commission at no extra cost to you should you click through and make a purchase. This is a sponsored post meaning I was compensated for my writing. All opinions are 100% brutally honest and mine. Read the full disclosure here.
Do you feel like you’re spending forever creating new pins for Pinterest just to keep things fresh?
Right now with Pinterest’s push for more fresh content you can quickly feel like you’re starting to burn out. Because it feels like you need to create new pins Every. Single. Day.
But what if you could make your Pin creation process oh so much faster? So that it no longer feels like a chore.
And you can actually find the whole process fun?
Well, that’s where learning how to create pins with Tailwind Create comes in.
- What is Tailwind Create?
- How To Get Access To Tailwind Create?
- Where To Find Tailwind Create?
- How To Create Your First Pins With Tailwind Create
- Finding Tailwind Create Pins That Work For You
- How To Edit & Tweak The Designs Tailwind Create Generates
- How To Completely Customize A Tailwind Create Design & Make It Your Own
- How To Use Tailwind Create Designs
- Benefits Of Using Tailwind Create Review
- Limitations of Tailwind Create Review
- Tailwind Create Review Summary
What is Tailwind Create?
Never heard of it Tailwind Create before?
Well, it’s a brand new tool as part of the Tailwind app that you can use to automatically create and schedule your pins to Pinterest.
Tailwind Create is a tool that will help you create fresh pins quicker and faster than ever before in an almost magical kind of way.
I’ll show you in more detail exactly what Tailwind Create can do and where you can get access to it yourself with this review.
📌 In a rush? Pin this post to your Pinterest or Blogging board to read it later! 📌

How To Get Access To Tailwind Create?
To get access to Tailwind Create yourself. You’ll need a Tailwind account.
If you don’t have a account just yet. You’ll first want to grab a free trial here.
Unlike many other trials, you can start Tailwind’s trial without any credit card. You can also try it for as long as you want until you’ve gone over the 100 scheduled pins or 30 scheduled Instagram posts limit.
Where To Find Tailwind Create?
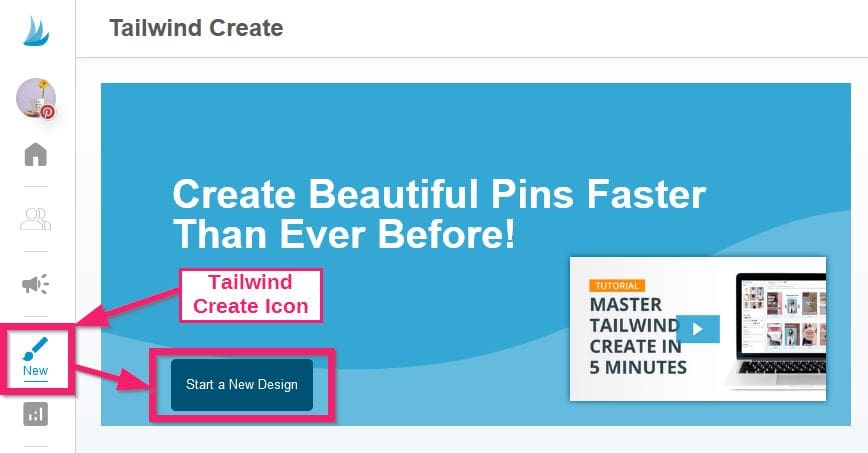
Once you have a Tailwind account. You’ll be able to login to your Tailwind dashboard and under Publisher, you should see a new menu for Create. (It looks like a paint brush.)
Click on this and then Start a New Design to get started.
How To Create Your First Pins With Tailwind Create
Set Brand Preferences
One of the first screens you’ll see once you access Tailwind Create is a page to set your brand preferences.
Take a minute to fill these in as they’ll save you time later.
(Don’t worry you can always change them later.)
Here’s what to set:
- Enter your brand name or website URL – Later, you’ll have the option to apply these to your designs to distinguish them as yours.
- Select your brand fonts or use Find a Font Combination – you can set one for your pins main title text and any subtext (remember these should be readable!)
- Set brand colors (up to 4), or you can select Discover Curated Palettes for pre-selected colors
- Add your logo and any variants – ideally with a transparent background
Once done, remember to click Save Preferences in the bottom right corner.

Set Your Pins Specific Settings
Next, we’ll need to set things that will be specific to your pin design. Such as:
- Destination link – the URL to your blog post or page you want to pin to direct to
- Title – the main pin title text you want on your pin image
- Photos – the images you want to use in the design
- Stock Photos – use photos supplied from Tailwind’s stock image sources
- Site Photos – select images imported directly from your blog post
Once done, click on Create Images in Tailwind Create, and it will start creating some designs for you.

Finding Tailwind Create Pins That Work For You
If there are too many Tailwind Create pins for you to choose from for your liking. Then you can use the filters in the top right corner to narrow things down. By:
- Content Type
- Industry / Niche
- Pin format
You can also mark designs as your favorite, allowing you to reuse them for other pins later quickly.
How To Edit & Tweak The Designs Tailwind Create Generates
Now, if you’ve already found some designs you’d like to use, then that’s great!
But what if you want to make some changes or something doesn’t fit right with the template you like?
Well, you can change your settings on the left to tweak all the pre-created designs. Including:
- Adding and removing more images
- Swapping color palettes from your brand to something else or even palettes generated from the chosen images
- Change up your Title text, font and emphasize any numbers
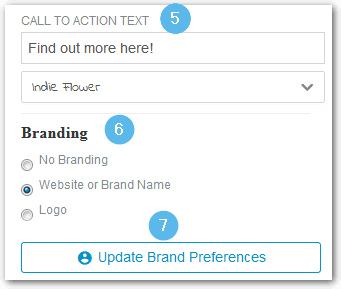
- Add a subtitle that you can use to apply another font
- Add a call to action with a font style of its own
- Toggle branding off or swap between your URL and logo
- Update your brand preferences (in case you want to change your settings from earlier quickly)

How To Completely Customize A Tailwind Create Design & Make It Your Own
But what if you only want to change 1 specific design? Well, you’ve got options for that too!
Like for each individual design, you can use the Try on different looks option to:
- Swap between the colors from your palette
- Use a different image from the ones you selected
- Cycle through the layout variations for the specific Pinterest pin template you are using

If you want even more precise editing, you’ll need to click on Edit. This will open your pin in the Tailwind Create editor.
Here on the left, you can…
- Add more text to your pin as either a title, subtitle, or call to action:
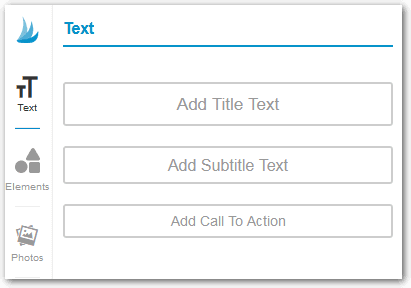
- Add elements like arrows and shapes:

- Add in additional photos:

Within the main Tailwind Create design screen, you can do everything you would expect with an image editor, such as:
- Dragging and moving things around
- Increasing and decreasing the size of objects
- Rotating objects using the small circle handle
- Edit text by double-clicking and typing
- Save your design as a favorite to use as a template for other pins
- Download the image as a jpg with the pin title used as the filename

For more details, you can further edit any element selected by using the settings on the right. Like:
- Move the element back and forth through layers to control whether it displays under or on top of other elements
- Duplicate the selected element
- Delete any element, even those created by Tailwind Create
- Crop (images only)
- Change the transparency/opacity for text, shapes, and images
- Change individual colors
- Adjust your images for brightness, contrast, saturation, and blur

You can also use the right sidebar to fine-tune the style of your text. Including the:
- Font
- Color
- Bold, italics, and underline
- Left, right, or center alignment
- Font size
- Text shadow
- Line height
- Letter spacing

Once you’ve made any changes, you can save the design as a favorite to reuse elsewhere or click on Save and Go Back to return to the other pin templates.
What’s Missing From The Tailwind Create Editor?
Currently, in this Tailwind Create review it’s clear it does many of the things you’d expect. But there were also a few things I found missing when playing around with some designs. Like:
- You can’t flip shapes unless you grab one side of it and drag it past the opposite side.
- All pin design sizes are limited to 1000x1500px. So you can’t experiment with taller or square designs yet.
- There’s no easy way to select objects behind others without clicking and dragging things out of the way. A layer or object list for more accessible selection would go a long way.
- You can’t zoom in or out at all to make more exact tweaks. Or to make it easier to select smaller objects.
- Gradients are possible, but only if the design already includes it, as I couldn’t find any way to create one myself.
- The Tailwind Create pin designs are output as JPG rather than PNG. Maybe it’s just me, but I find that PNG files uploaded to Pinterest come out way less blurry and pixelated.
- There’s an option for text shadows, but it’s not very consistent as you can’t control the color.
- I missed the lack of advanced font settings, like outlines, curves, and splicing. These are huge for creating good text contrast, even on the most tricky of designs.
Why You Should Consider Editing Your Tailwind Create Pinterest Designs
Right now, you could just select a bunch of designs from Tailwind Create and schedule them out into your Tailwind Smart Queue.
But to truly get the most out of Tailwind Create. You should always spend an extra minute optimizing the design for readability.
You see 80% of Pinterest users browse using their mobile, meaning dozens of pins get crammed onto a tiny screen.
So your text absolutely must stand out and be readable to stand a chance of ever going viral.
Will things take a little longer this way? Sure.
But since you’ll find everything streamlined in one place, it should only take a minute or so. And every pin will give you more bang for your buck this way.
Here are some examples of what I’m talking about:
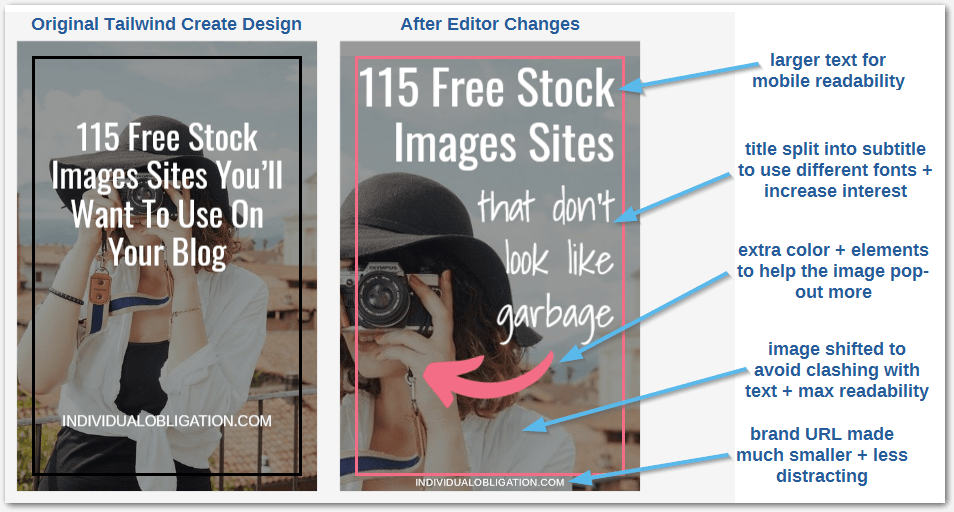
On the left is the design Tailwind Create generated. It looks okay, but the readability of the pin is somewhat suffering.
Now, take a look at the pin on the right. With just a few quick changes, the text is super easier to read, right? Even if you zoom super far out.
So with just a few small changes to the font sizes and shifting the image. The readability and click-ability for this pin just shot through the roof.
Here are a couple more Tailwind Create reviews for the pins generated:

Here is a design I would never have come up with by myself. But at the same time, I would never use this Tailwind Create design *as is* either. The text is tiny, and it just isn’t readable!
Luckily, it just took me a minute or so to shift things around in Tailwind Create to make things more pin-worthy, as you can see in the right image.

Pin collages are something I’ve never really done, as my niche doesn’t lend itself well to being visual.
But when I saw this pin in Tailwind Create, it sparked a brilliant idea for this particular post. (I still tweaked things around as the text was still too small in my opinion, though.)
What I love about this design was the idea that I could download plenty of example stock images from the websites included in the blog post. Upload them into Tailwind Create and let it do its magic by shuffling around the combination of images used in this collage.
I can see myself getting lots of use out of this single template!
How To Use Tailwind Create Designs
Once you have some pin template designs you like, in Tailwind Create, you can click on +Select to add them to your list. Then in the bottom right corner, click Review Your Selection.
You’ll see a quick overview of your selected pin designs. Where you then Download, or click Go Schedule with them.
Pro Tip: Download your images first as a backup and THEN click Go Schedule. (It’s always worth having the original image files so you can upload the most popular ones into your actual blog posts later.)

If you click on Download, you’ll get a zip file to save, and your Tailwind Create designs will get deducted from your monthly plan. (1 pin image = 1 credit)
If you click on Go Schedule, your designs will be created in the Tailwind scheduler for you to add to your queue. Your Tailwind Create pins will also get deducted from your monthly design allowance.
Also, it looks like you won’t have your credits deducted twice if you decide to Download and Schedule your designs.
Plus, Tailwind will automatically import your Pin Title and website URL to the Tailwind scheduler for you.
You’ll still need to add in a Pinterest description and select your boards before you can schedule these drafts into your queue.
And that’s pretty much all there is to it.
If you decide you want to create some more Tailwind Create pins based on your previous settings. You can actually reuse them by returning to the main Tailwind Create screen and clicking Create More Designs.

Benefits Of Using Tailwind Create Review
Now the critical question – is Tailwind Create beneficial to you?
So far, this new tool from Tailwind is one of the fastest ways to create Pin designs for Pinterest marketing.
It’s one of the closest ways to automatically generating Pin templates on-demand fast, even if you struggle with designing pins.
So why should you consider Tailwind Create? Here are some of the main benefits it has right now:
- You can create Pinterest images from scratch, all within the Tailwind app, saving you time and less faffing around with other tools.
- You can generate dozens of designs in just a few minutes. So you can generate new, fresh, and high-quality pins that will drive traffic to your blog fast.
- You can save time and still get the benefits of batching creation. Just make sure you drip feed those new pins slowly.
- Tailwind Create and it’s built-in editor are easy and intuitive to edit and customize
- There are tons of customization options to make your Tailwind Create pins unique.
- No design skills are required.
Limitations of Tailwind Create Review
Okay, but what’s the downside to Tailwind Create?
Overall, no tool is truly perfect, in my opinion, especially when it comes to using computers to automate human creativity. So it’s worth keeping the below limitations in mind for this Tailwind Create Review:
- There are some minor features still missing from the editor, like zoom and better font shadows.
- It’s an extra cost. Not only do you need to pay for the basic scheduling plan. Each Tailwind Create plan has limited credits. Meaning depending on how many pins you create, it might cost extra to use the tool. Plus, not all stock images get included either!
- Ideally, you’ll have to spend some time tweaking designs as often the text is too small, or there’s not enough contrast. Though I suspect this will improve over time or with the use of favorites.
Tailwind Create Review Summary
Overall, Tailwind Create for Pinterest can help speed up and streamline your Pin design process. So you can go from an idea to a scheduled pin without ever leaving the app.
The whole process can help make creating fresh pins for Pinterest a breeze. Without having to slog away for hours individually designing Pinterest images and templates.
While the whole process isn’t perfect, as you’ll likely still want to tweak your Tailwind Create pins. It’s still a hell of a lot faster than creating pins manually, especially if you hate doing design.
The best way to know for sure how much time it can save you, is to try it for yourself here.
What are your thoughts on Tailwind Create for Pinterest? Do you think you’ll use it to create fresh Pins for your blog? What features do you feel are missing?
📌 Enjoyed this post? Then pin this post to your best Pinterest or Blogging tips board! 📌
