This post contains affiliate links. Which means I will make a commission at no extra cost to you should you click through and make a purchase. Read the full disclosure here.
Do you want to know how to edit or create a WordPress menu for your blog?
Well, then you’ve come to the right place!
As this WordPress for beginners tutorial aims to do exactly that.
Exactly what I am going to show you. Is how to create a WordPress menu for your blog navigation from scratch. As well as how you can go about editing any existing navigation menus. So you can easily customize them to your blogs needs.
After all, your WordPress menu is one of the main ways your readers will interact with your blog. Alongside a WordPress search bar if you decide to add one to your blog.
If your WordPress menu doesn’t help your readers find what they are looking for. Then it really isn’t doing its job properly.
So, let’s look at where you need to go within your WordPress dashboard to create a WordPress menu bar.
![How To Create A WordPress Menu Easily [Beginner Friendly]](https://www.individualobligation.com/wp-content/uploads/2019/07/how-to-create-a-wordpress-menu-wordpress-for-beginners-wordpress-tips-pin-1-b-2.jpg)


How To Use The WordPress Appearance Menu To Customize Your Menus
Okay, so there are 2 different places to edit and create WordPress menus. But I recommend using the WordPress Appearance > Customize option.
So, by going to the Appearance > Customize menu from within your WordPress dashboard. You can open up a section called Menus by clicking on it.
What’s great about this method. Is that you can see exactly what effect your changes will have on your blog. Before making anything live.
Using WordPress Themes With Multiple Menus
Right, so some Themes can have multiple menu locations. That will allow you to set where you create a WordPress menu bar.
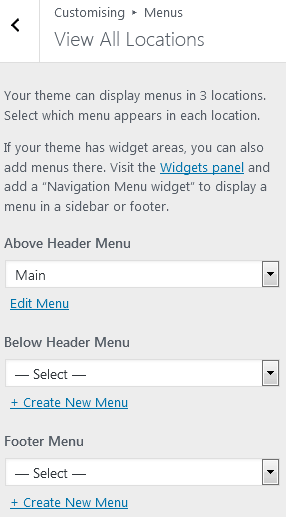
For example, on my theme, I can set the WordPress menu to display in 3 locations. To change this click into View All Locations. (You should already be within the Appearance > Customize > Menus screen to see this.)

As you can see mine allows me to set a WordPress menu to above the header menu, below the header menu and in the footer menu.
Under each of these areas. You can either select from the dropdown list, a menu you’ve created or even create a new menu from scratch.
So, to start with, I am going to talk about how to create a WordPress menu from the beginning. Then we’ll go over how to edit existing menus. Since it is worth noting that your theme likely has a menu you can edit already.
How To Add A Menu In The WordPress Header
So how do you create a WordPress menu or a navigation bar for your blog?
Well, as I’ve mentioned your theme will likely already have at least 1 menu already built for you. Usually, this will be called something like “Main”.
Starting from the main Menu screen. You can click on any already created menus to edit them. Or if you want to create a WordPress menu completely from scratch. Then click the Create New Menu button.
Let’s start with clicking the Create New Menu button. You’ll get a screen like this:
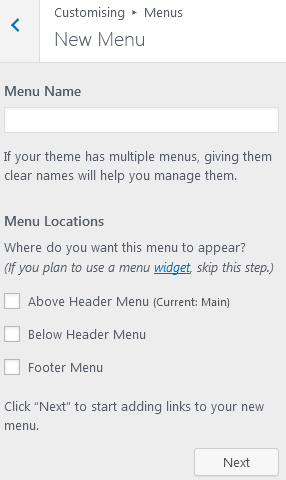
Give your new menu a meaningful name. And then select where you want new WordPress menu you create to appear.
You can do this by clicking the checkbox next to the locations. Which I explained earlier.
The locations that you can use to create a WordPress menu are dependant on your theme. Likely any already created menus and how they are named can also vary from theme to theme.
Once you’ve selected your settings click Next. WordPress will take a moment to create a WordPress menu. Before the preview of your blog on the right will update.
Don’t worry if things are blank or don’t seem to be showing yet. As if you created a new WordPress menu it won’t have any menu items to show yet.
To start adding items to your WordPress navigation. Click on the Add Items button. A new menu should slide out to the right which contains all the different items you can add to your WordPress menu.
Let’s take a look at each one!
What Can You Add To Your WordPress Menu?
Note: You can use the search box at the top to quickly find the specific WordPress menu items you want to add.
What Is A Custom Link In WordPress?
These Custom links are items you can add to your WordPress menus. You can use these to create completely custom menu items. That link to URLs both on and outside your blog.
Once you’ve set the URL you can also customize the Link text. It is really that simple, with just these two settings.
What can you use a custom link item for?
Well, you can use them to create a WordPress menu item for anything that isn’t included in the default list of items. In fact, a common use for this. Is to create your Home button for your navigation.
To do this, add your blog’s homepage into the URL box and enter Home into the Link text box. Then click Add to Menu. And the preview of your blog will update to show a handy little Home button for your readers to get back to your front page.
How To Add Pages To A WordPress Menu
Next, underneath the Custom link in WordPress. You’ll see an option for Pages. Within this section are all the individual pages you have created on your blog. So, if this option doesn’t show or is empty. It might be because you haven’t created any pages yet.
Any pages you do have will show here. So, if you were wondering how do I link a page to a menu in WordPress? Then this is the option you would use. All you need to do is click on the page to add it to your menu structure on the left side.
How To Add Posts To A WordPress Menu
But what if you want to link a specific post when you create a WordPress menu? Well, this is where the Posts section comes in. Every single blog post will show in this section.
Once you’ve found the specific post you want to add. All you need to do is click on it and it will be added to your WordPress navigation too.
Using Categories For WordPress Menu Items
Another option from the list of menu items you can add. Is the categories section. This is how you can add your category pages to your navigation.
These are a really great way to introduce your readers to more content they might be interested in. As this is often one of the first things a reader will look for when trying to find specific content on your blog post. Which is why it is important that you spend some time getting your WordPress categories setup correctly.
Any categories that you have setup will show under this section. Which you can just click on to add to your WordPress menu structure.
The Tags Section For Adding Items To Your WordPress Menu
Lastly, is the Tags section. This works a lot like the Categories section. In that, it includes every single tag you have on your blog. And by adding this to your menu it will add an item that links to the specific tags page. Which will show all your blog posts that have that specific tag.
Honestly, this is rarely used when creating WordPress menus. As categories are a much more useful menu item instead. But it’s worthwhile knowing that you can add these as items to your WordPress menus.
How To Edit An Existing WordPress Menu Bar
Okay, so because your theme likely already has a menu. Perhaps you would rather make a few edits to it? Rather than creating a WordPress menu from scratch. Or perhaps you just want to edit your own WordPress menus further down the line.
So, let’s take a look at how you can go about editing your WordPress menu bars.
Firstly, all the previously explained options of adding menu items still apply. So, the next thing you will want to know about. Is how to delete items that are no longer needed.
How To Delete Or Remove Items From Your WordPress Menu
So, how do we do that? Well, to start with, if you click into any of the items already in your menu. It will expand to give you further settings. Therefore, if you need to delete items from your WordPress menu. You can simply click on the item. And then click on its Remove option.

What you might also notice. Is if you click Add items to go into the edit mode. A red cross will appear next to each menu item you have. You can also click on this to delete items from your WordPress navigation menu.

How To Reorder WordPress Menu Items
But, perhaps you don’t want to delete or remove items from your WordPress menu. Instead, you might want to reorder them.
To do this, you can click and drag items up and down to change their order. You can also slightly indent items when dragging and dropping.

Which will make the item appear as a dropdown menu. Beneath the menu item above it.

How To Create A Custom Menu Widget In WordPress
Did you also know? That you can create a WordPress menu using your widgets. This will let you add your navigation menu to places outside of the usual locations. In particular, this option is often used for adding a menu to your sidebar.
So, if you want to know how to create a custom menu widget in WordPress. Then you’ll want to start off with navigating to your Appearance > Customize > Widgets screen.
If you then look for something named similar to “Primary Sidebar”. As these options can vary depending on your theme.
Click it and then click Add a widget. You can then use the top search to look for “menu”. And you should be able to select the Navigation menu item. Consider giving it a title (optional).
You’ll also want to set the Menu. That you should have already setup using the Appearance > Customize > Menus option.
Remember: If you have other widgets in your sidebar then you may need to drag and drop to reorder them.
Another option you can use instead of the Navigation menu widget. Is the Categories widget. So if you just want the option to list your categories in your sidebar. This is an easier option.
Simply click to add the widget to your Primary sidebar. Give it an optional title. And tick the relevant check boxes. Depending on how you want to show the categories. There are options to display them as a hierarchy, with a post count or as a dropdown list.

Once you want to save the changes. Click on Publish and all changes will be made live on your blog.
How To Add A Sub Item To A Menu In WordPress & Create A WordPress Dropdown Menu
Ever noticed how some blogs have submenus or even dropdown lists? When you hover over certain items in their menu. Likely you may have noticed this being done for the different blog topics or categories.
Well, this is straightforward to do. Once you know how!
So, when you click Add Items to create a WordPress menu. Select Categories and pick 1 item to be the top parent menu item by clicking on it. This will add the item to the left menu. Which you can then click on to rename. In this example, I’ve selected the “blogging” category and renamed it to “Topics”.

If you then click on Add Items again. You can add all the categories you want to display under the “Topics” menu. Including the one, you have used as the top parent menu item. Like in this example “blogging”.
You’ll end up with something like this once done:
How To Indent Your Menu Items Into WordPress Menu Groups
Now, here’s the important part. Once you have all your items added you can now click and drag to reorder them. But not only can you reorder them. You can drag them so they are slightly indented to the right. Compared to the parent item above them. When you do this, the indented items will become part of your sub-menu. Like this:
Makes sense? Do you see how indenting your menu items like this? Can allow you to create WordPress menu groups.
Check it out yourself by hovering over your parent menu item on the WordPress navigation. A dropdown list with your indented menu items should appear.
Also, you know how I mentioned using the Custom link to create WordPress menu items earlier? Well, they can also be used to help create WordPress menu groups and submenu dropdowns too.
So, you could create a Custom link to say your homepage. Name it “Topics”. And then use this as the top-level parent menu item for all the other dropdown items to fit under.
What This WordPress Menu Guide Has Covered
So, overall you should have a good idea on how to create a WordPress menu for your blog.
As we’ve covered:
- How to create a WordPress menu from scratch
- Ways to edit your theme’s existing navigation menus
- How to add categories to your WordPress menu
- Widgets you can use to create menus in your sidebar
- How you can add pages to your menu
- How to create a WordPress menu dropdown or submenu
Anyways, I hope this WordPress for beginners tutorial was useful to you. And that it has given you lots of ideas on how you can customize your own WordPress menus and navigation bars!
For more WordPress beginner tutorials, I recommend checking out these:
WordPress Categories And Tags – How To Use Them + Benefits
Top 11 Popular WordPress Backup Plugin Tools For Your Needs
How To Write Your First Blog Post On WordPress Gutenberg
If there is anything not covered here. That you’d love to be able to do when you create a WordPress menu. Then I’d love to hear your questions and thoughts below in the comments!
If you found this blog post useful then please consider taking a few seconds to share it to your favorite social media platform!
