This post contains affiliate links. Which means I will make a commission at no extra cost to you should you click through and make a purchase. Read the full disclosure here.
WordPress categories vs tags – are you using them the right way?
As a beginner blogger. Using WordPress categories and tags probably don’t seem very important, right?
They are just something you set for your blog posts. No one really sees them.
Or at least that might be what you think.
Fact is, it is the total opposite.
Which is why I’m going to show you everything you need to know about WordPress categories vs tags. So you know how to add, edit and remove them. As well as the benefits and the best ways to organize them.


So, What Exactly Are WordPress Categories And Tags?
WordPress categories are what you should use to create broad groups of blog posts. That are all under a certain topic. For example, a pet-focused blog might have categories for cats, dogs, birds and reptiles.
WordPress tags are the more specific and dominant features of your blog post’s topic. You can have multiple tags per blog post. And they should ideally be based on things your audience is actively searching for.
Again sticking with the idea of a pet blog. You could have tags for health, food, toys, specific animal breeds, genders and more.
Are WordPress Categories vs Tags Important?
Both WordPress categories and tags are important tools. That can help you organize your blog posts for your audience. As they help build up your blog’s structure that WordPress can use.
But what are the benefits of WordPress categories and tags?
Well, they are:
- Important to your blog structure
- Help organize your content
- Allow you to create navigation menus for both your top and sidebars
- Help related post plugins generate suggestions
- Can easily change and grow with your blog
- Improve your internal blog search results
- And more importantly, help your readers find what they are looking for
- Categories can improve your indexing in search engines by helping Google understand what your blog is about.
How To Create Categories & Tags

Okay, so there are several different ways to create WordPress categories and tags. So, let’s start with the most convenient one.
Creating WordPress Categories & Tags Directly Within Your Blog Post Editor
You can create your categories and tags right within the WordPress editor. The process is almost identical for both the Gutenberg editor and the Classic editor. The screen just differs slightly.
For the sake of this blog post. All the screenshots are done with the WordPress Gutenberg editor.
Creating your categories and tags straight in the WordPress editor. Has its own advantages. Firstly, it is super handy, since you’ll regularly be creating new blog posts anyways.
But secondly, you’ll know exactly the topic of the blog post you are in the process of writing. So you can decide there and then. Which WordPress categories and tags are most relevant. And create them without having to leave the editor at all! It is as simple as using the right-hand toolbar.
For categories, you will be given a list to select from based on any categories you already have

In the meantime, you can add new categories straight from here by clicking on the Add New Category button. And giving it a name (casing is important here!). You can also set a parent category. But I would avoid getting into the complexity of subcategories if you are just starting out. They don’t really offer any benefits over parent categories.
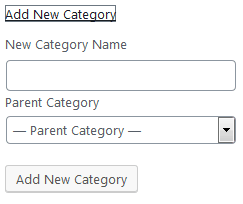
Once you have categories suitable to choose from. You can select a category from the list by ticking the box next to it. Note, that you can choose more than one category. And if you do, you will also see the option to select the Primary Category.
How To Create Tags Within The WordPress Gutenberg Editor
Next up, let’s look at the Tags section of the sidebar in the WordPress editor. Here you can simply type in any tags you want to create and hit the enter key. If the tag hasn’t been created previously. WordPress will go right ahead and make it for you. If you already had the tag, then it will just add it to your post without adding any new tags.

You might also notice that as you type in text into the Tags field. WordPress will give you suggestions based on tags you already have setup. You can click on any of these to use them on the current blog post.
Pretty straight forward so far?
Well, let’s take a look at the other way to create WordPress categories and tags. That gives us a few other options as well.
How To Create, Edit & Delete WordPress Categories From The Categories Page
To edit, delete and add WordPress categories outside of your blog posts. You’ll need to go to Posts > Categories.
The page will look like this:

You can use the left side of the screen to create new categories. Simply enter the name of your category and the slug which is basically what will be used in URL versions.
So if you wanted to add the category “Blogging” then your slug would just be “blogging”. Or if you wanted to use “Blogging Tips” then “blogging-tips” would be your slug. Makes sense?
Also, when creating a category. You can set a parent category if you want this new category to be a subcategory.
Once everything is set, click the Add New Category button to create it.
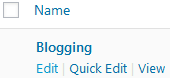
How To Edit Categories
Now, on the right side of the Categories screen in WordPress. You can see your current categories and edit them. To do this. You can hover your mouse under the name of a category and click Edit.
How To Delete Categories
Okay, so in order to delete a category. You will also need to be on the Posts > Categories page.
Then on the right side hover your mouse under the category you want to delete. Several options will appear. Click on the Delete option.
It is also worth noting that when you delete any categories. Any blog posts under that category will not be deleted.
Instead, one of two things can happen:
Firstly, the blog post will be moved to the Uncategorized category. If it doesn’t have any other categories set for it. Since every blog post needs to have a category.
Or, if the blog post has another category. It will simply stay in that category. It will not be moved to the Uncategorized category. Since it still has at least one category it fits into.
How To Remove The WordPress Uncategorized Category
Perhaps you want to remove the Uncategorized category. But don’t see the option to delete it. Well, unfortunately, you cannot delete this category.
Instead, to get rid of the Uncategorized category we can rename it as something else. Start by hovering your mouse under the name and click Edit.
On the next screen, you can change the name and slug from “Uncategorized”. Change this to a category you will use the most. For me, I set it to “Blogging” since most of my blog posts can fit into this category.
Click U
How To Create, Edit & Delete Tags From The Tags Page
So, now that we’ve looked at categories. Let’s look at tags next.
To edit, delete and add tags. You’ll need to go to Posts > Tags.
The Tags page should look like this:

You can use the left side of the screen to create new tags. Simply enter the name of your tag and the slug for it. Just like you would do for WordPress categories.
Everything works exactly the same as your categories page. You just don’t have the option to set a parent for tags. Since they don’t have any hierarchy.
Once everything is set, click the Add New Tag button to create it.
How To Edit Tags
Now, on the right side of the Tags screen in WordPress. You can see your current tags and edit them. By hovering your mouse under the name of a tag and clicking edit.

Whenever, you edit a tag. Any blog posts with this tag will automatically be updated with your changes.
How To Delete Tags
To delete tags. You will also need to be on the Posts > Tags page.
Then on the right side hover your mouse under the tag you want to delete. Several options will appear. Click on the Delete option.
If you have multiple tags to delete. You can also tick the checkbox next to each tag. Before then clicking the Bulk Actions dropdown and selecting Delete > Apply.
When you delete tags any blog posts with that tag will automatically have that tag removed. No other changes will be made to the blog post.
How To Bulk Add Categories Or Tags To Blog Posts From The Posts Page
Right, so far the changes we’ve made on the Categories page and Tags page. Have only created, edited or removed categories or tags. None of these options adds categories or tags to existing blog posts.
So, what’s the best way to add new categories and tags to already existing blog posts?
Firstly, go to Posts > All Posts
Tick the box next to all the blog posts you want to edit.
Then from the top where it
Here you can select categories and type in the tags you want to add to all the selected posts.

Once you’ve made your changes click Update to save them.
If you have lots of

Or use the search and filters near the top of the posts table to narrow down your posts for editing. You can even click on any categories or tags shown on the All Posts page. Which will also filter the screen to only show other posts with that WordPress category or tag.
How To Clean Up Existing Tags & Categories
Clicking the existing tags or categories and using the bulk edit. You can easily merge excess tags and categories. To help clean up your blog if you have too many tags or categories. Or just want to change the way things are organized.
For example, if I have blog posts with both the “blog” and “blogging” tag. I could simplify this by just having a “blogging” tag instead. So, to do this I could click on the “blog” tag on any of my blog posts. That are showing on the All Posts screen.

Then by clicking the topmost checkbox, right next to the “Title” header. It will select all the blog posts that were filtered to have the tag “blog”.
You can then click Bulk Actions > Edit > Apply and add the tag “blogging”. Make sure to click U
Then on the Posts > Tags page. You can go ahead and delete the “blog” tag. Which would automatically remove it from all your blog posts. Leaving you with just the “blogging” tag.
This can be good to simplify your tags if they’ve got out of hand. I’ve definitely had to prune mine a few times.
How To Convert A Category To A Tag
On the Categories page at the bottom of the Bulk Actions table, there is a link for the Category to Tag converter. Click it and then click Categories and tags converter. You can also get to this page from the Tools > Import menu.
Click Install, as it will install a plugin to do this.
Once done it will show as Run Importer.
Click this, and the following screen will appear:

Tick the category you want to convert to a tag and then click Convert categories to tags.
How To Convert A Tag To A Category
We’ve covered how to convert a category to a tag above. The same method is also true if you want to convert the other way as well.
All you need to do is make sure the plugin is installed from the Tools > Import page. Then simply click the option at the top of the screen called Tags to Categories.
Tick the tag you want to convert and then click C
The Benefits Of Categories To Improve Your Blog’s Navigation
One of the most important benefits of using categories. Is that they can then be used to add to your navigation menu. Whether you prefer to add it to the top menu or the sidebar. These categories, give your audience an easy way to find more of the content they love!
So, how do you go about adding this?
How To Add Your Categories To Your Top Menu Navigation
Ever noticed on other blogs how they have their blog posts split into topics. When you explore their navigation menu?
Well, you can do this too using your categories.
The best way to customize this and see your changes before making them live. Is to go to the A
Here you can then find the Menus option, and then look for what should be called Main. Click this and on this screen, you can Add Items to your main menu.
Mine looks like this:
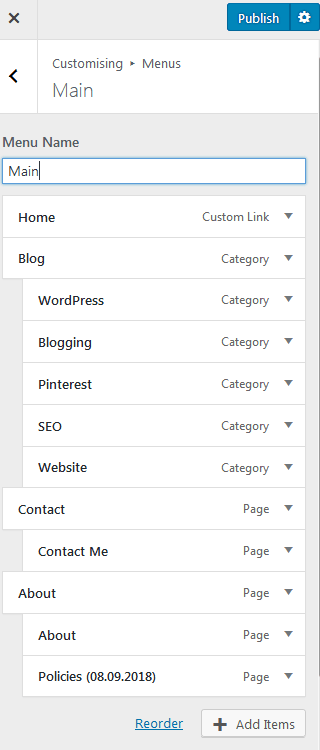
Any changes you make to this should automatically update as a preview on the right for your blog. This makes it easy to see how your changes look before you click Publish. In fact, if you click on the little cog next to Publish you can even schedule your changes if you want.
Note: You can see the same settings screen without the preview if you go to Appearance > Menus. It is a little quicker to get to but it won’t show you any changes before saving them.
Adding Your Categories To The Navigation
To add items to your menu, click the Add Items button at the bottom. And you should get a list of options available.
The option we are interested in is the one for Categories. Click it and it will expand to show your current categories. You can then click on each category you want to add to your navigation menu. And it will add a new item to the list on the left.

Once you’ve added your categories you can drag and drop the items to rearrange the order to your liking.
If you would like your categories under one submenu like I have with my categories under Blog. Then you’ll need to create an item for everything to sit under.
You could add a Custom Link item and set it to your homepage with the link text “Blog” or “Categories”. And then drag and drop your individual categories. So they are slightly indented under this.

Or you could do what I did and use a broad category, like blogging and rename it slightly. Then you can add all your categories. Including the one, you’ve already used as the top category, underneath it.
How To Add Categories To Your Sidebar Using Widgets
The other place you might consider adding your categories is in your sidebar.
Again, using Appearance > Customize but this time selecting W
Sometimes, I find the widget areas can be a little bit confusing. So using the customizer is the best way to see exactly how the widget will display. I don’t have a sidebar on my homepage. So in my case, I would need to browse to one of my blog posts. Using the preview of my blog on the right side. In order to see these widget changes.
You’ll likely only want to add your categories to the Primary Sidebar widget. So click on this. Then click Add Widget and look for the Categories widget.
Hint: You can type “categories” into the top search bar to find this widget quickly.
Click the Categories widget and it will add the item to the list and update the preview. Then you can drag and drop your Categories widget to reorder it as you like. Depending on whether you have any other items in your sidebar already.
If you click on the categories widget. You can also give it a Title, which will display above the widget on your sidebar. You also have additional options to:
- Display your categories as a dropdown
- Show the post counts for each category
- Or show the categories as a hierarchy if you are using any subcategories.
Mine looks like the below. But yours will probably look a bit different because of your theme and CSS styles.


Once done Publish any changes you want to keep!
Key Things To Keep In Mind When Creating & Editing Your WordPress Categories
Okay, let’s recap!
When creating or editing your WordPress categories. Here are some key things to think about:
- Categories should be broad groups of topics.
- You should keep in mind how categories can make the navigation of your blog easier as they provide structure
- The number of categories you have should reflect the amount of content you have. Start with 2 when just starting out. Only expanding to 3 or more once you have several blog posts for your first 2 categories.
- All your posts need to at least fit under a category, as a category is a requirement for publishing blog posts.
- A good category should have plenty of posts that will fit under it.
- Categories should have short and simple names.
- Rename your default Uncategorized category to your most used topic.
- Do not use categories or tags in your permalinks for your blog posts. In case you need to change or reorganize later.
- Setting a blog post to multiple categories is okay, but try to stick to no more than 1-2 categories per post.
- You can add subcategories if needed for further organization

Key Points For How Best To Use Tags For Your Blog Posts
And when creating your tags, try to keep these important things in mind:
- Tags should be the more specific details of a post that focus on the keywords and features of your posts
- Think about how certain words could be related to other posts for related posts plugins
- Multiple tags per post are okay, as many as you want but don’t go too crazy as you’ll only make them difficult to maintain!
- Consider the search terms your readers might use when searching for content
- Tags don’t have any order, they can be added in whatever order you like.
- Think of tags like recipe ingredients to your blog posts.
- Don’t get too nitty gritty with tags. They should still be an important part of your blog post for your audience.
And to add in a few examples of thinking about tags like recipe ingredients. Here are a few examples:
WordPress Tags Example 1 – Food
A food blogger might use tags for key ingredients for their recipes, such as chicken, beef, lamb, pork etc.
Whereas their categories could be:
- Main Course
- Side Dish
- Dessert
- Appetizers
- Soups
- Snacks
WordPress Tag Example 2 – Blogging
I have my categories setup as things like WordPress, Blogging and Pinterest.
The tags I have are often specific. Like the WordPress plugin I am writing about (Jetpack, UpdraftPlus, Yoast SEO). Or they can also be things like images, navigation, security, traffic and more.
The Key Point Of Categories & Tags
And finally, the key point of categories and tags.
It is so easy to get lost in the organization part of our blog posts using categories vs tags.
But the whole reason we organize our blog posts with tags and categories in the first place. Is for your blog’s readers.
When it comes to categories and tags. There isn’t a single answer that is always right.
What to use as tags and what to use as categories. Or even subcategories. Depends on your readers, your content and your goals.
So, Try To Think Like Your Audience!

Let’s go back to the idea of a food blog. I mentioned the idea of using categories for the type of recipe. Like main course, dessert, side dish etc. (It’s all very restaurant like if you ask me.)
But if you are a food blogger who focuses on a different aspect of food. Say, desserts. (Yum!) Then these categories just don’t work. In this case, you’d probably go for categories like ice cream, cookies, cakes etc.
Or think of it this way, you can probably think of a lot of different flavours of ice cream, right? I know I can.
This is why ice cream is a broad topic. And why vanilla ice cream, which is very specific is better as a tag. After all, you can probably only have 1 or 2 variations of how to make vanilla ice cream. I could be wrong about this though!
Categories should be broad enough that you can come up with lots of ideas. That your readers would expect to find in it.
Tags should be more specific but also something your audience is likely to pop into a search to find. It’s perfectly ok to only have 1-2 blog posts with a certain tag. Sticking with the dessert topic, flavours could make good tags. A reader could easily filter the type of dessert they want to make. With a flavour to get exactly what they are looking for.
The Is No Perfectly Right Answer, So Just Use Common Sense!
But! As I said before there is no 100% right way. You could do this the opposite way too. And this is why it also depends on your content.
Whilst a bit more outside the box, you could have a dessert blog that uses flavours as it’s categories. With things like cookies, cake, ice cream etc as the tags. But this will only work if you have plenty of blog posts for each flavour category.
This might work well for popular flavours like chocolate and strawberry. But less used flavours? Probably not. This is why it is important to consider how much content you can think of for any category you create!
Anyways, I hope this gives you some better ideas on how to use WordPress categories vs tags for your own blog posts. And that you find the more tutorial-like parts easy to follow!
So, tell me! How have you decided to set your categories and tags? Will you be using them in your top menu, sidebar or both?
If you found this blog post useful then please consider taking a few seconds to share it to your favorite social media platform!
