This post contains affiliate links. Which means I will make a commission at no extra cost to you should you click through and make a purchase. Read the full disclosure here.
So, perhaps you’ve heard that you should know how to add a favicon in WordPress? As you’ve seen it mentioned as a common mistake made with WordPress blogs. Or maybe you are just wondering what a favicon even is?
Well, this blog post aims to answer all your favicon related questions. So you can learn what a favicon is, how to add a favicon in WordPress using the easiest method out there. (That doesn’t require any coding or extra plugins.)
Plus the benefits and why you should already have one setup. Especially, if you’ve already created a logo for your blog.
So, keep reading below and we’ll start with the basics. Before moving onto how to add a favicon in WordPress. And towards the end, I’ve even included some troubleshooting tips.
What Is A WordPress Favicon?
So, a favicon, is also known as a site icon. It is a special setting that you can setup for your website or blog to display a small image or icon.
This image can then be shown in any browser next to your website title in different various places.
Where Does A Favicon Appear?
Knowing how to add a Favicon in WordPress is important. But where does a favicon appear?
Well, once installed your little favicon will appear in several places in your browser. Such as:
- On the tab for the web page.
- On your bookmarks toolbar, if you have one enabled
- Within your bookmark folders
- + Any other pages that show shortcuts to websites
Why Should I Use A WordPress Favicon?
Okay, so why should you use a favicon? Well, favicons are part of your blog or website’s identity. By using one you can:
- Improve your branding.
- Make your blog more recognizable and memorable.
- Give a professional impression, even from day 1
- Improve your reader’s ability to find your blog’s tab amongst a sea of other open tabs.
Also, the fact that a favicon is used when creating bookmarks. This means your blog can stand out in places like the bookmark folders. Or saved shortcuts to your computer and even your mobile desktop too.
How Do I Create A Favicon?
Before we get into how to add a favicon in WordPress. First, we need to create a favicon!
In most cases, you’ll want to use your logo as your favicon. So, if you have created a logo this process will be much quicker. If you haven’t, then I suggest you go and tackle that first.
In order, to create a favicon you can use whatever image editing software you’ve used previously. Whether this means using Photoshop, Canva or something like GIMP. These should be all you need to get started with.
What Size Should A Favicon Be?
Right, so let’s say you’ve opened your image editing software. And you have your blog logo ready to go. But what size does a favicon need to be?
The size you should aim for is 512x512px. Several other different sizes have been suggested. And vary depending on the method you use. But 512x512px is the recommended size by WordPress. Which is what we’ll be using below.
Whilst this size might seem big for a tiny image you’ll see next to your bookmarks and shortcuts. There are places where a much bigger version of your favicon is shown.
Such as Firefox sometimes displays some shortcuts on the new tab page. Or your mobile or tablet device will use the favicon as like an app icon. And the last thing you want is for your logo to get pixelated, right? As it would look unprofessional and you definitely don’t want that.
What Type Of File Can A WordPress Favicon Be?
Okay, so with size out of the way. What about the file type?
Well, previously you had to explicitly use an ICO file for your favicon. But today, you can choose between the more well-known file types of PNG and GIF. In addition to the ICO type, which is still used.
Can a favicon be SVG or JPG? Well, whilst JPG is widely supported. Some versions of Internet Explorer don’t support it. Which can cause problems with your favicon not displaying correctly. The same is true for SVG as different platforms have different formatting rules.
Because of this, it is strongly recommended that you stick to .ICO, .PNG and .GIF files. After all, you don’t want to go through the trouble of creating and installing a favicon. Just for it to not work properly, right?
Speaking of installing. We should look at doing that next!
How Do I Install A WordPress Favicon?
So, how do I install a favicon? You might be wondering.
Well, I am going to show you the easiest and simplest way for how to add a favicon in WordPress. All which can be done from your WordPress dashboard. With no extra WordPress plugins or coding required.
So, start off by going to Appearance > Customize
Then from the WordPress customizer, you’ll want to head over to the Site Identity. At the bottom of the screen, you’ll want to click on the Select site icon box. Which will open up your WordPress Media Library.

If you haven’t already uploaded your favicon image. Then now’s the time to drag and drop it into your WordPress Media Library to begin uploading it. Once the upload finishes you can then select your image and click Select.
Oh and if you did not ensure your image was 512x512px in size. Then WordPress will prompt you to crop your image. Once you’ve finished doing this, you’ll need to click on Crop Image to complete the process.

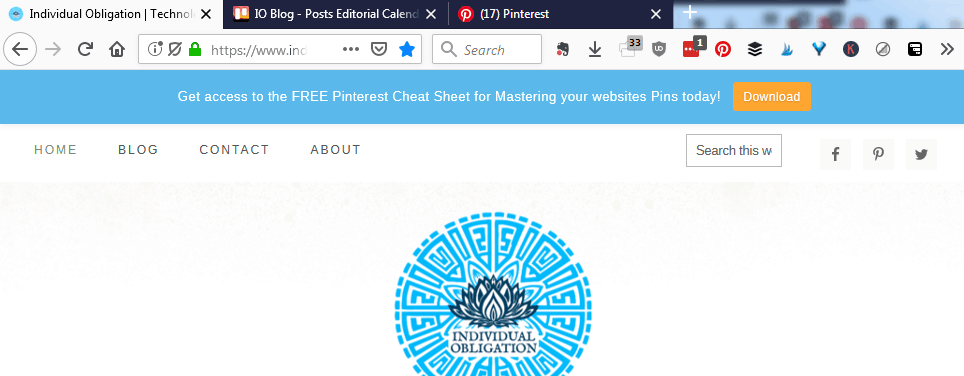
Your Site Icon settings should have updated to something like this:

Note: That in this image the black background of my logo image is due to transparent pixels.
You’ll need to make sure to click Publish to make these changes live. And that’s all there is to it. You should be able to browse to your blog and start seeing your favicon showing on your tabs. Simple right?
How Do I Change My WordPress Favicon If I Change My Mind Later?
Also, if you find that you want to change your favicon at any point. You can click the Change image button on the same screen. To select a new image to update your favicon with.
Tips For Troubleshooting If Your WordPress Favicon Is Not Showing
Sometimes when you create a new favicon for your blog or update an existing one. You might find that things don’t go to plan. Often resulting in your WordPress favicon not showing.
If you do come across this problem, then one of the first things I would suggest you try. Is to go into the Appearance > Customize > Site Identity and click Remove. This is how to remove your WordPress favicon.
You can then Publish the change and at this point, you should make sure to clear your blog cache. If you are using a cache plugin, which you should be. As they can have a significant impact on your blog’s loading speed.
Then if you go back into the Site Identity screen and upload the new favicon you want to use. And click Publish again. It should display correctly. But if you are still having problems, then it might be to do with your browser. As Chrome is often slow to update its own internal cache compared to Firefox for instance.
So, try clearing the cache of your browser. Especially, if only one seems to be having trouble displaying your favicon.
How To Clear The Cache In Chrome
To clear your browser cache in Chrome. Click on the Settings button (3 vertical dots icon) in the top right corner of your browser. Scroll down the page until you get to Advanced, click on this to expand it further. Then under the section for Security, there should be an option for Clear browsing data.

Click this and then make sure to select the Basic tab at the top. Set the Time range to All Time. Next, make sure only Cached images and files are ticked before you click on Clear data.

You can then go back and check if your favicon is working again.
How To Clear The Cache In Firefox
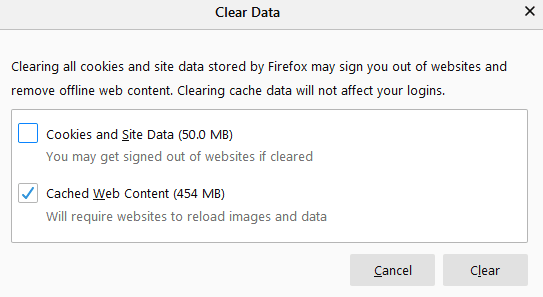
For Firefox, the process is similar. Click the Open Menu button (3 horizontal lines) in the top right corner of your browser. Then go to Options > Privacy & Security. Scroll down until you get to the section for Cookies and Site Data. From here click Clear Data… and ensure you only have Cached Web Content ticked. Before you click on Clear.
Make Sure You Know How To Add A Favicon In WordPress To Avoid This Common Mistake
Not knowing how to add a favicon in WordPress and ignoring it. Is one of the common WordPress mistakes that new bloggers make. Even though adding a favicon is quick and simple using the inbuilt customizer. That WordPress has to offer.
With this in mind. As soon as you have your blog logo created. You should make sure to tackle this small task. As it will help your blog look more professional and recognizable!
Whilst there are other methods out there for how to add a favicon to WordPress. This is by far the easiest one. Which is exactly what you need when just starting your WordPress blog. Nothing too complicated that could take up a lot of your time. When you could be creating content instead.
So, how far into blogging on WordPress have you got to before adding your own favicon? Did you find it easy or difficult to do? Let me know in the comments below!
If you found this blog post useful then please consider taking a few seconds to share it to your favorite social media platform!