This post contains affiliate links. Which means I will make a commission at no extra cost to you should you click through and make a purchase. Read the full disclosure here.
Are you a brand new WordPress blogger, who wants to write your first ever blog post. But don’t know where to start with Gutenberg?
You’ve got your WordPress blog setup. You’ve covered the important basics like setting your theme. And securing your blog security, to getting things ready for visitors.
Now it’s time to learn how to write your first blog post in WordPress Gutenberg!
But even if you’ve been blogging on WordPress for awhile now. You might be still using the Classic editor.
Do you worry about how long you will be able to keep using the WordPress Classic editor?
Are you worried that WordPress Gutenberg will make writing a blog post more difficult?
Well, this post is for you too.
Whether you are a new blogger or more advanced. The WordPress Classic editor will eventually be phased out.
To even be able to use the WordPress Classic editor. You have to now install a plugin.
Even so, the support for the plugin will be phased out after a few years.
So it’s best to start learning the new Gutenberg editor now to get ahead. Rather than being left behind.
So, by the end of this post. You’ll know everything you need to know about how to write your first blog post in WordPress Gutenberg.
I’m even going to show you some nifty tricks to help speed up your process. And any workarounds you might need if you run across problems.
Because knowing how to write your first blog post in WordPress Gutenberg. Is not as hard as it looks.
But before we start with how to use WordPress Gutenberg to write your first blog post.
Let’s look at understanding what it is exactly.

What Is WordPress Gutenberg?
It is the new WordPress editor that aims to replace what we now call the Classic WordPress editor.
Whilst you can get a plugin to enable the old editor. The support for this will be limited after a few years, so it is best not to rely on it too much. There’s no telling how long it will be around for.
WordPress Gutenberg aims to make it easier for non-designs and developers to customize their own blogs.
The Gutenberg editor aims to do this by introducing blocks. Every individual aspect of a blog post or page. Has been made into its own block.
If you are used to the old editor then this might sound clunky and confusing.
But it is not quite as simple as that. And I’ll show you why soon.
Why Knowing How To Write Your First Blog Post On WordPress Gutenberg Is Important
Many current bloggers are very familiar with the old editor.
And likely many of them are still using it. As the WordPress Gutenberg editor has come with a lot of negative feedback.
Mostly because it has been rushed and there were lots of bugs and errors in the earlier versions.
Heck, there are still some issues with it even as I am writing this post.
But I don’t see them as breaking my ability to write blog posts in WordPress Gutenberg.
Eventually, bloggers will likely have to stop relying on the old classic editor.
As more and more plugins will no longer support it, as they move to WordPress Gutenberg compatibility. And less and less people will be using the old editor in favour of the new.
I’ll be honest though. I never liked the old Classic editor anyways. Which may make me biased.
The WordPress Classic editor has many problems of its own. That many just seem to forget about. Because they’ve automatically worked around them for years.
When I first started blogging I hated the Classic editor. Because it added weird and uneven spacing between paragraphs. Or messed around with any code I added. For no real reason. Ugh!
Yet because I had no other option but to use Classic. I eventually ended up getting used to its usual annoyances. And just accepting them as normal.
In the long term, it is important to learn Gutenberg.
Is How To Write Your First Blog Post On WordPress Gutenberg Different From Classic?
Well, the main difference is that Gutenberg works in blocks.
Each paragraph of text, image, list of bullet points, headings, tables and more. Are each a block of their own.
It is in its early stages and there are still a few bugs.
The most important one you need to know about is the Preview button.
By clicking on this button inside the WordPress Gutenberg editor. It will open a new tab that shows a Live preview of what your blog post will look like.
Now, if you publish a blog post. And then come back to the Gutenberg editor to make changes. And again want to preview those changes before publishing them.
Then clicking on the Preview button will open a Live view. However, your changes might not be displaying.
If this happens then waiting a few seconds and then refreshing the preview page. Will bring up your changes this second time.
Not every WordPress Gutenberg editor will do this. It seems to depend on your set up. Meaning you might not even see this error.
I hope you don’t see it! But I just wanted to make sure you can quickly deal with it, if you did happen to come across it.
Why Using WordPress Gutenberg To Write Your First Blog Post Might Not Be As Bad As You Think
The negative opinion of WordPress Gutenberg is largely due to the way it has been rushed out. But there is also some resistance because it significantly changes the way you write content.
The Classic editor is more like writing in a Word document or a Google Doc. Many people are familiar with this way of writing.
But WordPress Gutenberg is all blocks. So it requires a very different way of thinking.
After all, why learn something new when you already have a proven method for it?
Why would anyone want to spend more time writing blog posts because they have to learn a new editor?
Short answer. They don’t. Which is partly another reason why many bloggers are not keen on learning the new Gutenberg editor.
But believe it or not. After I made the switch to Gutenberg and used it for a while. I found myself writing blog posts faster than ever. Because I was spending less time fixing the issues the Classic editor created for me.
I was also spending less time editing my posts. And while I do still edit all my blog posts several times for typos and readability.
I have fewer issues doing this in WordPress Gutenberg than the Classic editor.
And I’ve written about the same amount of posts using the Classic editor as the Gutenberg editor!
There’s also handy things like reusable blocks in the Gutenberg editor. That can help speed writing your first blog post. Which I’ll be covering in more detail later.
How To Create Your First Blog Post With The Gutenberg Editor
So, let’s say you’ve gone and logged into your WordPress admin dashboard. And want to find how to write your first blog post in WordPress Gutenberg.
Well the first thing you need to do, is create a new post.
You can do this from the WordPress dashboard navigation on the left-side by selecting:
Posts > Add new
Once the page loads. The next thing you want to do is set the Title.
Consider using CoSchedule’s headline analyzer and power words to write an enticing headline for your blog post.
Once you have a headline for your blog post.
Write your headline in the area that says “Add title”
How To Change URL Of Your Blog Post
Once you’ve created a title, click on the Save Draft.
After it finishes saving, click on the title you wrote. And above it the Permalink should appear.

This is the link that will be used to browse to your blog post.
Make sure to click Edit to change it to something short and relevant to your blog post’s topic. What you set, should make it easy to tell what the main topic of your blog post is.
How To Set The WordPress Gutenberg Document Properties
Next on the right-hand side should be a menu, it should have Document selected by default.

You should be able to see an option underneath it for Publish, by default it is set to Immediately.
Click this and set a date and time for your blog post to publish automatically.
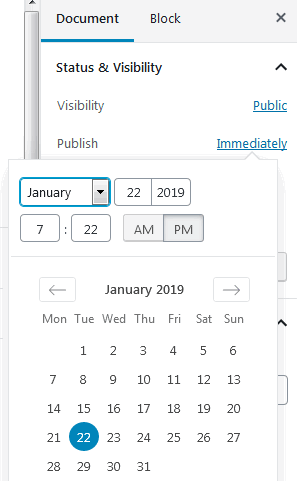
It is a good idea to set up a routine and post regularly so your audience knows when to expect new content from you.
For example, I post new blog posts every Monday at
If you scroll further down. You will see another place you can edit the Permalinks. But since we already edited this above. You can ignore this for now.
How To Set Categories And Tags
Below this is the Categories. If you haven’t created any categories yet. You can do so now by clicking Add New category.

Your categories should be broad topics, that you write about often.
Again, because examples are important. I would say I write a lot of blog posts that fit into the topics of WordPress, Blogging, SEO and Pinterest. So these are what I have set as categories.
A blog post can fit into several categories. So this post you are reading right now could fit under both WordPress and Blogging.
Oh and if you pick two categories, make sure the Primary category is set as your preferred category.
Further down in this Document menu is also the Tags section.

These are small groups that fit within the categories. That help you and your readers find blog posts more easily once your blog gets bigger and you have a lot of content.
An example of a tag I might use for this blog post. Would be something like Gutenberg or beginner.
How To Set A Featured Image For Your Blog Post In WordPress Gutenberg
The last setting you need to worry about in the Document sidebar is the Featured image.
Depending on the theme, you want to set an image here. That acts as the cover image for your blog post.
The size of this image will vary with your theme. So you’ll have to look it up. For my theme it is 400x400px.
So if you’ve ever seen little thumbnail images of blog posts, at the end of an article. Then this is likely the featured images you are seeing.
Important Gutenberg Blocks You Need To Know About
Okay, so next up in this how to write your first blog post guide. Let’s look at the blocks you’ll often need when writing.
Heading
Use it to write headings and subheadings to break up your blogs post’s text into meaningful sections. It will make it much easier to read!
You should only use H2 to H6. The H1 is only for the title of the blog post.
Paragraph
Use it to write you actual content paragraphs and the bulk of the text. You will use this block a lot!
Image
Further break up the text and headings with some colourful images. These can help keep your readers interested.
Custom HTML
If you need to add HTML code to your blog post then use this block.
Usually, Email subscribe boxes are just snippets of HTML code that you paste into your blog.
I also find this block immensely useful for writing the perfect Pinterest descriptions. That I can then embed into my blog posts. Making it even more shareable on the platform.
List
Use this for writing a list of bullet points. Awesome for breaking down key points into an easy to read format.
Table
Want to layout information, like important comparisons and stats into a table? Then this block will help you do that.
Note: This should not be used to try to layout the elements of your entire blog post to create a fancy design. Tables are for displaying data only!
Classic Block
Any old blog post that was created in the Classic editor. That is then opened using the WordPress Gutenberg editor. Will have this block inserted by default.
This Classic block will contain all the post content from the old editor. Which can be converted to blocks for editing in the new Gutenberg editor. But only if you want to.
Just be careful to double check the before and after. As not everything converts smoothly to a block.
Especially if it is some HTML code that the editor doesn’t know what to do with. (I’m looking at you Email Opt-In forms.)
Gutenberg Blocks That Are Used Less Often To Write A Blog Post
Here’s some more blocks that you will use less often when you write your first blog post, and any subsequent posts too.
Quote
Want to create neat little quote of some text that stands out from everything else? Well, this block will do it perfectly for you.
Formatting will vary depending on your WordPress Theme.
Gallery
Want to create a gallery of lots of images? This plugin will do that.
Audio
Embeds an audio file to your blog posts within its own media player.
File
Links a file as a download to the page. You can use this block to either send visitors to a preview of the file, or give them a download button.
Video
Embeds the video into a media player on your blog post.
Gutenberg Blocks That Are Rarely Used
Lastly, these blocks are ones you’ll rarely use when you write your first blog post. Though they may have further uses later on.
Column
If you want to set up your blog post into columns then this block will help you do it.
Spacer
Adds extra space between elements. This should be used rarely, as your CSS should handle any spacing already.
Button
Create a clickable button to go to a certain URL.
Separator
Can be used to create a horizontal line to break up text between sections.
Embeds
Lots of options to embed things like Youtube videos, Facebook, Twitter and much, much more.

Other WordPress Gutenberg Blocks You Might Find Useful When Writing Your First Blog Post
These blocks I’ve kept separate as they will have their own unique uses.
Syntax Highlighter Code
Use this to display HTML code snippets in your blog posts. So they can easily be copied and pasted by your readers. I especially make use of this on the Pinterest description blog post I wrote.
I realized after writing this blog post and editing it. That this snippet is not included by default in the Gutenberg blocks.
So if you find yourself needing this because the <Code> block doesn’t meet your requirements. Then look for and install the Syntax Highlighter Code plugin for this block.
Plugin Specific
Depending on your plugins you may find extra blocks specific to those in this section. Yoast SEO and Better Click To Tweet are just a few examples.
Widgets
Can depend on whether you are using any framework. Like the Genesis framework on your blog, or plugins.
Reusable Blocks
These are powerful ways to reuse customized blocks. Or even groups of blocks to help speed up the creation of blocks you use most often.
How To Add A Block
So far we’ve looked at the basic Document settings and the blocks overall.
For the next part of this how to write your first blog post tutorial. I want to cover how you can actually add blocks to your blog post.
There are actually a couple of ways. So use the one you are more comfortable with.
Firstly, in the top left corner of the editor is a little + icon. Clicking this will bring up the block menu so you can click on a block to add it to your blog post.
Another way is below the last block in the blog post. If you hover over the whitespace at the end of your blog post. The little + icon will appear here too, as well as some blocks you use most often on the right side.
Thirdly when you are finished with a previous block. You can press the Enter key and this will often start a new paragraph block.
This makes creating lots of paragraph blocks a smooth experience. Just like you would when typing in the Classic editor or a Word document.
You just hit enter and keep typing. No need to stop your writing flow by having to go look for and click on a new paragraph block.
Finally. You can add new blocks by hovering your mouse between blocks on your blog post. When you do this another + icon should appear.
So you can easily add new blocks between blocks you already have on your blog post.

How To Search For The WordPress Gutenberg Block You Need
There are so many blocks, it can sometimes be hard to find what you need quickly. Or to even know what you need.
But did you know you can search the blocks?
Whenever you press Enter to get a new line or Paragraph block. You can type the / key (forward slash) and start typing in words to search for a block quickly. Cool huh?

How To Delete A Gutenberg Block
So what happens if you add a block by mistake? How can you remove it?
To delete blocks, there are also a few ways.
In an empty block with no other text, you can press the Backspace key.
You can also click on the Options button for the block and select Remove Block. Or use the keyboard shortcut Shift + Alt + Z

You can even click and drag across multiple blocks to highlight them. And then press the Delete key on your keyboard.
How To Write Paragraphs Using The WordPress Gutenberg Editor
As I mentioned earlier. Writing paragraphs of text is actually very simple in Gutenberg.
Many people might look at the block nature of Gutenberg and immediately think. That it will significantly slow down their ability to write blog posts.
Because they will have stop and start every few seconds to create a new Paragraph block.
This is completely untrue.
It does not take any longer to create a Paragraph block in WordPress Gutenberg. As it does to create a new paragraph in any writing program.
All you need to do is simply hit the Enter key when you want to start a new paragraph.
You can even start a new paragraph within a block if you press and hold the Shift key while you press Enter at the same time.
Try it for yourself!
Once you’ve written your blog post title in the Gutenberg editor. Press Enter on your keyboard and start typing. When you want to start a new paragraph just press Enter again.
Got it? No hassle at all right?
And you know what? There is another cool feature in Gutenberg. That you can use to help make writing even less distracting in the WordPress Gutenberg editor.
How To Enable The Distraction Free Mode In The WordPress Gutenberg Editor
In the top right corner of the WordPress Gutenberg editor. You will find an Options button.
Click on it and select Fullscreen mode.
This will hide a lot of clutter in the WordPress editor so you can focus more on writing.
You can even close the sidebar on the right by clicking the little cross. For even less distractions.

Isn’t it surprising the difference such a small change can make?
And if you need to come out of this mode you can just go back to the Options button and click on Fullscreen mode again.
How To Use Google Docs With The WordPress Gutenberg Editor For Maximum Productivity
Here’s another fun fact for how to write your first blog post in WordPress Gutenberg.
With the Classic editor. You pretty much have to write from start to finish in it. Trying to write in anything else and copy paste it into a WordPress post is a total nightmare!
And for the earlier versions of WordPress Gutenberg, it was awful there too.
But you know what?
Text written in Google Docs transfers perfectly into the WordPress Gutenberg editor.
Why? I have no clue.
But I’ve been recently enjoying brain dumping my first drafts into Google Docs.
I can do my Spell Checking, proofing and re-formatting all in Google Docs. Before copying and pasting the whole document over into WordPress Gutenberg.
There is no spell checker in Gutenberg. Which drives me a bit mad.
But being able to use Google Docs instead. And then just copying everything over to WordPress Gutenberg. For final touches like images and links.
Has been a life saver. Especially since the alternative, Grammarly also works terribly with WordPress Gutenberg because of the block structure.
So to clarify my method is like this:
- Write the first draft of a blog post in Google Docs
- Use Google Docs to do a Spell Check
- Copy the document from Google Docs into a new Grammarly document and fix any errors there
- Copy from Grammarly into Hemmingway App and fix any further issues there. Usually focusing on very hard to read and difficult to read sentences.
- Then copy it all into WordPress Gutenberg. For formatting, adding links, inserting images and any other final touches.
How To Add Images To Your Blog Post Using Gutenberg Image Blocks + Easily Wrap Text Around Them Too!
Let’s take a look at how to add images. Using one of the add block methods mentioned earlier. Add an image block to your post.

From here you can upload or use an image from the media library. Or you can use a URL if you have the image loaded elsewhere.
You can also drag and drop an image here from a folder on your local computer. Which will automatically load the image into your media library. As well as place it inside the image block for you.
Add an Alt text description to the image using the right side panel.
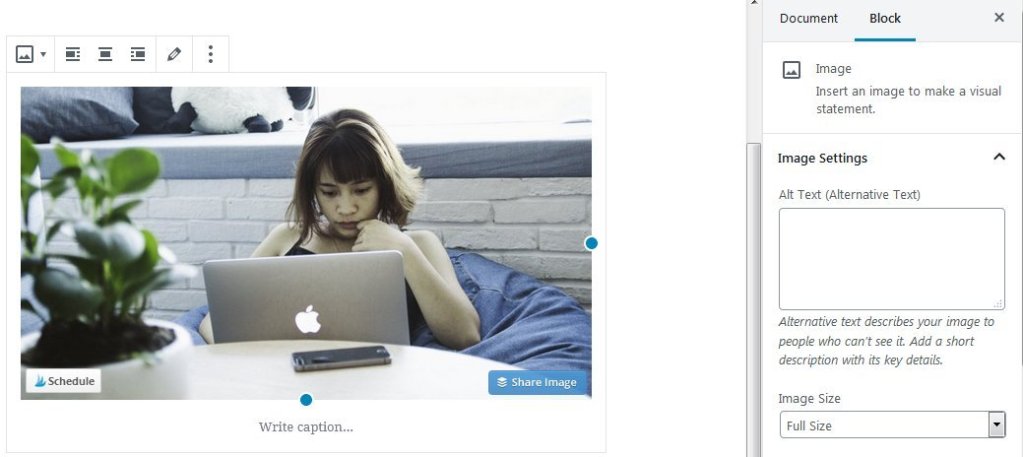
Underneath the image, you can also add a caption if you like.
How To Use WordPress Gutenberg Image Blocks & Alignments For Wrapping Text
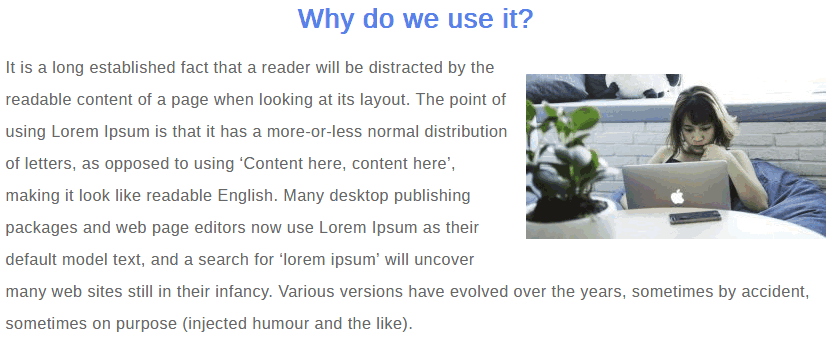
Now, by default, the image will be set to show left-aligned with no text wrapping.
Using the toolbar above the image you can set align left, align centre, and align right.
The default looks like this:

The Align left setting looks like this, see how you can wrap text around the image by simply clicking this button.

Align centre:

Align right:
Also, the best way to check what an image will look like with these different
If you are not happy with the wrapping, like in the left align example the heading is in line with the top of the image.
Then try moving the blocks up or down to experiment with positioning.
For example, for the right align example shown above. The block order is:
Heading > Image > Paragraph.
Whereas the align left is ordered by:
Image > Heading > Paragraph
Ideally, though. It is worth noting that you want the image above the heading block. Or between paragraph and heading blocks. If you want text wrapping to work.
So experiment to get the style you want if you like to have your images wrapped in text.
However!
Considering the fact there may be some of your audience reading your blog from a mobile device.
I strongly recommend you always set your images to align centre.
As sometimes text wrapped around images can simply look awful. Especially on extremely narrow screens compared to a desktop one.
By centring all your images you will avoid any problems like this.
How To Add Hyperlinks To Your Blog Post Text
Right, so how about adding some links? Those are usually another very important part of writing a blog post, right?
Well, it’s pretty simple.
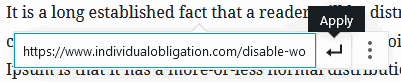
Just highlight some text and click the Link icon.
From here you can type some text to search for another blog post or page you already have published.

So you can either select a link from the search suggestions. Or copy and paste a URL you want to use for external websites instead.
Then click on the Apply button.
You can also click on Link Settings button which is to the right of the Apply button.
And then toggle on the Open in New Tab button, if you decide to.

How To Apply Nofollow To Links In WordPress Gutenberg
The only other thing left to set for your links is the use of nofollow. Sadly, this requires switching to the HTML view. As there currently isn’t any other way to do it.
To view a single block in HTML, you can click on the Options button for the block and then click Edit as HTML.

This is what my block looks like when I switch to the HTML view:

Now, if you followed my suggestion before and selected the link to Open in a new tab. Then you should check for if has been applied to your links.
Noreferrer is not the same as nofollow. And I highly recommend following this guide here to remove it from WordPress. In order, to prevent it messing up your affiliate links and Google Analytics tracking. If you have it installed yet.
If you want the link as nofollow, then add nofollow to the rel=”” tag.
If you want the link to be followed, which should be the case for all internal links. Then simply ensure nofollow is not used.
And that’s it.
Once you get familiar with doing it this way, I recommend switching the whole blog post to the Code Editor.
You can do this by clicking Options button in the top right corner of the editor. And then clicking Code Editor. You can then go through and edit the links all in one go which is much faster.
How To Embed Pinterest Images In WordPress Gutenberg
If you are going to use Pinterest images and want to embed them into your blog post.
Then you might be interested to know that you can use a Custom HTML block for this and some custom code. This custom code will let you set different image sizes, the URL the pin will lead to and a custom description.
And it doesn’t require using the alt text field either. Meaning you can focus on using it for SEO purposes. You can find
How To Write Your First Blog Post Faster Using Reusable Blocks
Another valuable trick that comes with the WordPress Gutenberg editor. That you can use when you write your first blog post. Is reusable blocks.
I’ve written an in-depth guide with examples on how to use reusable blocks.
But what you need to know for writing your first blog post in WordPress Gutenberg. Is that any block you add to the page can easily be turned into a reusable block. By clicking on the Options for that block and clicking Add to Reusable Blocks.
Once you’ve added a reusable block by saving it with a meaningful name. You can search for it and reuse it throughout your first blog post and any following blog posts that you write too.
So if you find yourself recreating the same block or even a group of blocks frequently. Consider creating a reusable block out of it as it will save you time!
How To Manage Reusable Blocks
And if you need to make any changes or want to see an overview of the reusable blocks you have set up. Then you can do so by clicking on the Options button in the top right corner of the editor. And clicking on Manage All Reusable Blocks.

WordPress Gutenberg Keyboard Shortcuts:
Another thing you might find useful. When you write your first blog post in WordPress Gutenberg. Is a quick reference of the keyboard shortcuts you can use. Some of these are common sense. And follow a similar pattern to other writing software, like pressing Ctrl + B to bold highlighted text.
| Shortcut | Effect |
|---|---|
| Ctrl + B | Bold |
| Ctrl + I | Italics |
| Shift + Alt + D | |
| Ctrl + Z | Undo actions |
| Ctrl + Shift + Z | Redo actions |
| Ctrl + Shift + Alt + M | Switch between Visual & Code Editors |
| Ctrl + S | Saves a Draft |
| Ctrl + Shift + , | Hide Block Settings |
| Ctrl + Shift + D | Duplicate Block |
| Ctrl + Alt + Backspace | Remove Block |
| Ctrl + Alt + T | Insert new Block b |
| Ctrl + Alt + Y | Insert new Block after |
How To Publish Your First Blog Post in WordPress Gutenberg
Once you’ve used all the above tips and tricks to write your first blog post in WordPress Gutenberg.
The only thing left to do is to Publish the blog post. Or Schedule it to publish. Depending on whether you decided to set a Publish date that was mentioned at the very start of the blog post.
And if you need to you can always come back and edit the post later with more details. As over time, your writing will definitely change as you get more experienced.
Besides, it is always a good idea to come back and update older posts after several months have passed.
But as a new blogger, writing new content is more important at the moment. Just do your best and know that you can come back later to edit if needed!
How To Write Your First Blog Post In WordPress Gutenberg Is Easier Than It Sounds
So, there you have it. All the tips and tricks I can think of that will show you how to write your first blog post in WordPress Gutenberg.
The only thing left for you to do is the practice using these tips and actually write the content itself.
Which, if you are finding it tricky. There is a great guide by Pineapple and Main for writing content. And Elna Cain at Twins Mommy also has some amazing tips to help you write better blog posts.
These both will show you useful tips on how to write interesting and engaging content. Which you can use alongside this guide to really create an amazing first blog post.
Hopefully, you can see that when used correctly, Gutenberg can be an asset and is nothing to be afraid of.
Sure it is different and will require some learning.
But the benefits are that it can help you build content in a powerful way. That gives you a lot of customization options. With very little required knowledge about coding.
You can do a lot with just the blocks alone. And there are some ways that WordPress Gutenberg will help you do things faster. Like reusable blocks.
But I would be wrong to say the WordPress Gutenberg editor is perfect and doesn’t have any faults. It does and there is still room for improvement. In terms of bugs and responsiveness of the editor.
(I can find it laggy when I write massive posts of 4000-6000 words. As it often results in tons of blocks!)
WordPress Gutenberg Looks Like It Is Here To Stay
Either way, this is the WordPress editor to use going forward.
As this is what WordPress is promoting. It is likely to be around to stay. So investing some time to learn the new editor now will likely pay off later.
Especially once support for the Classic editor plugin is dropped in a few years.
So, what’s the biggest fear you have when you think about how to write your first blog post in WordPress Gutenberg?
If you found this blog post useful then please consider taking a few seconds to share it to your favorite social media platform!

Honestly speaking, Gutenberg is quite confusing and takes time to learn. Classic editor was better as for those who wanted block-type elements, could have easily used page builder plugins.
Thanks for the write-up. I’m still learning to use Gutenberg and this article have been helpful. Thanks 🙂
Thanks, I’m glad you found it useful ^^
Thanks for sharing. I was struggling to understand the block editor but will now give it a try for my next post.
Hey Sarah,
Thanks for stopping by to comment. I really hope after reading this post that writing blog posts in WordPress Gutenberg will be much easier for you ^^
Thanks for sharing this knowledge.
Thanks for the comment.
got few ideas thanks a ton
You’re welcome, glad it could help
I just wrote my first post in Gutenberg. It took me a little longer but it was not as difficult as I thought it would be. I love the shortcuts you shared and will definitely use this rather than the Classic Editor.
Thanks so much! It really makes my day to know that these WordPress Gutenberg tips helped you 🙂