This post contains affiliate links. Which means I will make a commission at no extra cost to you should you click through and make a purchase. Read the full disclosure here.

Are you looking for ways to increase your blog traffic? So you can increase your chances of making money and your blog being successful?
Then perhaps you are considering learning search engine optimization (SEO). Because you’ve heard you can drive a significant amount of highly converting traffic. But the problem is you are not sure where to start or how best to get results.
Well, one of the ways you can improve your SEO game. Is by using a WordPress SEO plugin to help optimize your blog. As they can greatly streamline and simplify the process.
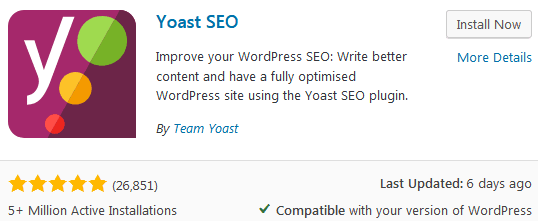
One of the most popular WordPress SEO plugins out there is the Yoast SEO plugin.
Below I’m going to show you not only how to use Yoast SEO but also:
- How to install the Yoast SEO plugin
- A Yoast SEO tutorial for running through the inbuilt wizard
- The Yoast SEO settings you need to consider
- + Some of the beneficial Yoast SEO features included with the plugin
But let’s cover some of the basics first!
- What Is The Yoast SEO Plugin In WordPress?
- Is Yoast Only For WordPress?
- Is Yoast Good For SEO?
- How Much Is Yoast SEO? Is Yoast SEO Free?
- How Do I Use Yoast SEO For My WordPress Blog?
- Using The Yoast SEO Wizard To Set Up The Basic Settings
- Yoast SEO Settings Not Covered In The Wizard
- How To Use Yoast SEO
- Can I Use More Than 1 SEO Plugin?
- Is Yoast SEO The Best SEO Plugin?
- How To Use Yoast SEO Tutorial + Settings Recap!
What Is The Yoast SEO Plugin In WordPress?
The WordPress Yoast SEO plugin is a tool that you can install on your blog. That will help you to manage and fine-tune the settings on your blog. Which can impact your SEO.
By improving your SEO. This is how you can also boost your rankings in Google. As the higher your website appears in the search results the more traffic you are likely to get.
Not only does the Yoast SEO plugin help with adjusting your blog’s overall settings for SEO. But it also acts as an assistant for editing your blog posts as well.
You can do this by setting keywords or a keyphrase for the blog post in the Yoast SEO menu. And then following the suggested improvements. That the plugin gives based on your written content.
Once you’ve made the changes. The Yoast SEO plugin will check and update its rating within a few seconds. Meaning you are always getting instant feedback.


Is Yoast Only For WordPress?
In short, no. Whilst the main focus is on the Yoast SEO WordPress plugin. It is possible to use Yoast on platforms such as Magento 2, Neos, Drupal and TYPO3.
As well as they are also open to helping you add it to other platforms too. So long as it meets their requirements. The major one being that the platform is open-source.
Which makes Wix and Squarespace unlikely since they are not open-source.
Is Yoast Good For SEO?
Yoast has many benefits for helping to boost your SEO. From adding extra metadata for Google to understand. To helping you include your keywords in the most important places.
But it’s not perfect though.
In summary, the free version is basic. With only green, orange or red lights to indicate if you are doing things ‘right’.
Yet SEO is far more complicated than this and you’ll need to do more than just get all green lights. Though it is a great introduction to the SEO world for beginners.
How Much Is Yoast SEO? Is Yoast SEO Free?
The Yoast SEO plugin comes at two prices.
The completely free Yoast SEO version of the plugin. Comes with all the basic features you need. That are great for getting started with. You can do a huge amount of stuff with just this version.
The premium version is $89 / £79 per site. Which is pricey for beginners.
Especially since it doesn’t even include anything that will help you with the most tricky part of SEO. Finding the right keywords!
How Do I Use Yoast SEO For My WordPress Blog?
Before you can learn how to use Yoast SEO. The first thing you need to sort. Is how to install Yoast SEO.
To start with, you’ll want to go to the Plugins > Add New menu.
Then from here search for ‘Yoast SEO’. Which you can then Install and Activate the plugin.
Using The Yoast SEO Wizard To Set Up The Basic Settings
The Yoast plugin icon will appear in your top toolbar. Hover over this and then click Configuration Wizard. Which you can use to get the default Yoast SEO settings done.
The first section is for setting whether your blog is live or not.

Bonus Tip: Remember if you choose the option that your site is under construction. Then once your blog does go live. You should go to Settings > Reading and make sure the checkbox for Search Engine Visibility is unticked.

Once you’ve selected an option. You’ll want to click Next to progress the Yoast wizard.
The next screen you should use to select your type of website. You’ll almost always want to select A blog for this.
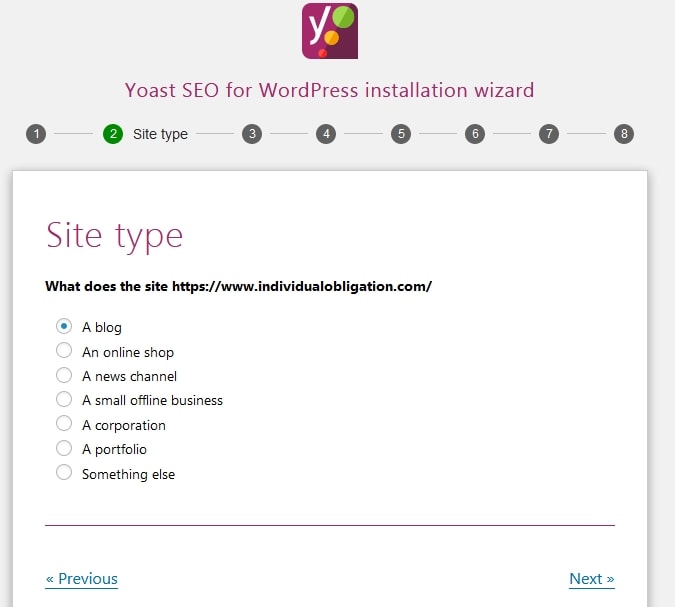
Click Next once done.
Then the Yoast plugin will now be asking about who the blog represents. Think about whether your blog and branding will focus on you or not.

Keep in mind this information appears in Google searches sometimes. As the block of information to the right of the search engine. Like this:

I opted for the Organization option myself. As I would rather have Google display my blog logo. Rather than my mug shot all over the internet.
Either way. Whichever option you decide to go for. Fill in the fields that Yoast SEO asks you for. Such as your blog logo and name.
You’ll also find towards the bottom of the page an area where you can enter your social media URLs or usernames. Such as Facebook, Twitter, Instagram, Pinterest, and a few others.

Don’t worry about filling everything in exactly though. As you can always come back and change it later.
Click Next once you’ve filled out as much as possible.
Post & Pages Visibility
You’ll now be asked about further options to set your blog’s posts and pages visibility. For search engines like Google.

Leave both of these set to Yes. As you can always disable the visibility of pages like your legal pages on an individual basis. Whereas you might want your about page and contact pages to show in Google search results.
Does Your Blog Have Multiple Authors?
Moving on, click Next and the Yoast SEO plugin will ask you about multiple authors.

If your blog is just you then leave this set to No. Again, you can always change this later, if things change.
Yoast SEO Setting For Titles Displayed In Search Results
Click Next again and it is now time to set your Title settings.
Here you’ll want to set your website name and title separator. For example, this is what I set mine to.

And this is what those settings might look like in Google search results.

Once you’re done, click Next again.
The following page has some information on further learning for Yoast SEO. Such as an option to sign up for their email list. And some shortcuts to their Yoast SEO videos.

Feel free to check out these details.
But be aware that they also sell a lot of SEO related courses and tools. So not everything is free.
Once you finish with this page. You can click Next at the bottom of the screen. And you’ll get a success page. You can then click Close to complete the wizard.
This will send you to the Yoast dashboard. Which can be accessed normally through the Yoast SEO icon. That is on the left menu of your WordPress dashboard and then
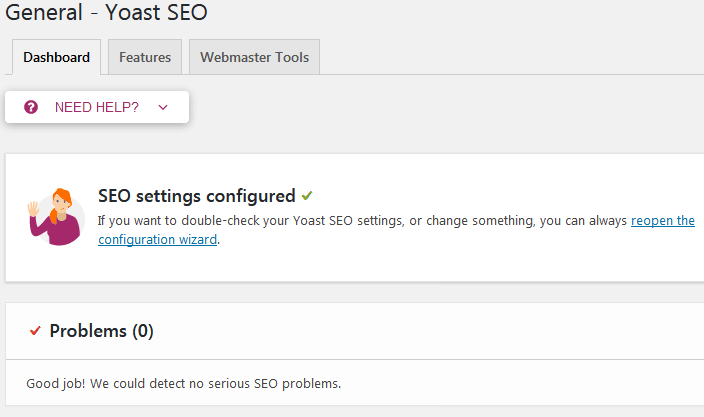
You can use this general section to rerun the configuration wizard. As well as see any notifications or problems that Yoast might flag up.
Yoast SEO Settings Not Covered In The Wizard
Whilst you would think using the configuration wizard. Would be enough to get everything set up. There are a lot of Yoast settings not covered by it.
Additional Yoast SEO Features Within The Plugin
The Features tab at the top of the General settings page. Definitely contains some of the settings you’ll want to check over.
In fact, you’ll want to have all of these features enabled for the maximum use of Yoast SEO’s features.

Yoast SEO Analysis
This is the bread and butter of this WordPress plugin. After all, you want to optimize your blog for SEO right?
Having this option enabled. Will show a writing assistant in your blog posts that you can use to add your focus keyword. This feature is available in both the WordPress Gutenberg editor. As well as the Classic editor.


Readability Analysis
Not only does Yoast SEO look at your blog post’s writing for keyword optimization. But it also looks at the readability of your writing. Which can provide you tips to help improve.
For example, it will check that you break up your text into reasonable chunks. That are separated by headings roughly every 300 words. It will also look for other factors that make your writing easier to read for your audience.
You can find this tool usually in a tab next to your SEO analysis.

Yoast SEO Cornerstone Content
The cornerstone content feature.
Text Link Counter
Interlinking your blog posts is a vital part of your SEO strategy. Since internal links are how Google crawls your blog and maps out your content.
With the text link counter feature enabled. The Posts > All Posts page in your WordPress dashboard. Will show extra columns. Including a column for internal links that lead to the blog post. Plus one for internal links that lead off the blog post to another page on your blog.
Every single blog post you have should have several of both types of links. And these extra columns in your posts table will help you spot any blog posts that need working on.

Yoast SEO XML Sitemaps
This feature is important to have switched on. Because Yoast SEO will create a map of your blog’s structure and how the posts are linked together.
You can then upload this file to places like the Google Search Engine console. To help speed up how Google crawls your blog. So it can add and update information about your blog quicker.
Ryte Integration
Turning on this feature will let Ryte monitor your blog. So it can notify you are any errors when trying to index your blog. As these types of problems could make it difficult to get your blog seen and clicked in search engines.
Admin Bar Menu
The Admin bar menu feature adds a Yoast icon to the top toolbar of your WordPress dashboard. (You know, the one I mentioned earlier. When we ran through the configuration wizard.)
This can make finding the button much quicker. But it is a totally optional setting. So if you would rather keep the number of icons in the top toolbar down to a minimum. You can opt to turn off this feature.
Security: No Advanced Settings For Authors
The setting used here is only significant if you have multiple authors on your blog. As this setting will prevent some of the more serious settings in the Yoast plugin. From being changed by certain user levels.
All in all, you should go through these features using the information above. So you can decide for yourself which to turn off or on. Then once you are done. You’ll need to click the Save Changes button.
Webmaster Tools
The third tab on the General settings page is for the Webmaster Tools. These allow you to link your blog through Yoast. To places like the Google Search Console or Bing Webmaster Tools.
You can click on the links within this page. To go through the steps that will link your blog with these webmaster tools.

Search Appearance Settings
With the General settings section out of the way. I want to direct you to the Yoast SEO > Search Appearance and then the Taxonomies tab.
Most of the settings in the previous tabs. Were already set through the wizard you ran earlier or are already set correctly by default.
In the Taxonomies tab. You’ll need to first decide whether to show your Categories in your search results.
You’ll also want to make sure that under the section for Tags. That the Show tags in search results is definitely set to No. Otherwise, every single tag you add to your blog posts will show as a separate search result in Google.
Archives Settings

The next tab is the Archives. In general, both Author archives and Date archives should be disabled. As a single author blog should be organized by categories instead.
If you do decide to have any archives enabled. Then you should ensure that these are not shown in search results. By changing the relevant setting to No.
Yoast Social Settings
There are a few settings you should check under the Yoast SEO > Social menu. The first screen that appears will look familiar if you went through the Yoast wizard. In fact, some of the fields might already be filled in under the Accounts tab.
But our main concern here. Is the extra metadata added for Facebook and Twitter. If you want to share your content across these platforms. Then you will want to click the relevant tab. Such as Facebook. And then make sure that the Add Open Graph metadata is Enabled.

If you then go to the Twitter tab. You’ll also want to Enable the Add Twitter card metadata. Which you can also set to display as either a summary or a summary with a large image. (I recommend the second option.)

The last tab, Pinterest. Gives you a screen you can use to confirm your blog through Pinterest. But if you’ve already got a verified website on Pinterest. You don’t need to do this.
Remember to Save Changes once done.
That’s pretty much it for setting up Yoast SEO on your blog. Though after blogging for about the first six months. I do suggest you come back and review these settings. As your plans might have changed!
How To Use Yoast SEO
Okay, so now Yoast SEO is installed and set up correctly. So that Google can include your blog in search results. This means your SEO setup is done right?
Wrong!
Once you’ve installed Yoast SEO. It is time to start using it for your posts and pages. As there are a few more things you’ll need to do for each blog post.
So, whenever you create or edit a WordPress post or page. You should see a widget for the Yoast SEO plugin. This can either be on the right using the toolbar in WordPress Gutenberg.
Or if you are still using the WordPress Classic editor. Then the Yoast plugin will be showing extra settings at the bottom of your blog post.
Other than the general position of the plugin. Everything else is the same regardless of which WordPress editor you are using.
How Do I Add Keywords To Yoast SEO?
So, with your selected blog post open. Go to where your Yoast SEO plugin hangs out. Where you see the box for Focus keyphrase. This is where you can stick a single keyword or phrase. Like “blogging for beginners”.

Sadly, you can only add extra keyphrases with the premium version of Yoast SEO.
Once you’ve entered your focus keyphrase. Yoast will do some calculations based on your blog’s content in relation to your keywords. And the smiley face will change color to reflect how well Yoast SEO feels your blog post is optimized.
The colors usually follow a traffic light approach. Where green is good, orange is not so good and red is bad.
SEO Analysis
If you click to expand the SEO analysis tab. You can see more information about the different factors that are being checked. As well as suggestions for how to improve.

As you can see from the above. Yoast SEO is giving me suggestions on how to improve my blog post’s SEO optimization. In this case, it is showing that the keyphrase or keywords I have chosen. Are not appearing in the blog post’s introduction.
You may have noticed that some of the suggestion appears to have links. If you click on these then they will send you to the Yoast SEO blog. Which expands further on the suggestion.
Below this first suggestion is two more orange suggestions that are less serious. One suggests I should have some external do-follow links. Whilst the other is suggesting my alt text is over-optimized.
Again, these also have linked content. So if you don’t understand why Yoast SEO is suggesting you change something. Then these links can help to give you further reading on the logic behind it.
You might also notice that Yoast SEO not only tells you what you should improve. But also what is already optimized well too. This way you can see exactly what Yoast thinks you are doing right when it is rating your blog post.
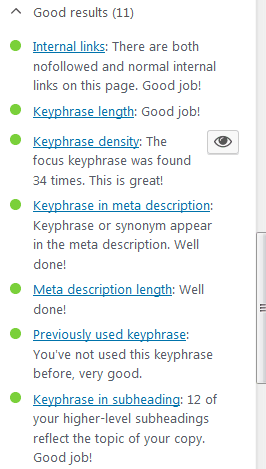
As you can see from the above example. The WordPress Yoast SEO plugin looks at things like:
- How many times your keyword has been used
- If your keyword is used often enough for the length of your text
- Whether you are using a good mix of internal & external links
- If you’ve used the keywords in your headings enough
- + More
Can I Use More Than 1 SEO Plugin?
In general, it is a bad idea to use more than one SEO plugin. As they can cause conflicts as well as duplicate meta-content which can hurt your SEO.
So as a general rule of thumb, try to disable any other SEO plugins. Compared to the one you plan to use above all others.
Is Yoast SEO The Best SEO Plugin?

The Yoast SEO plugin is one of many popular WordPress SEO plugins. Similar to:
Out of all the SEO plugins out there. It is one of the most well-known and popular. With over 5 million active downloads in WordPress.
However, this doesn’t make it the best SEO plugin.
As there are other options out there. That give features for free that are locked behind the premium version of Yoast.
Yet, the Yoast SEO plugin is probably one of the best SEO plugins to get started with. As it is extremely beginner-friendly.
One major flaw that does come up. Is that whilst the idea of getting green lights for every suggestion seems like a clever concept.
There is so much more to getting top SEO results on your blog. (Such as backlinks.) Than just getting all those bullet points green. Something that many new bloggers get fixated on only to limit their progress.
In fact, sometimes the suggestions made by Yoast SEO are not always 100% required.
One example is the keywords having to be in the ‘first paragraph’. Now depending on your writing style your first paragraph might only ever be 1-2 sentences. Making getting your keywords in rather robotic.
Instead, it should be more concerned. About whether your keywords are within the first 300 words. Which would be much less rigid and flexible to all varying writing styles.
How To Use Yoast SEO Tutorial + Settings Recap!

So, at this point, you should be familiar with all the settings you need to consider for your blog. As well as the extra features the WordPress Yoast SEO plugin offers. And what they can each be used for.
After all, being able to optimize your blog post’s SEO and other valuable aspects such as readability. Are definitely a plus for any blogger.
However, always keep in mind. That whilst Yoast SEO is a free WordPress plugin that is fairly straightforward to use. It does over simplify what your SEO strategy should be.
Moreover, you must understand that the Yoast SEO plugin’s main focus is on-page SEO. Which only accounts for about 50% of what impacts on your SEO ranking. The rest is affected by off-page SEO, such as building backlinks.
In truth, one of the best places to learn more about SEO for bloggers. Beyond the limited basics that the Yoast SEO plugin covers. Is all the amazing content written over at Backlinko.
So, over to you – What are your thoughts on the Yoast SEO plugin? Will you be using it as part of your SEO strategy or one of the many other WordPress SEO plugins instead?
If you found this blog post useful then please consider taking a few seconds to share it to your favorite social media platform!
