This post contains affiliate links. Which means I will make a commission at no extra cost to you should you click through and make a purchase. Read the full disclosure here.
The content on your blog should be as easy as possible for your readers to navigate. Often this involves adding WordPress menus, organizing our posts by categories and tags. As well as adding an internal search box. But have you ever considered adding a WordPress table of content to your blog posts?
After all, what better way is there? To give an overview of a blog post’s structure and topics. Whilst giving readers a quick way to jump to the section they want. Especially if you like to write longer content.
Yet, despite the obvious benefits of a table of contents. It is often forgotten about or considered too complex to put in place. When just starting with a brand new blog.
Which is why today, I want to cover 2 methods. That should fit any of your blog needs. Regardless of whether you prefer the WordPress Classic editor or WordPress Gutenberg.
And both work on any WordPress blog even after the major 5.0 changes. Which seemed to have messed up a lot of WordPress table of content plugins.
- How To Add A Table Of Contents In WordPress Without A Plugin
- Ultimate Addons For Gutenberg – Table Of Content Block
- Wrapping Up: The Easiest Way To Create A Beautiful WordPress Table Of Contents


How To Add A Table Of Contents In WordPress Without A Plugin
Okay, so the first way I’m going to show you. Is how to add a table of contents in WordPress without a plugin.
This method is more complicated than using any plugin. As well as being fiddly and time-consuming. With the possibility of mistakes being made. Especially on longer blog posts.
But you do get precise control of the end result. Plus it works in both the Classic Editor and WordPress Gutenberg Editor too.
Creating a WordPress Table Of Content Using HTML Code
So, to begin with. I would suggest getting your blog post written first. As well as formatted, with all your headings finalized.
Then you’ll want to paste in the code from below, into the place you want your WordPress table of content to show.
For the Classic editor, you’ll need to switch to the Text view tab. Or if you are using WordPress Gutenberg. Then you’ll want to insert an HTML block where you can paste the code instead.
The code you should paste in looks like this:
<div id="toc_container">
<p class="toc_title">Contents</p>
<ul class="toc_list">
   <li><a href="#toc1">1 | Setup Mistakes</a></li>
   <li><a href="#toc2">2 | Legal Mistakes</a></li>
   <li><a href="#toc3">3 | Security Mistakes</a></li>
</ul>
</div>
How To Add HTML Anchors In The WordPress Editors
Next for each heading in your blog post. You’ll want to set what is called an HTML Anchor. All this is, is the name of the link that will take you to a specific section of the current page.
To set the HTML Anchor, in the WordPress Gutenberg editor. You will need to click on the Heading block and using the settings on the right side. Click on Advanced. Which should expand to show you the HTML Anchor box.
If you are using the Classic editor. Then you will again need to be in the Text view tab. So you can see the blog post’s code. Your headings should start with the code <h2, <h3, <h4 etc. To add your HTML Anchor. You’ll need to copy and paste the code:
id=""
Then between the double quotation marks. You can add in your HTML Anchor name. It should look similar to this:
<h2 id="toc1" class="toc_header">Start A WordPress Blog Setup Mistakes</h2>
Normally, for the HTML Anchors. I just name these as toc1, toc2, toc3 etc. If I have subtopics, then sometimes I write these as toc1_1, toc1_2. The important thing to keep in mind. Is that they need to be unique for each heading you want to link to in your WordPress table of content.
Customizing Your WordPress Table Of Content Code With The HTML Anchors
Now, because every blog post will be different. You will need to edit and customize some of the code that you pasted in earlier. But this is pretty straight forward. As the only parts, you should really change are the lines that start with <li>.
Let’s take a look at the code again:
<div id="toc_container">
<p class="toc_title">Contents</p>
<ul class="toc_list">
   <li><a href="#toc1">1 | Setup Mistakes</a></li>
   <li><a href="#toc2">2 | Legal Mistakes</a></li>
   <li><a href="#toc3">3 | Security Mistakes</a></li>
</ul>
</div>
Right, so you see the “#toc1”? This is your HTML Anchor name. Make sure you update these to match the HTML Anchors you’ve added to your headings.
The text “1 | Setup Mistakes” is the text that will be displayed in your WordPress table of content. Again, edit these to match your blog post’s headings.
Also, if you need more than the 3 lines I’ve provided above for your headings. Which is very likely. As you will likely have more than 3 headings in your blog posts. Then you need to copy the entire line from <li> all the way to </li>. Create a new line above the </ul> and paste the copied line in the space. Like this:
<div id="toc_container">
<p class="toc_title">Contents</p>
<ul class="toc_list">
   <li><a href="#toc1">1 | Setup Mistakes</a></li>
   <li><a href="#toc2">2 | Legal Mistakes</a></li>
   <li><a href="#toc3">3 | Security Mistakes</a></li>
   <li><a href="#toc3">3 | Security Mistakes</a></li>
</ul>
</div>
You should then update this new line with the correct HTML Anchor name. As well as the text you want displayed in your contents table in WordPress.
But if you want to add subtopics to some of these. Then the code would need to look a bit more like this:
<div id="toc_container">
<p class="toc_title">Contents</p>
<ul class="toc_list">
   <li><a href="#toc1">1 | Setup Mistakes</a>
      <li><a href=”#toc1_1”>1.1 | Choosing The Wrong Platform</a></li>
      <li><a href=”#toc1_1”>1.1 | Not Understanding PermaLinks</a></li>
   </li>
   <li><a href="#toc2">2 | Legal Mistakes</a></li>
   <li><a href="#toc3">3 | Security Mistakes</a></li>
</ul>
</div>
How To Format Your HTML WordPress Table Of Content With CSS
If you’ve followed the above steps and tried previewing the final result. Then your table of contents in WordPress might look a little ugly. Which is why I’m going to show you how to add some formatting to your WordPress table of content. So that it looks professional.
This part is super easy. Just stick the following CSS into your Additional CSS box. Which you can find by going into Appearance > Customize > Additional CSS.
#toc_container {
background: #f9f9f9 none repeat scroll 0 0;
border: 1px solid #aaa;
display: table;
font-size: 95%;
margin-bottom: 1em;
padding: 20px;
padding-right: 50px;
width: auto;
}

.toc_title {
font-weight: 700;
text-align: center;
}

#toc_container li, #toc_container ul, #toc_container ul li{
list-style: outside none none !important;
}
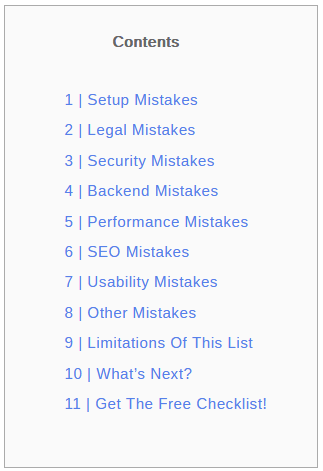
Once you’ve pasted it in. Publish the changes and go back to your blog post. So you can preview the final results before publishing the post itself.
The finished version of this WordPress table of content. Looks like this on my WordPress mistakes blog post. Yours should look similar. Though there might be some variations due to your WordPress theme.
Ultimate Addons For Gutenberg – Table Of Content Block
But what if you want something to automate all the coding and linking? Which gets to be time-consuming and complicated the bigger your blog posts get. Plus something that can actually work with WordPress Gutenberg.
Well, in comes the Ultimate Addons For Gutenberg plugin. This nifty little WordPress plugin will let you use one of their custom blocks. To create a WordPress table of content in just a couple of clicks. It will pull in all your headings and subheadings for you automatically. So you can get on with writing. Without having to worry about coding everything into a table of content later.
How To Install The Table Of Content Block From Ultimate Addons For Gutenberg
So, how do you get this WordPress plugin for your own blog?
Well, start by going to the usual Plugins > Add New from your WordPress dashboard.
Search for the Ultimate Addons For Gutenberg plugin.

Click Install Now and then Activate once it becomes available.
You’ll then be taken to their welcome page.

If you scroll down this page, then you will find a list of blocks included in the plugin. By default all these are active.
However, if resources are a concern. You can always click Deactivate All and then only enable the Table of Contents block for the time being. As you can always come back later to check out their other handy Gutenberg blocks.
Other than that you’re all set to go. So let’s move on to your actual blog post.
How To Use The WordPress Table Of Content Block In The Gutenberg Editor
Open your WordPress Gutenberg editor. Again, get your blog post and content all written. Before you worry about how to add a WordPress table of contents.
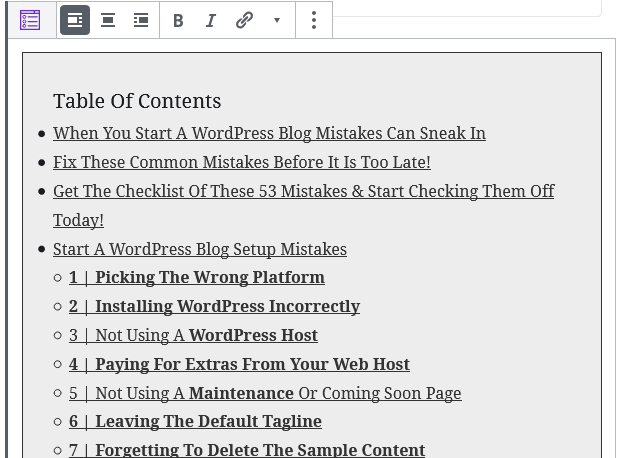
Once everything is written, click the plus icon to open the block selection menu. And scroll down until you see the Ultimate Addons Blocks.

Click this to expand it and then click on the Table of Contents.

This block will then automatically generate a table of contents in WordPress Gutenberg. With all your headings included automatically and linked. Without you needing to edit code or add HTML Anchors.
Settings To Customize Your Table Of Contents Block In WordPress Gutenberg.
For settings you can adjust for this block, on the right side. You can select which level headings you want to include in your WordPress table of content.

The next section below controls the scroll when clicking on the links in your table of contents. Smooth scroll effects how the page scrolls down once you’ve clicked on a link in your table. Whilst the Smooth Scroll Offset can be used to adjust where you land when scrolling down.
This is important to check! For example, this blog has a hello bar at the top. Plus the main WordPress menu navigation stickied to the top as well.
Meaning with the default settings. When I clicked on a link in the WordPress table of contents. The page scrolled down several lines too far. In the end, adjusting this to 200 helped the page scroll to the perfect location. So check and test this yourself!
Furthermore, the Scroll Animation Delay adjusts how quickly the animation kicks in. Which I just left as it was since it was pretty quick and smooth.

And finally, this section also has the option to Show Scroll To Top. That if you enable will allow you to set an icon and background color. Which will be previewed on your blog post at the bottom right. This can be a handy feature to allow your readers to quickly get back to the table of contents.

Content Settings For The Ultimate Addons Gutenberg Table Of Contents
Next, in the Content section, there are options to adjust the text of your contents table. Including spacing, color and the fonts if you click the little spanner tool icon.
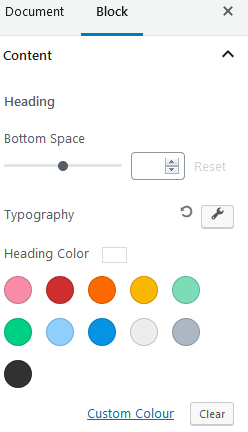

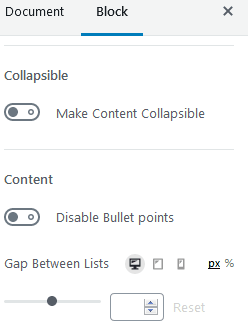
If you continue to scroll down this section. There are also options to Make Content Collapsible. So readers can hide the table if they want. As well as Disable Bullet Points, if you don’t like these.
You can also set the font color for the links and their hover over color too.
Style Settings For The Ultimate Addons Gutenberg Table Of Contents
Next, under the Style section. You can find the settings to change the background color, table width, columns and spacing.

The last section is for Advanced. Which simply allows you to set an additional CSS Class.

With all these settings it is really easy to create a customized table of contents for your blog posts. That can fit perfectly with your branding.
In fact, with just a few minutes of work, I was able to create something like this:

Also, because there are so many settings and customization options. I strongly recommend creating a reusable block for this. As it can help you to keep your WordPress table of content consistent across your blog.
In addition to letting you create a WordPress table of content in as little as 2-clicks. Which is miles faster than the previous method, I covered above! How amazing is that?
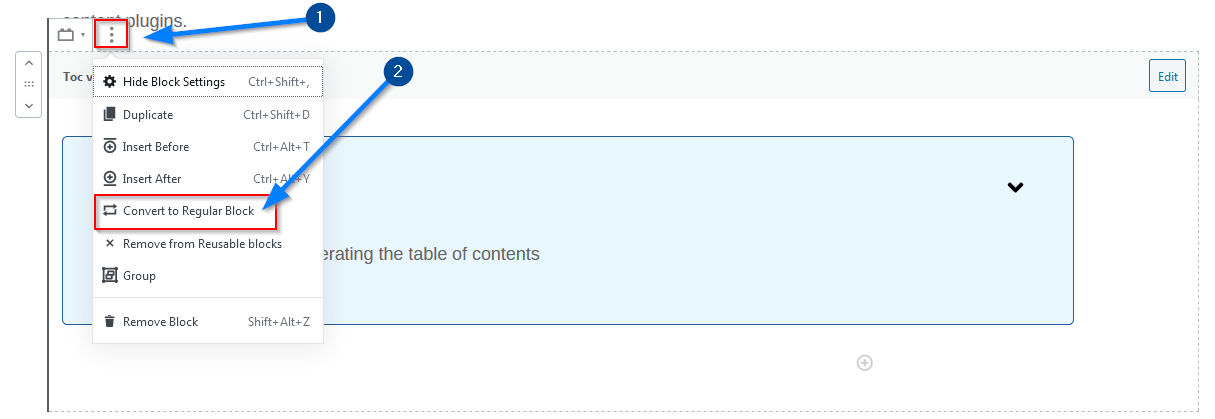
Just keep in mind when you add the reusable table of contents block you created from the Ultimate Gutenberg Blocks plugin. You will need to click on the More Options (those 3 vertical dots) > Convert to Regular Block before your current blog post’s headings will display. Don’t worry it will still keep all those styling settings from the reusable block you created.
Wrapping Up: The Easiest Way To Create A Beautiful WordPress Table Of Contents
There’s a real contrast on the two main methods I’ve listed here. The first method I’ve used on and off for a while. As I wasn’t able to find a WordPress table of content plugin that worked with all the changes in WordPress 5.0.
This HTML table of contents works and allows more control. Compared to using the Ultimate Addons Gutenberg blocks table of contents.
Limitations Of Using The Ultimate Addons Gutenberg Table Of Contents Block
Specifically, for the Ultimate Addons table of contents. The headings you use in your blog post is exactly what will show in your table. You can’t change these without changing your headings.
There also seems to be a lack of options for setting the bullet point colors. As from my tries, they stuck to the same default dark grey color. Despite me changing the content font color.
You also cannot change the “Table Of Contents” heading text that displays at the top of this block.
On the other hand, these minor restrictions. Are far outweighed by the amount of time this custom Gutenberg block can save you. Especially, if you setup a reusable block with your favourite settings. Not to mention the bonus features. Which could be quite difficult to put in place otherwise. Such as the option to add a scroll to top button. Or collapse the entire table. Plus the scrolling offset feature to adjust exactly where the table of contents scroll to.
So, if you use a lot of WordPress table of contents in your blog posts. Or have been considering adding them. But felt they would be too much work. Then the Ultimate Addons Gutenberg Blocks plugin is an amazing solution. That is completely free! And that’s before you even check out the other nifty custom blocks they’ve come up with.
So, tell me – Which method are you planning to use? Have you already been using a different method or plugin to add a WordPress table of content to your blog posts? What are your thoughts?
If you found this blog post useful then please consider taking a few seconds to share it to your favorite social media platform!

Hi,
nice description!
One question: have you been able to use the Gutenberg Table of Content as a Reusable Block?
If I save it as a reusable block and just got the old content from the first post when I insert it into another post. So basically it seems it is not dynamic, which means I have have to add the style settings to every TOC I am going to insert.
Can you advise how you did it?
Alternatively, I also tried to use the CSS settings in combination with the Gutenberg TOC but unfortunately failed as it seems tricky to style everything in a manner it looks great at the end.
Thanks, Chris
Hey Chris,
I use the Gutenberg Table of Contents from Ultimate Blocks in all my new posts. (I still need to go back and update older content.)
If you’ve created the table of contents as a reusable block. You can add that reusable block to any new blog posts but I forgot to add that after you’ve added it to a new blog post. You’ll need to click on the 3 vertical dots to get to the More Options and then click on Convert to Regular block. It should then pick up the headings of your current blog post whilst keeping all those style settings you set in the reusable block itself. I’ve updated the post to better clarify this for others.
That’s amazing, thank you so much for your reply. It’s so easy and saves me installing an additional plugin.
It is interesting that it works because in the wordpress forum of the Gutenberg Ultimate Add-Ons they once said it is not possible to take over the styling site-wide.
Thanks again, this was super helpful!
Chris
Hey Chris,
I’m glad it worked out!
I wanted to let you know that this is really an informative article for beginners like me! I have bookmarked this article and I’m sure these tips will be very helpful for me.
Thanks James, I’m glad you found it useful
This is really great ,thank you very much for putting forward every tips in detail, I know that it’s going to take some time for me to install or set things the way you have described.I would love to share this with my other blogger friends.🌹👍🙏
Hey Francis,
It may take some time to setup but it’s worth it. Thank you so much for the kind comment!