This post contains affiliate links. Which means I will make a commission at no extra cost to you should you click through and make a purchase. Read the full disclosure here.
You either love it or you hate it.
Regardless, WordPress Gutenberg looks like it is here to stay.
Whilst Gutenberg is the new editor on the block. There can be a very steep learning curve. It is a different way of thinking. That’s not your typical style. Compared to the tried and trusted writing documents. Like Word, OpenOffice or more recently Google Docs.
Whether you find Gutenberg confusing or you feel like you’ve got the hang of it. Here are 7 hidden WordPress Gutenberg features. That are significant and useful features you might not have known even existed.

1 | The Fastest Way To Find Blocks With This Quick Shortcut
Firstly, finding and adding blocks can feel a bit jarring and cumbersome. When you are trying to create your content. It can be quite the flow ruiner. Especially if you often find yourself having to move your hands. From the keyboard to your mouse. To click on those little plus icons. Only to have to scroll through tons of blocks you’ll likely rarely use. It is nice that the functionality is there for when you want to embed files on
Well, not anymore with this trick!
So, what do I mean exactly? Well, when you are typing away your content for your blog post. And you decide, “Hey, I want to add an image here.” You don’t have to go click on that little plus icon or wherever else the Add new block button is. Since it is in several places for easy access.
Once you’ve finished typing your paragraph. Simply hit the Return key as you would normally to start a new paragraph. A new Paragraph block will be created by default. But here’s the thing.
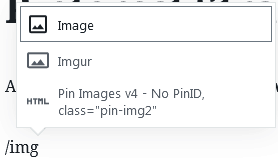
If you start typing with “/” (forward slash), it will bring up a list of available blocks. Like this:

And if you keep typing after the “/” with the name of the block you are looking for. Say the image block as mentioned in this example. As soon as you type “i” the image block will show with a bunch of other options. The more you type, the shorter the list gets!
See what I mean?
This method has been the fastest way to find blocks in my experience. And helps to keep your workflow, well flowing!

2 | Wrap Text Around Images With A Single Click
Next up, I’ve seen some pretty long-winded examples of how to wrap text around images using WordPress Gutenberg. Trust me, it is much more simple than it looks at a first glance. Especially, once you start thinking in terms of blocks. Instead of trying to figure out how on earth you can add an image to a paragraph block.
It’s simple. You don’t.
If you want to wrap text around your images. Keep it simple. Add your text to a paragraph block. And the image to an image block. Exactly like you would if you weren’t trying to wrap the text around the image.
You then need to have the paragraph block above or below the image block. The order can affect the way the text wraps. So be sure to test both options if you are not sure. (I’ve gone in more depth with these settings and how to write blog posts using the Gutenberg editor here.)
Then on your image block, click either Align left or Align right. If you leave the image block set to Align centre. Then the image will be centred on the page and no text wrapping will happen.
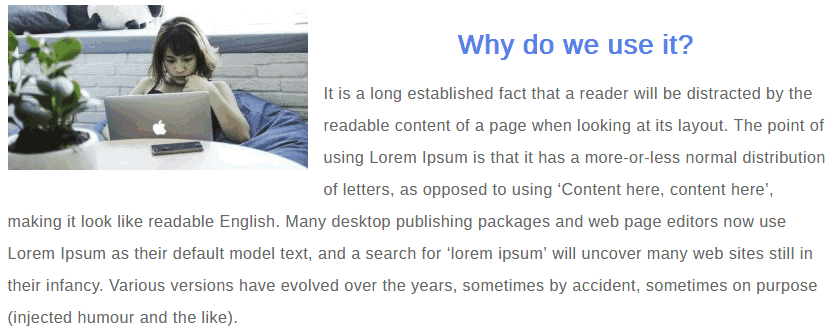
Here’s what it looks like for my Align left example:
And my Align right looks like this:

So apart from creating the paragraph and image block like normal. Wrapping text around your image is as simple as 1-click. Super easy, right? Just remember these 2 key things:-
- The order of your blocks can affect how the wrapping looks. So be sure to check the preview of your blog post before publishing.
- The wrapping of text around images might not display exactly in the editor as it would your live post. So, you should always Preview the post to see the effects. Which further emphasises why you need to check how things look using the Preview button before hitting publish.

3 | WordPress Gutenberg Features To Write Distraction Free For Maximum Productivity
So, the Gutenberg editor and the Classical editor. Both have this one particular problem. And it’s a real productivity suck when you are trying to write content.
Do you know what it is? Well, let me tell you. It is the number of buttons, sidebars, information displays. And general clutter in the editors. When you are trying to create content. Do you need to see each and every extra setting at the start? No, not really. Which is why the distraction-free Fullscreen Mode. In the Gutenberg editor is such a life saver.
So, get rid of all the distractions when you want to simply write. By going to the Show more tools & options button, in the top right corner of the editor. (Hint: it’s the 3 vertical dots.)
And then go down the list and click on Fullscreen Mode. This will hide all the distracting sidebars from the WordPress dashboard. So all you have is the basic features you’ll need for writing. And if you need to change it back, just go in to click the Fullscreen Mode again.
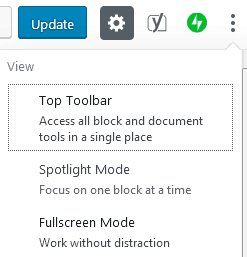
Plus if you want to go one step further, you can. Because if you click the cross in the top right corner for the right-hand sidebar. Where all the document and block settings appear. Then you’ll end up with an even more clear interface to work with.
Looking at something so clean and blank. Should trigger that urge to fill it with content, right? Try it for yourself! It really can help to boost your productivity.

4 | Use Reusable Blocks To Save Time On Repetitive Tasks
Do you find yourself recreating the same blocks over and over?
Well, if you find yourself recreating the same blocks often. Then you should consider using reusable blocks. This nifty little time saver and also a lifesaver, if you ask me. Can help speed up creating content and adding those final touches.
How do you create reusable blocks? Well, I’ve covered the step-by-step details in this blog post. Which even includes some useful examples that every blogger can benefit from. As well as some advanced tricks too!
But in short. You simply need to create your block

At this point, you can give your reusable block a name and then save it. Once it has been saved you can find it in the Reusable blocks section. Whenever you go to your usual method of adding blocks.
You can even use the shortcut I mentioned earlier and type “/” followed by the name of your block that you set. And it will bring it up for you here too!
5 | Go One Step Further With Reusable Blocks Within Reusable Blocks!
Using a single reusable block is one thing. But, you can actually go one step further with this.
How does combining multiple blocks into 1 reusable block sound? Crazy, right?
This is a more advanced feature of reusable blocks. That many people don’t even know about. But it can be a very powerful feature once you know about it.
Again, I’ve covered it in detail here. But the main difference between this and a single reusable block. Is that you can highlight multiple blocks to be saved as one reusable block. And, yes. It really is that simple.
In fact, you can use this method is to create an entire blog post template! If you find for example you always use the same structure. Like a call-to-action at the end of posts. An email opt-in form in the middle. Click to Tweets throughout the post and Pinterest images at the end.
Then you could easily create the blocks for all of these and then add them into a single reusable block. Which you can add to any new blog posts. Once you’ve done the initial setup. It can be reused over and over again with just a few clicks.

6 | Use Quick Navigation To Easily Jump Around Your Post’s Sections With These WordPress Gutenberg Features
Here’s another hidden WordPress Gutenberg feature. That you probably didn’t realize was there. Because it is tucked away and it’s not obvious you can even click inside this menu!
Okay, so where is this feature? Well, you should be able to see an “i” icon near the top left of the Gutenberg editor. If you click on it, it’s where you can find details about your blog post. Like the word, heading and paragraph counts.

Below these summary stats, you can see a document outline. Whilst it is handy to be able to see how your post is laid out from the top level view. What makes it even handier. Is that you can click on each of these headings. And the Gutenberg editor will take you straight to that section of your blog post.

This means you can easily navigate around your blog post by using its headings. Which can be especially useful when writing longer blog posts.
7 | Convert Google Docs To WordPress For Extra Flexibility
Did you know? You can convert Google Docs into WordPress blog posts easily. Simply by copying and pasting across into WordPress Gutenberg. Yes! It is that simple.
In fact, you’ll find that all of these copy across to WordPress Gutenberg from Google Docs without any issues:-
- Bulleted & numbered points
- Paragraphs
- Bold, italics, underlines
- Links
- Headings & Levels
What doesn’t copy across? So far it seems:-
- Images
- Fonts
- Borders
- Paragraph and heading spacing
So if you find you aren’t a fan of Gutenberg because of the whole blocks thing. You can get around it by going and writing your content in a more familiar style using Google Docs. Which is free for every Google mail user! So no extra costs or compatibility issues like Microsoft Word.
You’ll still get all the benefits of WordPress Gutenberg blocks and any future benefits too. Without having to worry about going back through all your posts. To convert posts made with the Classic editor into the WordPress Gutenberg editor. If it ever gets made redundant.
I’ve certainly found it handy to write outlines and first drafts in Google Docs. Apply some basic styling like headings, paragraphs, bold, italics, bullet points and links. And then just copy it over to WordPress Gutenberg. So I can get it ready for the final touches like images, SEO, setting link properties and so forth.
Styling like paragraph spacing, font types and sizes generally won’t copy across. But this is because of your WordPress Theme and it’s CSS take control of these. Which is definitely not a bad thing as it keeps a consistent look across your blog.

These 7 WordPress Gutenberg Features Can Boost Your Efficiency & Productivity With The New Editor
So, there we have it. 7 WordPress Gutenberg features you probably didn’t even know existed! These useful little features can have powerful benefits. As they can help you:
- Be more productive
- Navigate your content structure quickly
- Give you the flexibility to write outside WordPress Gutenberg
- Save time by recreating blocks for you
Many of these features are not obvious at first glance. And feel almost hidden. So I hope this post helped give you some insights. Into how you can make your time spent with WordPress Gutenberg. More efficient with some of these lesser-known features.
So, tell me – which of these WordPress Gutenberg features did you not know about? Are any of them surprising? Or did you find one not included here? Let me know in the comments, as I would love to hear from you!
If you found this blog post useful then please consider taking a few seconds to share it to your favorite social media platform!

“ Or little formatted paragraph blocks to add extra tips or sidenotes.” That grabbel my interest, but how did you accomplish that? I’ve been looking for says to add sidenotes, but can’t seem to manage it using gutenberg?
Hey Cura,
I do this by adding a Paragraph block in the WordPress Gutenberg editor. I add the text like “Pro Tip: Did you know you can wrap text around your images in WordPress Gutenberg?”
Then on the right side of the screen there should be a menu with all the settings for that Paragraph block. Look for the Color Settings. Which should have the option to set a background color. I usually select a background color like the light blue option and set the text to a dark blue or black color. I’ll also bold the “Pro Tip:” part. And the end result looks quite nice!
I’ve only been using Gutenberg for a few months, but where has Tip #6 been all my life (as I just scrolled to the bottom of my blog post for the millionth time)? Thank you!
Hey Rachel,
Thanks for the comment! It’s definitely handy for getting around your blog post quickly. It took me a while to even notice it was there myself.
Also, whilst not specific to the Gutenberg editor. If you need an even faster way to get to the bottom of the your blog posts. Then if you click on any white area just outside any of your Gutenberg blocks. You can also press Ctrl + End on your keyboard.
The editor will shoot all the way to the bottom of your post super fast this way 😉
I can’t seem to get text wrapping to work. Do these concepts still apply given recent WordPress updates?
Hey Bob,
You don’t really need to set text wrapping unless you want it to wrap around images.
To wrap text around your images using the WordPress Gutenberg editor simply use an image block and set it to left or right align. The editor should take care of the rest for you.
Hope this helps!