This post contains affiliate links. Which means I will make a commission at no extra cost to you should you click through and make a purchase. Read the full disclosure here.
Ever tried to write a detailed guide on something that’s based on the computer? Procedures, step-by-step guides, tutorials all take time to write. But what guide is complete without accompanying screenshots to help your audience visualize each step with you?


A comprehensive guide can require a lot of screenshots. Taking these screenshots, clipping them to the correct size, blurring sensitive information, watermarking and formatting to a reasonable file type and size. All can become very time consuming when you do it all manually and have to use various different programs for different stages.
Well, this is what this blog post aims to help optimize for you. By reducing the number of steps you have to do manually so the whole process is more productive. So you can create guides for computer-based topics, quickly and efficiently. Letting you focus more on other aspects of the guide, such as the very important actual writing of it 😉
Below I’ve reviewed 5 different tools for streamlining the process of screenshots. I’ve organised them based on what’s already available on the Windows Operating System and what I feel is most useful.
The last item on the list is the one I currently use for making my screenshots. This is just my opinion though. I feel that they all have their uses and you should experiment with different ones if the first one doesn’t work for you.
Let’s start with some of the tools already installed on your Windows PC (Mac won’t be covered here I’m afraid).
5) Windows Print Screen
Chances are you are familiar with pressing the PrtScn (Print Screen) button on your keyboard. This basically puts an image of your screen on to your clipboard.
Sounds pretty handy, don’t you think? There is one major problem with this method though. You have to manually paste this image into a separate image editing software. As well as go through the process of naming and saving the file. Assuming no further cropping or editing is required. That’s a lot of extra steps if you ask me.
What if you could cut out some of those extra steps? Think of how much time you could save when you have dozens of images to process.
If this sounds good to you, then I recommend signing up for and installing Dropbox locally on your PC. It’s free unless you need more storage space in the cloud. Which at 2GB is more than enough to temporarily store screenshots. You’ll even get an extra 500mb for signing up through this link.
And in case you have any difficulty finding the download for the desktop app, it’s here.
Once installed, there should be an icon for Dropbox in the system tray. ![]()
Click the Dropbox icon, then click the little cog in the top-right corner.
The go down to click Preferences…

The Dropbox Preferences screen will appear, with several icons along the top for different subsections.
Under General you’ll want to tick Start Dropbox on system start-up. This means it won’t forget to save any PrtScn button presses since it will always be in the background.
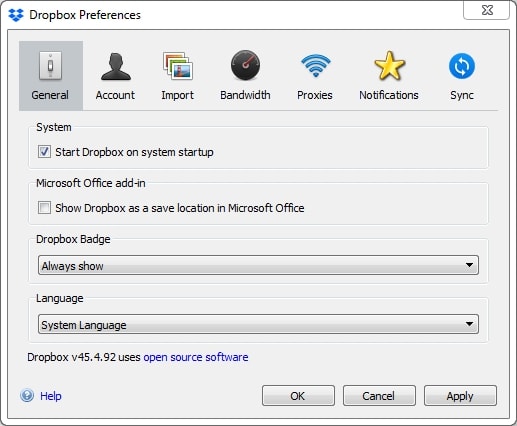
Next go to the Import section. Tick Share screenshots using Dropbox.

Click Apply and OK. Now we’re all set!
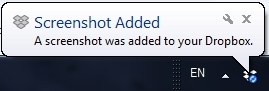
Try it out for yourself. You should get a little pop up to let you know once Dropbox has saved your screenshot.
It will save any Print Screen images to a folder called Screenshots within your Dropbox folders. It saves them as PNG using the naming convention Screenshot YYYY-MM-DD HH.MM.SS.png
Did you know you can also do a PrtScn of just 1 monitor (if you have multiple) or the selected program window you currently have open? You can do this by pressing and holding Alt when you press the PrtScn button.
Combining Dropbox with the inbuilt Windows PrtScn button is an awesome and free way to make taking screenshots 1-click only. Share on XThe disadvantages of this method are that you can only really take screenshots based on screen or window size. There’s no custom option. The second main disadvantage is that there are no options for how the file is saved. It’s just a high-quality PNG. So if you are writing a guide that is viewed on the web you might have to consider compressing or changing to JPG. Both of these mean that depending on your situation you may still need to open files into another image editing software.
Bonus!
This method of windows PrtScn + Dropbox also works as a nifty way to take in-game screenshots. So if you like making gaming guides this is also probably right up your alley. As always though test it works first before going all in. I tried it with a few of my games and all worked. But it’s not a comprehensive test of all games sadly.
4) Windows Snipping Tool
This is another tool that comes with the Windows Operating System from Vista onwards. Unlike its Print Screen counterpart though a lot of people don’t know this already exists. You can usually find it under All Programs > Accessories > Snipping Tool.
It is more advanced than Print Screen. And can be used as is, without any additional software like Dropbox. Though it’s worth noting Dropbox won’t work with this as it’s more of a point-and-click interface and doesn’t use PrtScn button.
What’s good about it compared to Print Screen is you can select more different snip sizes. Such as Free-form, Rectangular, Window and Full-screen.
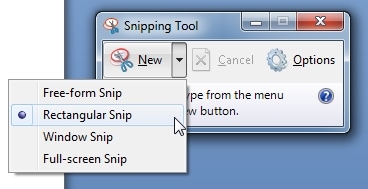
Once you’ve decided on a Snip size. You can click New and select the area you want to screenshot. A preview of what you selected will appear.
In the preview, you can use some extra tools to do some final editing before saving – Pen, Highlight or Eraser. There are also options to email the Snip. If you’re sporting the new Windows 10 on your PC, you’ll also have access to a new delay function. Which lets you set a countdown until the screenshot is snapped.
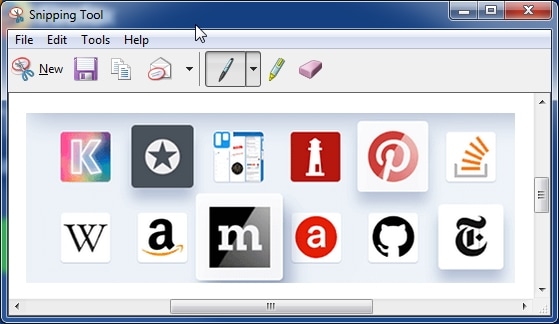
After you’ve made any final changes you can click Save. Where you get the option to set a filename and choose your file type.
That’s pretty much all there is to it. Personally, I prefer the Print Screen + Dropbox combo over this. But this option allows a lot more control at the cost of time. I think it’s more time efficient than doing it manually though.
3) Webclipper : Easy Screenshot
This one is a rather niche tool. It has general screenshot capabilities. But it is a browser add-on and is therefore restricted to taking webpage screenshots.
None of the other mentioned tools on this list can capture entire web pages even if they require scrolling. Which is primarily why I have included it. If you ever come across a situation like this where you want to snapshot a whole webpage in all its glory as an image then I recommend Webclipper : Easy Screenshot.

If you do use it for this function, then it is also worth mentioning that clips are automatically saved as PNG. The page name and timestamp will be used for the filename. And it will automatically save screenshots to your browsers Downloads folder. There aren’t many options to customize this (they are hidden at the bottom of the addon page). But again I would only use it for capturing long web pages anyways.

There are versions for Firefox, Chrome and Opera. So it nicely covers most popular browsers. Use a browser that is not supported? Let me know and perhaps I can help find something that will work with it too!
Because it is limited to a browser’s window, I would only use this for its niche ‘entire web page’ screenshot capabilities. If you want something to cover more than just the browser than I suggest trying something else on the list.
2) Snipping Tool++
Snipping Tool++ is exactly what it sounds like. A more advanced version than the default Windows one. It is a standalone software, which you will have to download and install.
If you decide to use this tool, you will have to have Java Runtime Environment installed. Not sure if you have it installed? Well, don’t worry. If you don’t have it installed, it will let you know by popping up the below error message.
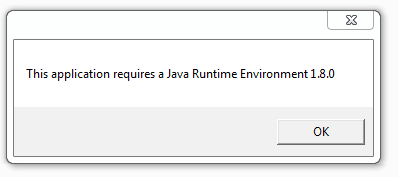
To get it installed go to Oracle’s Runtime Environment Downloads page.

Select Accept License Agreement. And then download the Windows file that ends with .exe by clicking the relevant red downward arrow. In the above screenshot, this was the file 3rd from the bottom. Once downloaded run the .exe file and this will guide you through the install. You should then be able to open Snipping Tool++ without any issues.
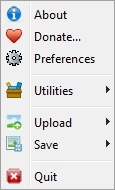
The Snipping Tool++ will appear in the icon tray as ![]() . Right-clicking it will give you the menu.
. Right-clicking it will give you the menu.
Here you can manually select the different options available. They all have key binds which you can also use when you get familiar with them. It can take some learning though and the overall interface is less user-friendly because of this in my opinion.
This software’s Preferences lets you set a default location for saved files. Change the output image quality from a scale of 0 to 100. As well as customize the key binds. There’s even an option to upload to FTP if you set it up. This gives you a lot of control over it.
You can screenshot either the screen or a user-selected portion of it. After you select something to screenshot you have some post-editing options. Like adding shapes, text, blurring or customizing with the pencil tool.

I think Snipping Tool++ is better than the original Windows version. If you are looking for more post-editing capabilities then this is perfect. However, I still think it’s lacking some options like setting the output file type.
1) Gadwin PrintScreen (Free version)
Last on the list is Gadwin PrintScreen, out of all the others this one is currently my go-to tool. It works perfectly for my screenshot workflow. I even used it to take all of the screenshots on this post, except for the internal Gadwin PrintScreen ones. Getting a screenshot tool to screenshot itself is kinda tricky XD
This is standalone software that will need to be downloaded and installed from their website. Like previous tools, it will put an icon into the icon tray.
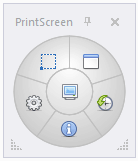 Left-clicking the icon will bring a little circle widget with clickable shortcut buttons that you can pin on top of all windows.
I personally find using the key binds easier since they are similar to just using Print Screen on its own. PrtScn will take a screenshot of the full screen, Shift + PrtScn takes one of the currently in focus window, and Ctrl + PrtScn will allow you to draw a custom box. If you forget the key binds you can just hover over the ![]() icon and it will remind you.
icon and it will remind you.
This little guy also maintains a History of screenshots you’ve taken. Just in case you need to go back to something. It will even open the file for you when you double-click any items in the History.

In the Options, you can customize key binds, turn off notifications, toggle sound effects, the widget, and set countdowns.


You can also set post editing options like showing the mouse cursor, resizing images to a set size, adding watermarks, shadows and converting to greyscale.

As well as, control whether you see a preview of the image before saving. And lots of control over the type of file that is saved. From a variety of files types like PNG, JPG, BMP. Automatic file naming or not. With the ability to customize the naming structure with things like date and time. You can also set the default folder to save files to, send via email or to a printer.

There are so many options you can customize it to suit your needs. It might be slightly overwhelming at first. But totally worth the time to figure it out.
Personally, I have the default ‘My Screen Shots’ folder setup to automatically save any screenshots using a date/time file naming convention to a JPG file type. I have preview turned off. As I don’t really need to check what I’ve snapped. It’s just extra clicks and time for me. I can then switch between the 3 different clipping modes to get exactly what I need.
This tool allows me to create a variety of screenshots for my guides without having to switch between programs. And honestly, I feel like I don’t really need to do any post-processing either. Which is a nice productivity boost!
The only thing I might have to do with these screenshots is optimizing them for the web by getting the file size as small as possible. Whilst still maintaining quality. This is the only thing this tool is missing. The ability to fine-tune the output image quality. I’m thinking this might be handled better by a tool dedicated to optimizing images though!
Overview
Now that we’ve looked at each tool. I’ve compiled an overview of each into a comparison table. In case you are still undecided or would like a quick summary of what was covered earlier in the post.
Each of these 5 screenshot tools can help make taking screenshots for writing guides less time-consuming. Boosting productivity! Share on XFor me Gadwin PrintScreen (free) wins hands down currently. It has so many features for almost any situation. I’m able to get my screenshots within 2-clicks! But I’d be interested to hear what you think!
| Features | Pros | Cons | |
| Windows Print Screen |
|
|
|
| Windows Snipping Tool |
|
|
|
| Webclipper : Easy Screenshot |
|
|
|
| Snipping Tool++ |
|
|
|
| Gadwin PrintScreen (free) |
|
|
|