This post contains affiliate links. Which means I will make a commission at no extra cost to you should you click through and make a purchase. Read the full disclosure here.

Have you ever edited your live blog?
Imagine, all you are doing is adding a simple plugin. Something you couldn’t possibly believe would cause any trouble. Only for things to go boom.
The next thing you know your blog is down. With every page of your blog showing a big fat error message to all your visitors.
If you ever edit your live blog like this. Then you are taking huge risks that could result in a massive headache. One that you’ll often end up regretting.
Even if you’ve gone through the trouble of setting up your WordPress backups. Editing your blog this way might be quick, but it’s definitely not the best way to do it.
In fact, would it surprise you to know that there is actually an easy solution to this? That can help you keep the downtime of your blog to a minimum.
What am I talking about? Well, it’s called a WordPress staging site.
Whilst, it might sound complicated and expensive. Stick with me here and you might discover. That you’ve had access to one all this time. You just never realized it!
- What Is A WordPress Staging Site?
- What Is The Purpose Of A WordPress Staging Site?
- How Are WordPress Staging Sites Different To Using Maintenance Mode?
- Why Do I Need A Staging Environment? What Are The Benefits Of WordPress Staging & Production Sites?
- WordPress Hosting With Staging – Which Hosts Can You Use?
- How Do I Create A WordPress Staging Site?
- How To Access Your Bluehost Staging Environment
- How to Make Changes Using Your WordPress Test Site
- Alternative Staging Site Tools
- Summary Of Using WordPress Staging Sites For Your Blog
What Is A WordPress Staging Site?
Not sure what a WordPress staging site is? Well, let me explain the basics.
Firstly, it is a clone or exact copy of your live blog. That is being hosted on a separate URL. (Usually a subdomain of your hosting.)
This staging site looks and works identical to your live blog. Meaning you can safely make changes to it. Without it impacting the version your audience is currently interacting with.
Yes, you might still break things on your staging site. But no one will ever know as a staging site is hidden for your audience. Unless you tell them of course 😉
In some cases, you might also hear people call this a WordPress test site or a WordPress sandbox site. As everything is all contained in an isolated website that only you have access to as an admin.
This is what many pro-bloggers do to prevent downtime with their blogs. But that doesn’t mean it has to be complicated to do as a beginner blogger. Nor does it have to be expensive either.
In fact, depending on your blog hosting. You might be surprised to find out that some plans include a free WordPress staging site. I know I was. And I am even more surprised it isn’t more heavily promoted. As it is a huge selling point.


What Is A WordPress Production Site?
When you hear about bloggers using a WordPress staging site or tools. Then you might also come across the term production site. This is the website or blog that is live for your audience. And currently being used to produce pages of content and other resources.
As a general rule of thumb, you’ll make changes on your staging site. Then once ready they can be moved to your production website.
What Is The Purpose Of A WordPress Staging Site?
WordPress maintenance is critical for every blog. Especially when it comes to keeping your blog themes and plugins updated.
It is so important for your WordPress security. As one of the biggest factors of a WordPress blog getting hacked. Is not using the latest updates for their blog.
The whole purpose of using a WP staging site. Is that even if your changes break something on the staging site. Such as applying a plugin or WordPress update. Then your live blog can still happily carry on doing its own thing. As it is all kept completely separate.
The general process is that you make your edits to your WordPress staging site. Then test to make sure everything works and looks as expected. Then when you are ready. You can migrate these changes back to your live blog. Where everything should work the same as your staging site. Meaning nothing gets broken and the update only takes a few minutes.
How Are WordPress Staging Sites Different To Using Maintenance Mode?

One method of doing maintenance or changes to your blog. Can be to use a plugin like the Under Construction plugin to display a WordPress maintenance page. While you work on your blog in the background.
This is different from a WordPress staging site. As it affects whether your audience can still use your blog while you make changes.
I mean, which would you prefer?
I know I would prefer for my readers to still be able to see, use and browse my blog. While I do any maintenance tasks in the background.
You could just make the changes without a maintenance page. So your audience can still access your blog. But then you are back to risking things going wrong and those issues being displayed to your readers too.
Which in all honesty doesn’t look very professional. And it is definitely one of the many mistakes I’ve made in the past. One that I don’t recommend you do!
So, in short, if you use a staging site you can do maintenance and make changes to your blog in the background. But your audience can still use your blog in the meantime. Sounds like a win-win situation if you ask me.
Why Do I Need A Staging Environment? What Are The Benefits Of WordPress Staging & Production Sites?
So, why should you go through these extra steps and trouble to manage a WordPress staging site for your blog? Well, here is a list of the most important benefits for your blog:
- Keep your blog updated with peace of mind as you can test all updates before making them live.
- Useful for building new blogs as well as updating established blogs too.
- Little to no downtime for your blog.
- Professional appearance as no more errors or mistakes will be seen by your audience.
- Make changes with less pressure or time constraints.
- Changes can be done whenever it is suitable for you. Rather than worrying about peak traffic times.
- Better testing since you can see everything exactly like you would if your blog was live.
Just keep in mind that using a WordPress staging site. Will involve slightly more time to implement. But your changes will be better tested. Also, you might find that it costs more depending on the tools you use or your hosting.
WordPress Hosting With Staging – Which Hosts Can You Use?

In general, staging is not included with all WordPress hosting plans. So be sure to carefully check the individual features of each plan. Before you commit to anything. If this is an important feature you are looking for.
Here’s a list of some places you can often get WordPress staging from:
- Bluehost (All packages)
- SiteGround (GrowBig & GoGeek)
- GoDaddy
- Kinsta
- WP Engine
You can also sometimes find that some premium backup plugins. Also, offer site staging as part of their packages. Like BlogVault for example.
How Do I Create A WordPress Staging Site?
One of the easiest ways to create site staging for your blog is through Bluehost. Since it is a popular platform for beginner bloggers to first start their WordPress blog. But also easily accessible and affordable. Plus all their packages include WordPress staging sites.
Meaning if you already have Bluehost or you plan to get it for your hosting. Then you already have access to the tools you need to set this up.
This process is similar to other platforms. But I have chosen to use Bluehost because it is the most widely accessible. I also love this staging site tool and currently use it myself!
How To Create A Bluehost WordPress Staging Site
Firstly, go to your WordPress dashboard. Near the top of the left side menu, there should be a Bluehost > Staging (beta) option.

If for some reason you don’t have this. It might be because you disabled or even removed this plugin. Most likely because you didn’t know what it was for and felt it wasn’t needed. After all, Bluehost just installs it by default into your WordPress dashboard. Yet they never tell you why. Or even what it can do.
If you did remove this plugin for some reason. You’ll need to go find it again in the WordPress plugins menu to reinstall it before you can proceed.
Once you’ve clicked on this menu option. Look for the Create Staging Site button and click on it.
The page will start showing a loading icon whilst Bluehost is setting everything up for you. This might take a few minutes depending on the size of your blog. For me, it was about 2-3 minutes though.
Once Bluehost has finished setting up the WordPress staging site. You’ll get a screen with further details.

Additional Options Available In The Bluehost Staging (Beta) Screen
Near the bottom of the page, you will also see two options that are useful to know about.
The first option is to clone your live blog to your staging site. Because over time if you make changes to your live blog. You might want to copy these changes back to the WordPress staging site. To ensure you are testing using the latest version of your blog.
If you’ve only just set up staging by following the steps above you won’t need to do this. As the initial setup does this automatically for you.
The second option Destroy Staging will delete and remove completely your staging site. So make sure you’ve applied any changes to your live blog first. You’ll be able to create a new staging site fresh once you’ve used this option.

How To Access Your Bluehost Staging Environment
Okay, so with those options out of the way let’s click Go To Staging Site. This will take you to the cloned version of your blog. Things should look almost identical. It will even open up to a very similar Bluehost staging page. Like the one, you were just on.
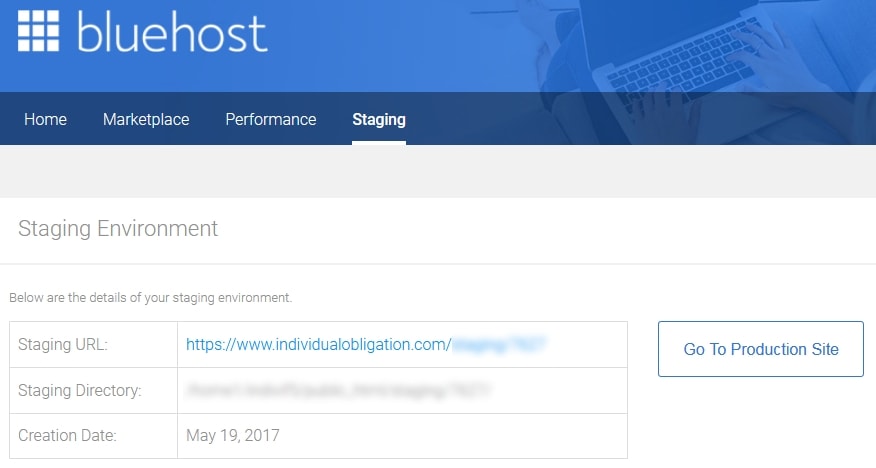
Here you’ll have an option to Go To Production Site. Which will take you back to your live blog’s WordPress dashboard. There are also 3 different options to copy your staging site with its changes back to your live blog. (More on that later.)
As well as the option to Add Restoration Points for your site staging. Which you can use to revert changes or troubleshoot problems with.

Also, if you are not sure whether you are on your live blog or the staging site. A quick way to tell is if there is a Staging Environment notice in your WordPress dashboard’s top menu. Like this:

How to Make Changes Using Your WordPress Test Site
So, now that you are on an actual staging site. What next?
Well, this is the part that is up to you. You can do everything here the exact same way as on your live blog. In fact, you’ll find that WordPress staging sites are invaluable for doing tasks like:
- Updating WordPress core.
- Adding, disabling and updating plugins.
- Making changes to your theme or changing it altogether.
- Editing your blog’s code such as files like functions.php or htaccess.
- Cleaning up excess files or the media library to reduce your blog’s overall size.
- Changing your blog layout.
- Adding new elements to your blog.
Keep in mind that a WordPress staging site is NOT a replacement for doing WordPress backups. You should always do regular backups using a plugin like UpdraftPlus. Or one of the other many backup plugins out there. Even if you have a staging site. As things can still go wrong when copying your staging site back to your live blog. Also, a staging site won’t save you from hacks or malware.
Go ahead and make whatever changes you would like to make. Then view your blog using the Staging URL from the main staging site page. Or by clicking the home icon in the top right corner of the dashboard.
How To Apply Your Changes By Migrating WordPress Staging To Production
Getting your changes from your WordPress staging site. Back to your live blog is super straightforward with Bluehost.
Once everything has been tested and checked. You can use the Bluehost plugin to migrate and push all the changes back to your live blog. Ready for your audience to see and use.
At this point, I recommend making a manual backup of your blog using your favorite backup plugin. Just in case there was something the staging site missed. In the majority of cases though, you won’t have any issues.
Then you want to navigate back to the Bluehost > Staging (beta) menu. Here you’ll want to select one of the deployment options mentioned briefly earlier. There are 3 options:
- Deploy Files Only
- Deploy Files & Database
- Deploy Database Only

In almost all situations, you’ll want to use the Deploy Files & Database option. As this is the simplest option. Unless you have a deep understanding of how the changes you’ve made. Impact on your blog’s files and databases.
For example, changing the settings of your theme. Will likely only affect your WordPress files. But as soon as you start changing images this can affect your database too.
So by using this option of Deploy Files & Database. The changes to your staging site are more likely to avoid conflicts and nothing will get missed out.
Click your preferred option and a popup will appear asking you to confirm. You’ll want to click on Yes! Let’s Deploy if you are sure you want to make the changes. This will start the process and Bluehost will take some time to copy over the changes.

Alternative Staging Site Tools
I would like to point out that there are other alternative tools. That you can use for creating WordPress staging sites. However, you should expect to have to pay for these plugins in most cases.
They are also limited in several ways. Like they might not accurately replicate your live blog’s environment. As well as being more complex to set up and use.
Some examples of these are:
The free WordPress staging site tools you get from Bluehost. Are incredibly powerful when you compare it to tools like WP Stagecoach that costs $12 per month. Which is more than hosting plans cost from Bluehost and SiteGround.
Summary Of Using WordPress Staging Sites For Your Blog

Overall, WordPress staging sites are less complicated to set up. Compared to what you may have originally thought.
I took forever to get a WordPress staging site for my own blog. Because it seemed complicated and possibly expensive to do. But this was a huge mistake as it meant I was tinkering and often breaking my blog for actual visitors. And probably annoying them at the same time. Whoops!
Instead, having a staging site like this. That comes with all Bluehost’s plans or SiteGround’s GrowBig and GoGeek plans. Meant I was able to add a WordPress staging site 100% free to my blog.
Best of all, it was a simple 1-click set up to start with. There is zero technical knowledge required to use it. Something that gives Bluehost a huge advantage over the smallest SiteGround StartUp plan. Which currently lacks any WordPress staging option.
The Value Of A WordPress Staging Site Is Underestimated

Surprisingly this feature is underpromoted when it comes to WordPress hosting plans. Even though it is a huge advantage for beginner bloggers and small business bloggers alike. As you can create a complete duplicate clone of your blog. Where you can make and test all changes safely without any downtime.
The benefits?
- Less annoyed visitors.
- Less pressure to get changes done asap.
- More uptime.
- No maintenance mode requirements.
- No loss of access to the blog for your visitors.
- Make your changes when convenient without worrying about peak traffic times
So, if uptime, reliability and professional appearance are important for your blog. Then a WordPress site staging is a must. As it can help to prevent errors, embarrassing mistakes and annoying your audience.
Also, by using your web hosting to host a staging site over plugins or a local version. You will increase the chances that things will go smoothly. As everything is in the exact same environment. And you don’t have to worry about making a mistake during the setup. As it is all done automatically for you.
So, do you have access to a WordPress hosting plan that includes a free staging site? Have you ever made changes to your live blog and risked breaking it?
If you found this blog post useful then please consider taking a few seconds to share it to your favorite social media platform!
Great article!
We are working on a similar service with geekbee.io, except that our merging solution allows us to keep the possible changes in the live site aswell, while others are working on the staging site.
Hey Peter,
Thanks for commenting. Do you perhaps have a release date set for geekbee.io yet?
Hey Lisa!
We are now only weeks away from a testable beta version, and also searching our first testers.
I can give you a notification if it is all set, or you can subscribe on geekbee.io and follow the whole process
Another excellent post about a critical subject Lisa.
Most people have no idea about having separate instances of their blogs and it’s a huge mistake as you explain. The worst thing imaginable is to work on a blog for two years and then foul something up and have to import backups…. a last resort solution itself because even if you know what you’re doing things can still be lost.
Much safer is to protect your production WordPress instance with a staged version.
Hey there,
Thanks for the comment! I agree and I definitely made this same mistake myself when I first started a blog.