This post contains affiliate links. Which means I will make a commission at no extra cost to you should you click through and make a purchase. Read the full disclosure here.
If you use GIFs on your blog to bring life to your writing. Are you aware that they can easily become heavy hitters in the file size department? This could be slowing down your page from loading and hurting your SEO. Well, fear not because there is a way to reduce GIF size!
You can reduce GIF size using this free and easy online tool. By following my exact steps, which I have detailed below. You can see exactly how I get a 520 KB GIF down to 80 KB! So, keep reading to find out more.
Ready? Let’s start then!
What Tool Should I Use To Optimize GIFs?
There are many online and offline tools for making and editing GIFs. But Ezgif.com is one of the easiest tools you can find. That is completely for free and has all the options you could possibly need to customize and optimize your GIF.
Ezgif.com has many tools in its arsenal. Including useful features like making GIFs using static images, converting Video to GIF, resizing and adding effects to GIFs. So you can truly get creative without the need for expensive tools like Photoshop.
But the features we will be focusing on here will be to reduce GIF size.
💡 Pro Tip: If you’d rather not go through the slow process of optimizing each GIF image separately and would like to nip those big JPG and PNG images at the same time. Then this tool can automate the process for you.
GIF Files Can Be Massive If Not Optimized
The base file used in this example was an 8 second video of scrolling through the new WordPress Gutenberg toolbar. This video was converted using Ezgif.com Video to GIF converter using the video’s original image size and 5 frames per second (FPS). The result was a 520 KB GIF file, even though the original video file was only 333 KB.
500 KB may not mean much. But what if I told you that my optimized homepage is just under 1 MB (1000 KB). This means that a GIF of this file size is massive. And would add an extra 50% in data size to my homepage. For a single image that lasts 8 seconds! It’s shockingly impractical to use GIFs in your web pages with these massive file sizes.
Are you using un-optimized GIFs on your webpages? If you are then consider doing a website speed test using one of these tools. Then try removing the GIF and retest to see just the amount of impact it is having.
It Is Vital You Optimize & Reduce GIF Size

Hopefully, you can now understand how important it is to reduce GIF size. So you can prevent GIFs from negatively impacting your page load and SEO.
Not optimizing your GIFs is just one of many common mistakes made on blogs and websites when it comes to images and loading speed.
GIFs are no different from the other images on your website. So you should always optimize all images, including GIFs.
So, how exactly do we optimize and reduce GIF size?
Well, let me show you:
How To Optimize & Reduce GIF Size In Ezgif.com
The first step we need to consider is, if there are any unnecessary sections of the animated image. Think about it like this, is there anything that you can crop out of the image that you don’t need to see?
Reduce GIF Size By Removing Unnecessary Pixels
In this example GIF, there is a scrollbar to the right. We really don’t need to see this in our image. So we can actually crop it out.
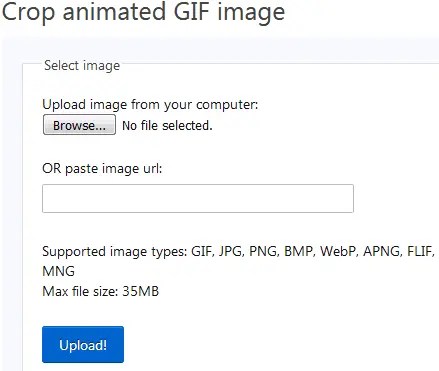
So, let’s get rid of those extra pixels. Open up Ezgif.com and click Crop from the top toolbar.

Here, you’ll need to upload an image from your computer or you can provide a URL link. Click Upload! once you’ve selected your file.
Your animated GIF will appear with a box overlay. Drag this box to fit the area of the image you want to keep. My example GIF looks like the below. Notice how the scrollbar is darker? This will be deleted once Crop image! is clicked.

I left all the other settings on the page as their defaults. Once you are happy with your selection click Crop image!
A new version of your image will appear below. Which lets you preview what changes you made. If you notice anything wrong. You can always go back to the image above and adjust the settings.
Pro Tip: A handy little summary of the new images file size will appear below the new image. You can use this to compare how much of a difference each setting makes. For the example GIF the file size decreased to 486 KB which is a 6.5% reduction.
Deleting Excess Frames
Now that we have a GIF with only the pixels we want. The next step is to remove excess frames.
Depending on how you made your GIF you may have more frames than you need. This is especially true if you created your GIF from a video.
If you did not create your images from a video then you may still want to try these steps. After all, you can try them and preview the changes. If it doesn’t look right, or if the file reduction doesn’t seem worth it then feel free to skip it.
Removing Every 4th Frame
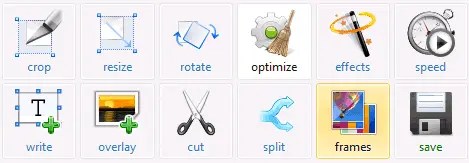
Right, so hopefully you still have the cropped GIF still open. What you may have noticed. Is that underneath there are tool options. So you can take this modified image through other options. Without having to download and upload each change. Awesome, right?
For the next steps, you want to click on GIF Optimizer. Underneath your GIF there is a drop-down list for Optimization method. Click it and select Remove every 4th frame. Then you can click on Optimize GIF!

A preview of the GIF with your changes will appear. Notice how the GIF looks very similar to the previous version. It may move faster than before, but we can adjust this later.
The important part here is to check the file size. Removing every 4th frame, I was able to reduce GIF size to 340 KB. Which is a significant reduction of 30%.
Removing Every 3rd Frame

It is possible to remove more frames, depending on your image. Under the new GIF click Optimize. But this time under the Optimization method select Remove every 3rd frame. Then click Optimize GIF!
The new GIF will further reduce GIF size. For the example, on the GIF I am using. It reduced the total GIF size to 243 KB. Which is another 28% decrease in overall file size.
This GIF will be scrolling much faster than your original. But we are going to fix that next!
Increasing The Delay Between Frames
Due to the previous steps, the amount of frames in the GIF are much lower. This means that the animation appears to run quickly in comparison to the original. To adjust for this, we can increase the delay between frames.
Again, underneath your new GIF from the prior steps. Click frames.
You will see a thumbnail of all the image frames that make up your GIF.

The example GIF at this point, has 21 frames compared to the 41 it started with.
If you scroll down below the frame thumbnails. There are settings for Delay time. With removing all 3rd and 4th frames I would suggest taking the default delay from under the GIF frames (for me this was 20) and multiply it by 2 – 4 depending on your preferences. I decided to use a delay of 80.
It’s worth noting at this point, that the exact settings you’ll use will vary a lot depending on your image. So if increasing the time delay makes things run too clunky try lowering your delay to make things smoother.
The reason we use the frames delay rather than the GIF speed setting. Is that it generally adds back in those frames we just deleted increasing the file size.
But don’t panic if adding a delay here also increases your GIF size as the next steps will help get things better compressed.
For example – I’ve played around with 4MB GIFs that have doubled to 8MB here. But after following with the rest of this tutorial I still ended up with a 1.3MB GIF.
That’s an amazing 67.5% decrease in file size using Ezgif’s tools!
After this step your GIF animation should now run more like the original.
Reduce GIF Size By Optimizing Transparency
Next, let’s get your GIF image file size way down. To do this we need to head back to Optimize by clicking the icon under our new GIF.

Scroll to below the GIF and change the Optimization method to Optimize Transparency, leave the Fuzz % at 3. And then click Optimize GIF!

There will be no noticeable difference in the resulting image. But there should be a substantial reduction in file size. My example file went down to 172 KB which is another 42% reduction.
Removing Excess Colors
Click Optimize again. And set the Optimization method to Color Reduction + dither. Change Reduce colors to 64 before clicking on Optimize GIF!

This shaved off another 37%, to reduce GIF size to 108 KB. Without any noticeable change in the image.
(Depending on your image, you can try increasing or lowering this value to suit your needs.)
Lossy Compression
Finally, let’s run it through one more Optimize. Change the Optimization method to Lossy GIF and then depending on your preferences you can compress between 60 and 200. Which yields 20-30% more in reduced GIF size.
Pro Tip: Start at 200 for Lossy Compression to check the final result. If you’re not happy with the quality you can always go back and work your way down from 200 until you get the right balance of compression vs image quality.
At the maximum 200 compression, with all the other previous steps. The end result GIF was 77 KB. Here’s what the final result looks like.
The End Result To Reduce GIF Size
Here’s what important points we can take away from these results:
GIF Optimization Can Yield Massive Savings

From 520 KB (the original GIF size) to 77 KB using the method I outlined above resulted in a total reduction of 443 KB. This makes the optimized GIF 85% smaller than the original.
The amount of savings you can get by optimizing your GIFs is huge. The 443 KB saved in this example GIF is almost the same as halving my homepage’s total file size.
By using the free online tool Ezgif.com, you can bring the benefits of GIFs to your blog posts without heavily impacting on page load speed or hurting our Search Engine Optimization (SEO).
Overall, with such dramatic savings – the time spent optimizing your GIFs this way is well worth the effort. But if you use animated GIF images often this process could be rather tedious. In which case tools like this might be an optimal compromise.
You Should Use GIFs Only When It Makes Sense
Despite the savings of optimizing your GIF images. It doesn’t mean that you can go crazy with using them. Why? Because they are still much larger than other optimized images such as JPG and PNG images. You can discover how to go about reducing image sizes with this guide.
For example, most of my optimized images range between 10-30 KB. Making this GIF at 77 KB still 2-3 times larger than a normal image.
With this in mind, GIFs are versatile tools, which we can use to help bring life to our writing. But they are best used when trying to help readers visualize a topic that is complicated to explain or demonstrate with only text.
Take for example the Gutenberg GIF we optimized in this post. Trying to describe the sidebar bit by bit would take many words. And at the end, chances are the reader might not visualize it the way you intend them to.
By using an animated GIF, you can use fewer words to describe. Meaning you can be clear and concise with your writing. Whilst still providing readers a clear visual. As an added bonus, you respect your own time and your readers by avoiding excess words. While the image can be understood more rapidly.
Results Will Vary For Your GIF Optimization
Just as optimizing images can vary for JPG and PNG. So can optimizing GIFs. The methods I’ve shown you will give you a solid understanding of how you can go about reducing the file size of your own GIFs.
But as different GIFs have different frames, colors and pixels etc. All of which can change which settings work best.
This means that none of these savings are guaranteed. So, you may have to play around with the settings provided here. If you do not get the results you want first time.