This post contains affiliate links. Which means I will make a commission at no extra cost to you should you click through and make a purchase. Read the full disclosure here.

There is nothing like the feeling of getting positive feedback on your blog posts through your WordPress comments.
Blog comments can be an invaluable insight into how well your content meets your visitors’ expectations. As well as another way to interact and engage with them.
But you might be wondering about one of the many questions that come up about WordPress comments. Like:
- What are WordPress comments + how do they work?
- Are there advantages or disadvantages to enabling comments in WordPress?
- How can you enable comments in WordPress or even disable them?
- What settings can be used to customize them?
- How can you moderate comments and prevent spam?
- + Many other questions
Let’s take an in-depth look at what WordPress comments are all about. So you can get the most out of them for your blog and avoid many of the common issues that can appear.
- What Are WordPress Comments?
- Why Enable WordPress Comments?
- Why Some People Disable WordPress Comments
- 4 Methods To Enable Comments In WordPress
- How To Optimize & Configure Your WordPress Comments
- Customize How Comments Are Displayed In WordPress
- Comment Moderation
- WordPress Comments & Dealing With Spam
- Comment Moderation & Comment Blacklist
- How To Prevent Spam Automatically With Antispam WordPress Plugins
- Disabling WordPress Comments
- Alternative Comments Systems To The Default WordPress Enabled Comments
- Comments & Blog Speed
- Quick Recap On How To Enable Comments In WordPress, Disable + Optimize Them
What Are WordPress Comments?
WordPress comments are the system built into the core of every WordPress blog. That allows your audience to leave messages on individual blog posts. That are publicly viewable. You can also use it yourself to respond to messages.
This makes adding a comment section to your WordPress blog extremely easy. Without the need to add an additional plugin.
Although there are many useful WordPress plugins out there. That can improve upon the basic system in place.
WordPress comments are enabled by default. Although some themes might decide not to display it.
📌 In a rush? Pin this post to your Blogging or WordPress board to read it later! 📌


Why Enable WordPress Comments?
Getting comments on your WordPress blog can come with many positive benefits. Such as:
- Visitors can add valuable insights
- You can get more feedback on your content
- Visitors might point out mistakes which you can fix to improve your content
- Google values content with comments so they can benefit your SEO if they are meaningful.
- Visitors will be more engaged + feel like their views are valued and heard.
- Comments can act as social proof
- Responding to comments promptly shows that you care + your blog is active
- You can discover common questions which can inspire new blog content
- You can learn more about your audience.
Why Some People Disable WordPress Comments

Like all things though, enabling comments in WordPress can have disadvantages. Including:
- All blogs can suffer from spam. Even from day 1.
- You need to moderate comments for spam + malicious behaviors
- Comments can be time-consuming to respond to if you get many regularly.
4 Methods To Enable Comments In WordPress
There are a few different ways to enable comments on WordPress. Depending on whether you want comments enabled site-wide. Or just for specific posts or pages.
For Enabling Site-Wide Commenting In WordPress
If you want to enable WordPress comments on all blog posts. Go to Settings > Discussion.
Then under the Default post settings. Tick Allow people to post comments on new posts.

This will enable comments in WordPress but only for any new blog posts you create.
To add comments to already published content. You’ll need to also use one of the following methods as well.
How To Enable WordPress Comments For Single Pages
To enable comments in WordPress for single/individual pages. You’ll need to be in the WordPress Gutenberg Editor. Or the Classic Editor for the particular blog post you want to enable comments on.
Find the Discussion box on the right-hand menu and tick the option to Allow comments.

If this option isn’t available then you might need to click on Screen Options and tick the box for Discussion.
For blog posts that are already published. You’ll need to click Update to republish your post to enable commenting.
How To Enable WordPress Comments For Multiple Specific Blog Posts (Not Site-Wide)
For adding commenting on multiple posts and pages. But not going completely site-wide.
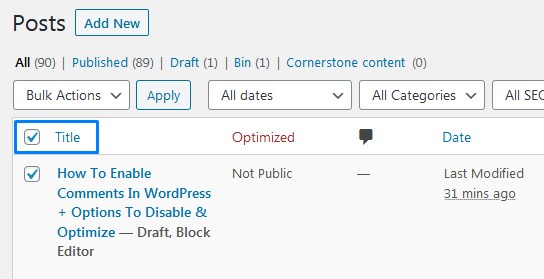
Go to the All Posts or All Pages screen. Tick the box next to the blog posts you want to enable comments on.
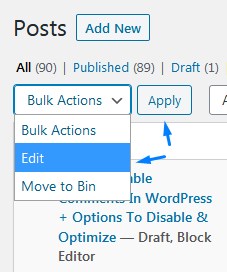
Then from the Bulk Actions dropdown select Edit > Apply. You should then be able to select Allow from the Comments dropdown box.
Finally, click Update to save your changes.

The Differences Between Enabling Comments On Posts & Pages in WordPress
By default comments are disabled on WordPress pages and usually enabled on posts.
So, the easiest way to ensure comments are enabled on pages. Is to go the Pages > All Pages screen in your WordPress dashboard.
There you can use the Bulk Actions option to select, edit and allow the pages to use commenting. The method is exactly the same as the one for bulk editing your blog posts.
How To Optimize & Configure Your WordPress Comments
Okay, so when you first enable your WordPress comments. You will want to configure your discussion settings.
So, to start with go to Settings > Discussion from the WordPress dashboard.
Here untick the options for:
- Attempt to notify any blogs linked to from the post
- Allow link notifications from other blogs (pingbacks and trackbacks) on new posts
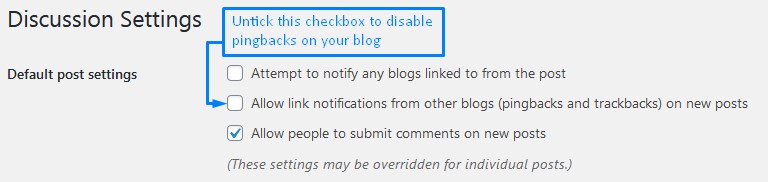
Whilst enabling these settings might seem like a good idea. More often than not these days they are used by spammers. So, this is why I recommend keeping them disabled.
As previously mentioned. Ticking the option to Allow people to post comments on new articles. Will allow commenting on all new blog posts and pages you create going forward.
You can override this setting on a post by post basis. By changing the Discussion options for the post. While inside the WordPress Gutenberg Editor or the Classic Editor.
Next, let’s look at the options under Other comment settings that are on the same screen:
Comment Author Must Fill Out Name And Email
You can enable this to prevent anonymous comments. And encourage your audience to be open about commenting.

Though this won’t prevent people from using fake names or email addresses. This option is worth enabling.
Users Must Be Registered And Logged In To Comment
With this option ticked. Only people registered with your blog and logged in can post comments.

I like to combine this with Jetpack’s comment login extension. As it allows people to log in using accounts they likely already have. Such as Facebook, Google and Twitter.
Automatically Close Comments On Articles Older Than __ Days
If you only want your visitors to comment on your recent posts. Then you can set a limit for how long the comment section is open in WordPress.

The default setting will set this at 14 days. Meaning once your blog post has been published for more than 14 days. Your visitors will no longer be able to comment.
I’d avoid using the setting as you can never tell when someone will decide to comment. Especially if your blog posts are evergreen or don’t have a specific time-frame where they are relevant.
Customize How Comments Are Displayed In WordPress
As a general rule of thumb. Your WordPress theme will control most of the style and colors of your blog’s comment section.
However, there are some options on this screen. That you can use to add small amounts of customization.
Enable Threaded (Nested) Comments __ Levels Deep
This setting allows visitors to reply to one another or for you to reply to a comment. So that they can be shown nested or indented underneath the original comment.
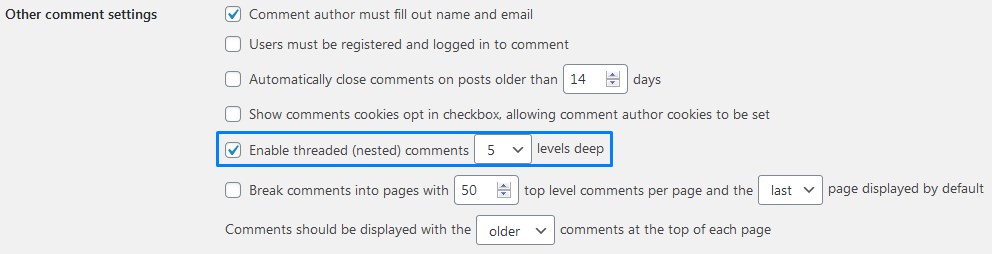
Overall, this option limits how many levels down this can go. Usually, 3 levels should be enough in most cases.
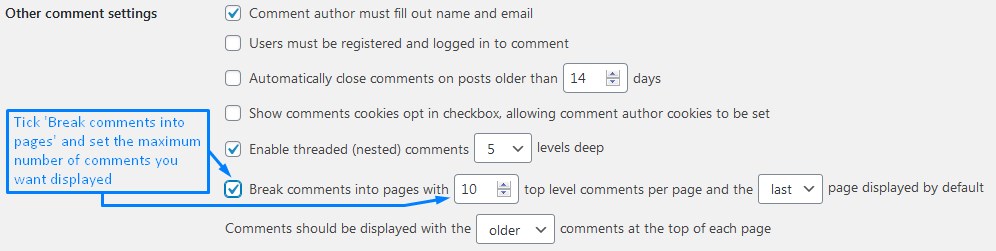
Break Comments Into Pages With __ Top Level Comments Per Page And The ____ Page Displayed By Default
These options let you adjust how your comments are ordered. Whether you prefer to have the most recent comments at the top or the oldest.

You can also set a limit for how many comments are shown. Because sometimes if you have lots of comments. You may want to limit the comments shown per page. As this can help reduce the impact on your blog speed.
I have this set to 10 comments per page and the last page displayed by default.
Comments Should Be Displayed With The ____ Comments At The Top Of Each Page
This sets whether older or newer comments should be at the top of each page.

The option you choose is a matter of preference. But I prefer to have the newest comments at the top. So other visitors can see the latest comments, questions and responses.
Avatars
If you continue to scroll down the Settings > Discussion screen. (We’ll cover the comment moderation and blacklist later.)
There will be options related to showing avatars on your blog.
Use these settings to set what images are used next to users’ comments.
You should consider what the maximum rating of avatars shown should be. As this can be used to prevent possibly offensive avatars being used.
You can also set a default avatar for anyone who hasn’t set one when commenting. These are down to your own personal preferences.
Comment Moderation
With WordPress comments enabled on your blog. You will eventually start getting comments posted. This is when you’ll need to consider how you want to moderate them. As they are an important part of your WordPress maintenance.
So, to start with. There are a few places where you can view submitted comments.
Using The WordPress Dashboard Activity To Moderate Comments
Including the WordPress dashboard’s Activity box. That will show all recently submitted comments.
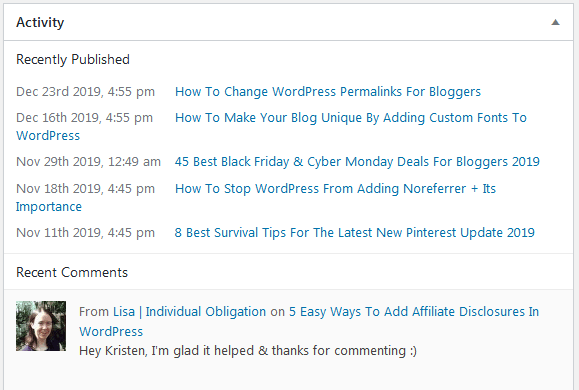
Here you can hover over any comment for quick moderation options.
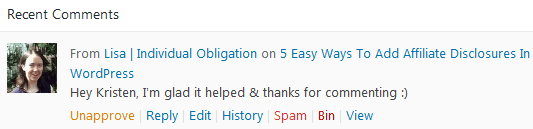
If the comment was held for approval. You can quickly click Approve so that it can be published on your blog. If it hasn’t already. You can also use the options to reply, edit, move to spam, bin or view the comment.
A useful WordPress tip I have found is to have this WordPress dashboard screen set as a shortcut in my bookmarks. So whenever I log in I can see the activity box straightaway.
Related: Find 21 more top WordPress tips and tricks here.
Using The Comments Menu To Moderate Comments
But it is worth noting that you can also see when new comments are submitted. Within the top toolbar as a number next to the comments icon. Which can be seen from any page of your admin dashboard.

If you want to view and moderate all the WordPress comments on your blog. Then there are further tasks you can do from the Comments menu in WordPress.
Every single comment on your blog can be found here. Each comment gives details. Such as:
- Username
- Blog URL
- IP address
- Time submitted
- Comment text
- + Which blog post the comment was responding to
The comments each have their own shortcut options too. Such as approve, reply, quick edit, edit, spam, and trash.
Email Notifications To Get Emailed Whenever A New Comment Is Added
Did you know? You can set up notifications to email you whenever someone comments on your blog.
Whether you enable this might depend on your workflow and the number of comments that you get.
As if you get many you might not want them all sent to your email address. Unless you set up an account just for dealing with them.
If you do want to use this feature. Then you’ll need to go to Settings > Discussion again. Here under the section for Email me whenever.

You can tick the options depending on your preferences. For WordPress to send you an email when:
- Anyone posts a comment
- A comment is held for moderation
Overall, this can be a simple way to keep tabs on when people comment or reply. Without needing to check your individual blog posts. Or even log in to your WordPress dashboard.
I don’t know about you. But I check my emails more frequently than the WordPress dashboard.
Because I mostly only need to login to the WordPress dashboard when I am writing new blog posts. Which honestly isn’t every day.
WordPress Comments & Dealing With Spam
Back at the beginning of this blog post. I mentioned that one of the disadvantages of enabling comments in WordPress was spam.
I want to cover some tips and tricks for dealing with spam. So you can enjoy the benefits of getting comments on your blog. Without having to deal with tons of spam.
Firstly, under the Settings > Discussion menu. There are a few options we can use to prevent spam comments from appearing on the live side of your blog.
Comment Must Be Manually Approved
If you tick this box. Every comment submitted will need to be manually approved by you before they appear on your blog.

Whilst this will give you complete control over what is shown on your blog. It can become tiresome, repetitive and time-consuming.
I leave this unticked myself. As there are far better methods to prevent spam comments. Such as Akismet or Antispam Bee. But more on these soon though.
Comment Author Must Have A Previously Approved Comment
This option can reduce the amount of work you have to do. If you have the previous option enabled.

As enabling it will automatically approve any comments by visitors. Who you have already approved on a separate occasion.
Meaning manual comment approval will be more on a person by person basis. Rather than comment by comment.
Hold A Comment In The Queue If It Contains _____ Links
Under the Comment Moderation section. This setting will automatically hold all comments for manual approval. If they have a certain number of links within them.
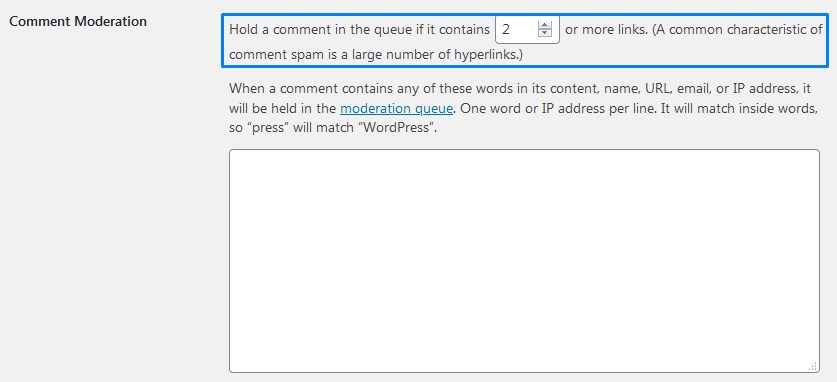
The default suggestion is to set this to 2 links. But I usually set this to hold any comment with links. Even if it is just one.
Because generally, comments shouldn’t contain links at all. They are usually either feedback or a question.
Also, based on this. I would rather manually check all links before they are published in a comment. This way I can make sure they are safe before any other visitors come across it.
So, by enabling this option there’s a good chance it will prevent a fair amount of spam.
Comment Moderation & Comment Blacklist
The last two big white boxes under Comment Moderation and Comment Blacklist. You can use to block comments that use certain words or are from specific IP addresses.

Again, whilst you can adjust these settings manually yourself. Using an anti-spam plugin like Akismet or Antispam Bee is far more efficient. Since they are able to collate data from thousands of different sources.
How To Prevent Spam Automatically With Antispam WordPress Plugins
If spam on your WordPress blog is a major concern for you. That is potentially holding you back from enabling comments on your blog.
Then it is worth noting that there are several advanced WordPress plugins. That makes combating spam comments a breeze.
Keep in mind though that these plugins are just machines. Meaning sometimes they can get things wrong. So you may sometimes find non-spam comments marked as spam and vice versa.
This is why it is critical to still moderate your comments. Especially those in your spam folder.
Akismet
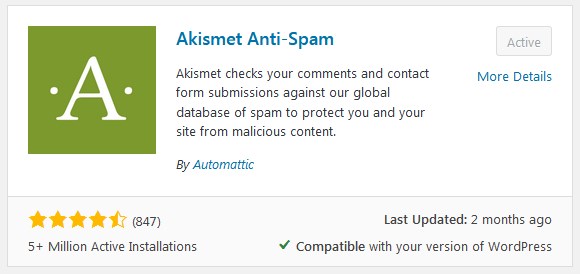
Akismet is a powerful WordPress plugin. That can actually come pre-installed along with Jetpack.
This platform uses advanced filters to prevent spam from being published. It does this by analyzing information on thousands of comments. Not just from your blog but others out there.
Using this information. Along with feedback on whether comments were marked as spam or not. Akismet can come up with clever filters to catch out spammers.
If you plan to use Akismet on your blog make sure you follow these instructions. As the default settings could result in legit comments being deleted. Ouch!
Antispam Bee

Antispam Bee is comparable to Akismet. But it is completely free even for commercial websites.
Whilst it doesn’t use the same network of information to build its filters. It is still highly accurate and offers more customization options than Akismet.
Not sure about the differences between Akismet and antispam bee? Click here to see the comparison.
WPBruiser

The WPBruiser plugin offers a slightly different solution to both Antispam Bee and Akismet. In that, it prevents spam comments and form submissions ever reaching your blog.
This means that comments aren’t filtered so that spam comments will end up in your spam folder to moderate.
Instead, WPBruiser removes any spam automatically. So you never have to see or deal with the spam directly.
However, keep in mind you should fully test this plugin using their test mode. To make sure you are not getting false positives. Because if they do happen you won’t be able to manually restore and approve them.
Disabling WordPress Comments
Despite the many benefits of WordPress comments. Some bloggers do decide to disable their comments section.
Whilst I encourage you to focus on using tools instead. Like Akismet and Antispam Bee to keep comment moderation simple and fast.
Sometimes you might find that you need to focus on other things instead because of limited time.
So if you decide to disable your WordPress comments how do you go about doing this?
To start with, you’ll want to go to Settings > Discussion. Here untick the option to Allow comments on new blog posts.
Then you’ll want to go to your Posts > All Posts screen.
Expand your view to show all your blog posts. By clicking on the Screen Options tab at the top of the screen.

Then change the Number of items per page to something higher than your total number of blog posts. Before clicking Apply.

Then select all your already published posts with the top tick box in the table header.
Next click the Bulk Actions dropdown box to select Edit and then click Apply.
Once the bulk editing box appears there should be the option to change the Comments dropdown box to Do not allow.
Then click Update.

You should repeat this exact same process for your pages. By using the Pages > All Pages screen.
Overall, doing all this manually is a bit cumbersome. In which case you might want to simplify the process by using a plugin like Disable Comments.

All you need to do is install this plugin. It will then completely disable WordPress comments on everything. As well as remove any references to it within the dashboard.
You should only use this solution if you want to disable comments on your blog site-wide though.
Alternative Comments Systems To The Default WordPress Enabled Comments
So far I’ve talked exclusively about using the built-in WordPress comments system.
But you can actually go one step further and use a third-party commenting system.
These can either build on top of the default WordPress comments. Or provide you with a completely separate system altogether.
Here’s some popular ideas you can checkout:
Comments & Blog Speed
Now, one last thing I want to cover. Is how blog comments can affect your blog speed.
Because comments add additional data and requests to your blog posts.
This means that popular posts can get dozens and even hundreds of comments. Can potentially slow down your blog.
So what can you do to prevent comments on your blog from grinding it to a turtle pace?
Well, one of the best ways to reduce the slow down that comments have on your blog. Is to limit how many comments are shown initially.
To do this you can go to the Settings > Discussion screen. And change the value for Break comments into pages with __ top level comments per page.
I aim for 10 comments per page. But you can experiment with some speed testing tools. To find the right balance for yourself.
Other options you could consider involve using a Lazy Load plugin for your comments.
Or using an alternative WordPress comments system to the default one. As sometimes they host all the resources externally to your blog. Reducing the load on your own blog.
Quick Recap On How To Enable Comments In WordPress, Disable + Optimize Them

Phew! That was a huge chunk to cover just on the topic of enabling comments in WordPress!
It’s always surprising how a seemingly small topic. Can involve so many different considerations, tips and mini tutorials.
WordPress comments can be extremely beneficial to your blog and I urge you to consider using them. As they are an easy way to keep in touch with your readers and get feedback.
If you are concerned about spam. Then there are plenty of tips here you can use to tackle these. So you don’t spend long periods of time trying to moderate them.
Lastly, keep an eye on any blog posts that get many comments. As you may want to consider taking steps to ensure they do not slow down your blog.
Now, what will your comment setup look like on your WordPress blog? Will you be using a combination of the tips and tricks here to find the perfect commenting system.
Or will you be opting to disable your comments instead? Let me know your thoughts and ideas below:
📌 Enjoyed this post? Then pin this post to your best Blogging or WordPress tips board! 📌