This post contains affiliate links. Which means I will make a commission at no extra cost to you should you click through and make a purchase. Read the full disclosure here.
Have you ever made a massive blog images mistake, that you’ve regretted? That you spent ages fixing because of the serious impact it was having on your blog?
When I first started out. I had no idea about the impact images and their uncompressed sizes. Could have on my blog’s loading speed. And even when I did finally figure it out. I blindly believed different compression tools. That would always state they were the best at compressing my images.
Only to discover, they weren’t quite as good as they said.
Which sucked, because it was a huge time sink to go back and optimize them with a tool. That could get me better results. Eventually, at some point. I did a massive comparison of a bunch of tools. And was finally able to make an unbiased and properly informed decision.
Now, as a new blogger, you should have gone through the process of starting a WordPress blog from scratch. Before moving on to how to write your first blog post. If you haven’t done either of these, I strongly suggest checking them out first!
New Bloggers Need To Watch Out For These Image Mistakes
Okay, so when writing your first blog post. You’ve likely briefly gone over the idea of adding images to your blog posts. Well, this blog post aims to specifically tackle this aspect of your blog post in more detail. By focusing on the mistakes you want to avoid while adding images to your WordPress blog.
So you can avoid making the same mistakes I did. And hopefully, avoid all that time I ended up spending to go back and re-optimize my images. And more!
Also, whilst most of the points here can also apply to other blogging platforms. This blog post is specifically written with a WordPress.org blog in mind.
But before we get into these blog image mistakes. First, let’s take a look at why it is important to use blog images in the first place.


Why Are Blog Images Important?
Did you know? Blog images have an important role to play in our blog posts. They are not just there to make things “look good”!
There are many important benefits of using images in your blog posts. Including:-
- Increased engagement
- A boost to shares on Social Media
- They help explain or demonstrate information related to the blog post
- Make your posts more memorable
- Can be used to evoke emotions
- Break up text to keep readers interested and avoid boring them. Or worse putting them off with such big and intimidating blocks of text.
- Add additional SEO benefits when images are used correctly and not keyword stuffed
Now, that you can see why blog images are so important. Let’s take a look at the mistakes you want to avoid with your images.
Mistake #1 | Your Blog Images Are Not Cropped Effectively
Okay, so let’s start off with one of the first things you need to think about. Cropping your blog images.
When you pick an image for your blog. Are you cropping it to remove any excess parts of the image that are not needed? Think of things like whitespace around the image which isn’t needed. Or what the focus point of the image is.
Whilst what is effective cropping of blog images, will differ from image to image. Here’s an example of what to look out for.
Here, I’ve used a screenshot of a box in WordPress. Which is better cropped, do you think?


Clearly, the 2nd one is better because the excess white space and box size is removed.
Whilst this might be down to preference. In this example, the rest of the image that was cropped out. Doesn’t add any extra information or value to the image. So, cropping it out is optimal. As these extra pixels are simply wasting resources. By costing you space on your blog’s server and could add to the overall loading time of your blog too.
Basically fewer pixels = a faster blog. And faster is always good for your SEO, keeping readers on your blog longer and overall traffic.
Mistake #2 | Your Images Are Not Resized To Their Actual Display Size
This blog images mistake is similar to my previous point. In that, this mistake will cost you in terms of extra pixels which are using up your blog resources.
Specifically, in this case. You want to resize your images to the size you want to display them on your blog.
For example, the featured images on the front page of my blog are 400×400 px in size. This is information my Theme’s documentation told me. And will vary from Theme to Theme.
But, my point is. That the images I use for these featured images should be resized to 400×400 px. Using software like Photoshop, IrfanView or when setting a graphic size in Canva.
If I instead created my featured images at 800×800 px instead. Whilst these images would be usable and look similar to the smaller resized images. Because your Theme would do some extra work to scale the image for you.
The thing is, this 800×800 px image would be double the file size. Compared to if you resized it to the correct 400x400px size.
Think about it. If you multiply this by every image you have on a blog post. And then every blog post you have published on your blog. Things add up fast. And your blog becomes slower and a real resource hog.
In short, you are not doing anyone any favours by not resizing your images.
Mistake #3 | You Haven’t Compressed Your Blog Images At All

After looking at the mistakes of not cropping or resizing your blog images. The next common mistake that beginner bloggers make. Is that they don’t compress their blog images at all.
Not compressing your blog images can be a major culprit for slowing down your blog.
Why? Because even though you’ve removed a lot of extra bloat by removing unnecessary pixels. You can still reduce your image file sizes by about 50%+ depending on your settings.
Your blog might have 1000’s of images as it grows. And reducing all those images by 50% in size. Is a huge saving in resources. As it will speed up your blogs load time and help you avoid running out of server space. It will even help keep your backup files small too. So you can squeeze more backups onto your free storage options. Like if you are using UpdraftPlus with Google Drive.
This means every single image you upload should be optimized! No excuses.
And the easiest way to do this. Is to use some image optimization software or better yet a WordPress plugin. To do the compressing for you.
But before you run off to go find an image compression tool for your blog images. You’ll want to check out my next point first.
Mistake #4 | Your Image Compression Tool Doesn’t Get You The Best Results
Okay, so compressing your blog images are important. And if you’ve not made the previous mistake. Then you are likely making this mistake instead.
Simply because not all image optimization tools are created equally. And it can take trial and error to figure out the optimal setup for you.
Luckily for you though. I’ve done some extensive testing for you. And I’ve come up with an optimal free software tool for compression. If you prefer to use this type of tool to compress your blog images manually.
Or if you want to go down the WordPress plugin route to automate your images. Then this blog post has compared all the top popular tools. And compared all the different compression rates. So you can clearly see which tool does actually compress the best.
Based on these results. I recommend the following tools for compressing your blog images:
- ShortPixel WordPress Plugin
- TinyPNG (Both WordPress plugin & web versions)
- EWWW WordPress Plugin
- IrfanView
- GIMP
- Photoshop
Remember! When using desktop software to save images for your blog you want to make sure to use the Save for web option.
The Best Image Compression Tools & What To Avoid
In addition, I would suggest avoiding the WordPress plugins Smush (free version) and Kraken.io. As the compression of both of these tools is poor, compared to the options listed above.
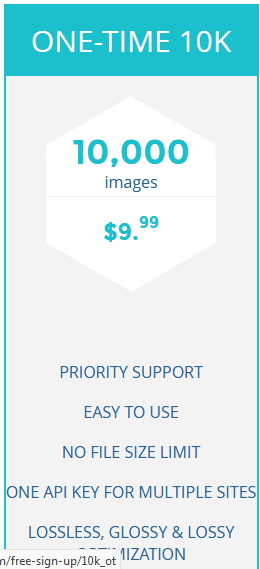
Both ShortPixel and TinyPNG are optimal options you can consider. As they both offer WordPress plugins. Which you can use to 100% automate your compression. Including a free monthly allowance to compress your blog images with.
So when you first start out. You likely won’t have to pay anything. Whilst still getting a superior compression to image quality ratio. And even if you do find yourself needing more than the free monthly allowance. Extra credits are extremely cheap and ensure you are only paying for what you actually use.
For example, with ShortPixel you can get 10,000 image credits for $9.99 using their one-time plan. That’s as low as $0.01 per 10 images!
Mistake #5 | Not Using Any Or Enough Images In Your Blog Posts
With the extra effort required for adding images to your blog posts. Such as cropping, resizing and optimizing. You might be tempted to skip out on adding images altogether. After all, it all sounds like a lot of effort, right?
The thing is not using any images or very few. Is another blog images mistake you want to avoid.
Why? Because as I mentioned at the start, blog images are important. And whilst they require effort. They do bring many benefits with them too. Like improving your audience’s engagement with your content. As well as improving how easy it is to understand your blog posts. If you use your images to help explain your points.
If you skip out on images then you are missing out on all these benefits!
In short, always try to include images in your blog posts and the more relevant they are the better. There are no set rules with how many images are enough. So you’ll need to judge for yourself how many to use in your blog posts.
Mistake #6 | You Are Using Copyrighted Images On Your Blog
Can I use images I find in Google? Is a common question new bloggers ask about.
The answer is almost always no. As they are more than likely copyrighted images. Unless specifically stated as public domain.
This mistake can have serious consequences. So make sure you do not use copyrighted images without permission!
Instead, make sure what images you do use. Are stock images whose’s rules you are following carefully. Keeping in mind that rules can differ depending on the source. You can also consider public domain images. Or images you have taken yourself.
If you ignore this mistake you could end up with a hefty fine like this blogger did.
Mistake #7 | You Are Using Low-Quality Images
Another common mistake that can sometimes happen. When trying to juggle all the previous issues. Is that you end up using low-quality images on your blog.
Again, this is subjective. But you should take a long hard look at your blog and think to yourself.
If this image was on another website I was visiting. How would I view it?
Would you notice the image quality? Would the image make you think the blog is low quality?
These are all important things to consider. Especially, when it comes to picking your images and optimizing them. As there can be a fine balance been compression and pixelated images.
Mistake #8 | You Struggle To Find Images For Your Blog

Okay, so previously I’ve explained about not using copyright images. And many other common mistakes.
Now you might be thinking:
How can I avoid using copyrighted images and make sure the image is of high quality. On top of all the other things here?!
I suck with using a camera!
I simply don’t have the time and resources to do it myself.
After all, all this image business, sounds like a lot doesn’t it?
Don’t worry though. I’ve been there too. And well, it’s easier than you might think. Once you’ve found some amazing resources to easily find images!
In fact, there are actually tons of places to find stock images. And here are a few of my favourites.
Mistake #9 | Not Renaming Your Images With Meaningful Names
Another key point you could be missing out on. Is making sure to name your image files with something meaningful.
If you are making the mistake of leaving your images as the default D9002.JPG or something similar. Then you are missing out on some serious SEO benefits. That you could gain from describing your image and including some important keywords.
Like all things though. Do this in moderation. Don’t keyword stuff the filename of your images. Instead, just include 1 or 2 keywords if they are relevant for explaining what the image is.
Mistake #10 | Your Blog Images Are Missing Alt Text

Here’s another common blog images mistake that bloggers often make. Your images should have alt text descriptions!
It’s not uncommon for the alt text of images to be used incorrectly or simply ignored altogether. That could cost you tons of time later down the road. When you have to go back through 1000’s of blog images. To add in all those missing alt text attributes to your images.
So, how do you avoid making this mistake?
Well, firstly the alt text of images should be used to describe what the image is about.
Secondly, you should make sure to always fill these in. So, whenever you upload images to your WordPress media library. Go through them and add in some descriptive alt text.
Whilst it might be suggested to include keywords in your alt tags. To help boost your blog SEO. You should try to keep the alt text meaningful to the image. Again, do not keyword stuff!
Mistake #11 | Wasting Time Trying To Wrap Text Around Your Images
Finally, the last thing I want you to consider is this:
Wrapping text around your images or the time spent trying to figure out how to do this. Especially in things like the new WordPress Gutenberg editor. Is often time wasted.
Because while wrapping text around your images might look professional and stylish. It generally doesn’t adapt well to mobile device screens.
I’ve seen it on many occasions where an image wraps neatly on the desktop version of my blog. But then when opening it on my smartphone. It leads to a line of single letters down the left or right side of that image. Which makes things look terrible and difficult to read.
Just like this:

It looks terrible, right?
So my suggestion to you – is to simply focus on keeping all your images centred! Because centred images don’t suffer from this problem.
Save Yourself Time & Start Avoiding These Mistakes With Your Blog Images
So, there you have it!
The 11 big mistakes bloggers make with their blog images on WordPress.
You’ll want to avoid making as many of these mistakes as possible. As some can have dire consequences. Like getting fined for using copyrighted images on your blog.
Others can result in large time investments to fix the longer you leave them. So, if you’ve realized you are making any of these blog image mistakes. The sooner you fix them the less time you’ll need to spend to fix them later.
So, don’t leave it until later to fix these mistakes. Get them fixed today! Your blog and its traffic will thank you for it.
Now, over to you – Which of these mistakes have you made on your WordPress blog? Why don’t you let me know in the comments! (I know I’ve fallen for tools that have promised the best image compression rates. Only to find out, they aren’t as good as they’ve made out.)
If you found this blog post useful then please consider taking a few seconds to share it to your favorite social media platform!

Some great tips here Lisa.
I’ve been following your blog for a while now (found through Tailwind) and I really like what you do! I’ve used WordPress for a very long time but I’ve picked up lots of useful nuggets from you!
Thanks again.
Thank you for such a kind comment 🙂
I’m really glad you’ve found the WordPress tips and tricks useful!
Hey.
I’m a complete newbie and novice here so this is valuable advice. I have noticed l already that some of my images lose their quality after compression and I do think – “yikes, would I want to look at that if I was a visitor?”
Thanks for the tips and suggestions. I’m pinning this post for future references.
Cheers!