This post contains affiliate links. Which means I will make a commission at no extra cost to you should you click through and make a purchase. Read the full disclosure here.

Being able to access your blog with the right WordPress FTP settings and credentials is important.
As it can help rescue your blog if you ever find yourself locked out of the WordPress dashboard. Or when your blog breaks. (This is easier to do than you probably think.)
Having access to your FTP can also be useful. If you ever want to upload files directly to WordPress as well.
It may sound intimidating or complex. But once you’ve set up it is as simple as any other website or tool that you log in to.
This blog post will tell you everything you need to know about:
- What an FTP is
- How to set up with your WordPress FTP settings
- And the basics of how to use it once setup
What Is FTP?
FTP stands for file transfer protocol and is a method of accessing your blog’s backend. So you can see the files that make up the structure of your blog.
Using your FTP you can download, upload and edit files.
This will impact the live version of your blog though. So be careful and always create backups of your files.
Or to keep things even more simple. Do a complete backup of your blog using a plugin like UpdraftPlus.
An FTP for a WordPress blog is like any other website. The main difference with a WordPress FTP is the overall structure and files you’ll see.
📌 In a rush? Pin this post to your Blogging or WordPress board to read it later! 📌


Why Use WordPress FTP When You Can Upload Files Through The Dashboard?
Now, you might be wondering what’s the point of setting up a WordPress FTP for your blog?
After all, you can upload most files through your WordPress dashboard. Like images using the Media Library.
Well, whilst you can upload many things through the WordPress dashboard. Some core files cannot be edited this way.
Secondly, you might find yourself unable to access your WordPress dashboard. As certain issues can break the dashboard itself.
So being able to use your WordPress FTP can be a powerful workaround.
For example, you can use your WordPress FTP settings to disable plugins. Even if you cannot log into the WordPress dashboard.
Or you can fix many coding errors that may have broken your blog in the first place.
How To Install & Setup Your WordPress FTP Settings

1. Download The FileZilla FTP Software
The first step to getting your access setup for your WordPress FTP is to install a program on your computer.
This software is the main way you will access your FTP.
So whenever you need access you’ll open this up and select the correct login profile. We’ll talk more about how to do the WordPress FTP settings for this later.
There are several different software options you can use for your FTP. Such as:
This guide will focus on using FileZilla. Because it is reliable – I’ve used it for many years myself.
So, go to the FileZilla websites here. Then under the section for Quick download links. Click on the Download FileZilla Client button.

Then click the green Download FileZilla Client for the 64bit version. Followed by the Download button for FileZilla.

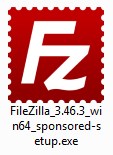
Your file should then begin downloading.
If you need a different version because the 64bit version will not work with your computer. Then click on Show additional download options to try the installs stored here.
2. Install The FileZilla FTP Software
Once FileZilla has downloaded. Go to the folder it was saved in and double-click the setup.exe file.
Click Run when prompted.

FileZilla’s client setup and settings wizard for the WordPress FTP. Will then be displayed.
Firstly, you’ll want to accept the user agreement by clicking I Agree.
Next, leave the default option for who the software should be installed for and click Next

On the following screen, you will have options to check. I recommend leaving all options ticked.

But you can untick anything you don’t want to keep. Such as a shortcut icon being added to your desktop screen.
Click Next once ready.
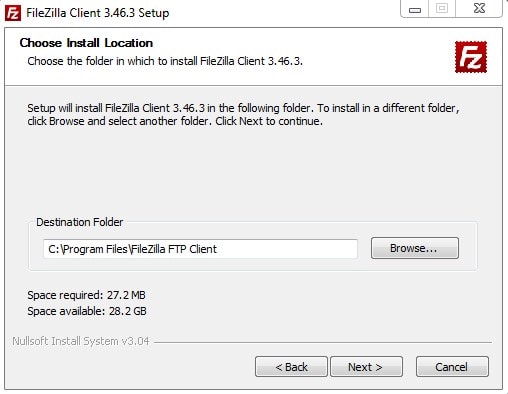
Leave the default folder as the install location. And click Next again.
Again you can leave the default settings for this screen. This will set a shortcut to the software in your All Programs menu.
Finally, click Install and once complete your FTP client in FileZilla should be ready to go.
3. How To Configure FileZilla With Your WordPress FTP Settings
Now that FileZilla has been installed. Open up the software.
If a Welcome screen pops up you can just click OK to dismiss it.
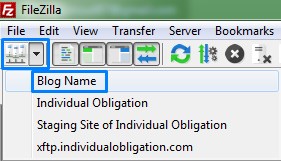
Next from the top menu click File > Site Manager…
A new screen will popup. You’ll want to click on New site so you can add your WordPress FTP credentials.

Name it after your blog’s name for reference. Then on the right, you’ll need to enter some details. You should have received these by email when you signed up for your hosting.
So a quick search in your inbox for your host’s name + FTP should help you quickly find it. If not then you may need to contact your hosting support to get new FTP credentials for WordPress.
For example, you’ll want to enter the information for Host or Host Name into the box for Host in FileZilla.
Your FTP credentials in the email from your blog hosting. Should also include an FTP username. Enter this under Username.
You’ll also need to enter your password. This might be included in your FTP credentials or welcome email. But for me, this was the same password I used when I created my Bluehost account.
Finally, for the Protocol. If your web hosting supports it. Then you can switch this from FTP to SFTP. As this is more secure.
Your WordPress FTP credentials and settings should look like this when done:

You may have noticed the Port field is blank. This is perfectly fine and not a typo!
Also, you do not need to worry about any settings within the Advanced, Transfer Settings or Charset tabs. Their default settings should work fine.
It is worth noting that in this WordPress guide. I am using FileZilla to connect to a WordPress blog hosted on Bluehost. So keep in mind different web hosts may require slightly different settings.
Once everything is filled in you should now be able to click Connect.
See how simple it actually is?
If the details you entered were incorrect. Then you’ll likely see an error message like the below. Double-check your details and settings!

If all the settings and credentials for the FTP were entered correctly. Then you may need to confirm a certificate for the connection.
You should then see the following screen. (Your files and folders might vary.)

Finally, you might be wondering why this WordPress guide directs you into the Site Manager. As you can add your details directly into the fields just below the main toolbar and click Quickconnect.

This is because setting things up in the Site Manager. Will make things easier for you in the long run. Since all your details and settings will be saved for any future sessions.
Instead of having to type in your credentials every time. You can instead click the small downward arrow next to the server icon. Then select your blog details, that you set up earlier.
And the FileZilla FTP will connect automatically for you.
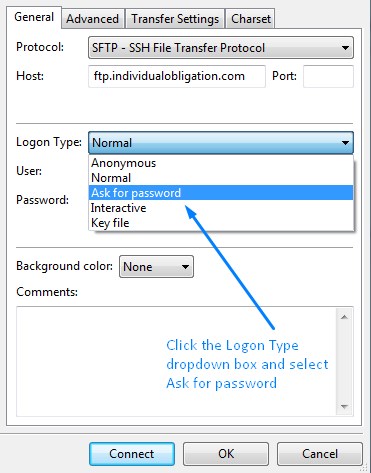
If you would rather not have FileZilla store your password for security reasons. Then within the Site Manager screen. You can change the Logon Type to Ask for password.
4. Using The FileZilla Software To Edit Your WordPress FTP Files & Folders
Now that you have your WordPress FTP setup and settings are working correctly.
Let’s talk a little bit more about the overall user interface.
On the left side of the screen. You should have a list of the local folders that are on your computer. The bottom box should be a list of the individual files and folders within the selected folder.
The same is true for the right side of the screen. Only these windows should be the folders and files of your WordPress blog.
You can easily download files from your WordPress blog. By dragging and dropping files from the right side to the left side of the screen.

The opposite is true if you want to upload files to WordPress. Then you’ll want to drop files or folders from the left side of the screen into the right.
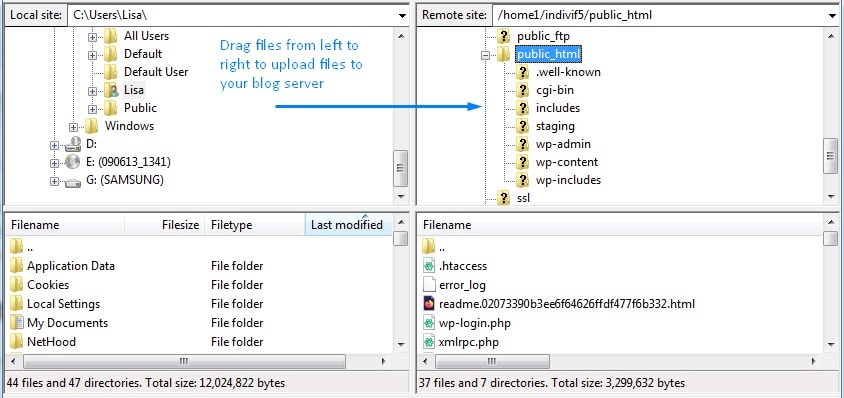
You can also drag and drop files from a folder open in Windows Explorer straight into FileZilla as well. So you don’t have to be limited by browsing to your files using the FileZilla view.
If you only want to edit a specific file. Then you can always right-click on any file and then click View/Edit.

Your WordPress FTP will download the file, open it in your default program for that file type.
You can then make your changes and once done FileZilla will upload it for you too.
Remember the location of files on your WordPress blog is extremely specific.
So if you want to upload things like a premium plugin or theme through your FTP. Then you’ll need to make sure they go into the correct folder.
Let’s look at some examples of this next.
Quick References For Useful Files & Folders You May Need
Overall, the WordPress files and folder can seem daunting and not make much sense.
I recommend focusing on the public_html folder. As this is where the main files and folders you’ll need to access.
For reference under the public_html you can find files for your .htaccess. Which is important for a lot of tasks like setting up your blog for HTTPS, redirects and other security settings.
You can also find your WordPress favicon here. This is used to set the icon that appears in the browser tabs for your blog.

If you go into the wp-content subfolder. You should also be able to find all the files for your themes, all uploads to the media library and plugins.
These are the most useful folders and files you’ll likely need to access using your WordPress FTP.
Recap Of How To Setup Your WordPress FTP With The Right Settings & Credentials

The setting and configuration of your FTP might seem like a complicated, scary task. But when it gets down to it. The steps required are quite simple.
The main tricky part is making sure you input the right credentials into your FTP software like FileZilla.
Since many new bloggers glaze over this technical information. When it is first sent over after purchasing new blog hosting.
Despite this, knowing how to access your blog’s FTP is one of several useful WordPress tricks. That every blogger should learn.
Because it can be useful in a variety of troubleshooting and tweaking tasks like:
- Disabling a bad plugin
- Getting into WordPress even if you are locked out
- Adding code to .htaccess
- + Many more.
Overall, there are 4 main steps to getting your WordPress FTP setup and running. Including:
- Downloading FileZilla or another FTP software of your choice
- Installing the FTP software to your computer
- Setting up your blog’s profile with the correct credentials
- Connecting and managing your files. Making sure to upload files to the correct locations!
What are your thoughts on the setup of WordPress FTP settings and credentials?
Or do you have any further questions not answered here? Leave a comment below with your thoughts.
? Enjoyed this post? Then pin this post to your best Blogging or WordPress tips board! ?