This post contains affiliate links. Which means I will make a commission at no extra cost to you should you click through and make a purchase. Read the full disclosure here.

Creating strong passwords is only part of the battle of keeping your blog secure.
Passwords can be broken quite easily or stolen. Using things like malware, viruses or even brute-force attacks.
This is why adding an extra layer of security to your login using WordPress two factor authentication (2FA). Can be a huge improvement to your overall WordPress security.
There are a few different ways to use WordPress two-factor authentication on your blog. But because things like SMS authentication aren’t as secure as using an app. This guide is going to focus on using the Google Authentication app. As a way to generate codes with your smartphone instead.
Before we talk about how to go about installing WordPress 2-step verification on your blog. Let’s talk about what it is.
- What Is WordPress (2FA) Two-Factor Authentication?
- Why Use WordPress 2-Factor Authentication?
- Disadvantages Of WordPress (2FA) Two-Factor Authentication
- How To Use The Google Authentication App For Two-Factor Authentication In WordPress
- Alternative Two-Factor Authentication Plugins:
- Mistakes To Avoid When Using WordPress (2FA) Two-Factor Authentication On Your Blog
- Recap Of Using WordPress (2FA) Two-Factor Authentication To Secure Your Blog
What Is WordPress (2FA) Two-Factor Authentication?
WordPress (2FA) two-factor authentication is also known as two-step authentication or simply 2FA.
Using WordPress 2FA or two-factor authentication on your blog. Is a method used to improve the security of your login. As passwords alone are considered weak. Since they can be easily broken through brute force methods.
By using 2-factor authentication. You are increasing the steps required to successfully log in. Because a valid password and a code generated by a separate app. Must be input before being allowed to log in.
The app used can vary and usually involves installing it on your smartphone or tablet. This app then generates a secure code unique to the device. That changes within a short time interval. Like 30 seconds for example.
Think of it this way. Using WordPress 2-factor authentication on your blog. Is like having two passwords to log in. But only one of those passwords is only known by your smartphone which changes every 30 seconds.
Whilst the generation of codes through SMS. Is also another way to setup WordPress two-factor authentication. It is not as secure as using an app. As SMS is not a secure channel of communication and can easily be faked by hackers to intercept your codes.
📌 In a rush? Pin this post to your Blogging or WordPress board to read it later! 📌


Why Use WordPress 2-Factor Authentication?
WordPress’ two-step verification is a powerful way to boost the security of your WordPress login. By creating a second step that requires a unique code in addition to a password.
This makes it significantly harder for hackers to break into your blog. Just through your username and passwords.
Meaning even if a hacker gets your blog login password and username. Through methods such as phishing, brute force attacks or malware. They still won’t be able to actually log in.
As they’ll need that extra password code that changes every 30-seconds.
Good luck trying to brute force guess that!
And you know, this doesn’t just apply to your blog. This is a serious game-changer for any other website that you use 2-factor authentication on. (That ideally doesn’t rely on SMS.)
Disadvantages Of WordPress (2FA) Two-Factor Authentication

Whenever there are benefits there are almost always limitations too. So, here are the limitations of using 2-step verification with your blog:
- Adds an additional step to your login process.
- If you use SMS to receive your code it is not fully secure.
- Using a second device and app to generate codes means you need to have that device with you. As well as have enough battery power to log in.
- You could potentially have issues or find yourself locked out of your blog. If you add the authenticator to your smartphone and then lose it.
- Whilst greatly improving your security. It doesn’t guarantee 100% protection. Like not keeping your blog updated could be exploited to work around logging in at all.
How To Use The Google Authentication App For Two-Factor Authentication In WordPress
Login to your WordPress dashboard.
Go to Plugins > Add New
Search for the Google Authenticator plugin.

Install and Activate the WordPress plugin.
Configuring The Google Authenticator plugin.
Once installed go to Settings > Google Authenticator.
Under the Roles requiring Google Authenticator Enabled. You will want to tick the types of WordPress users that you want to use two-factor authentication at login.

If it’s just you logging into your blog, then Administrator is the one you need to ensure is ticked.
Once you’ve ticked your options click Save Changes at the bottom.
Next, go to Users > Your Profile.

Scroll until you find the Google Authenticator Settings section.
Here you will want to tick Active.
If you want, change the Description to something meaningful.
Then click Create new secret.
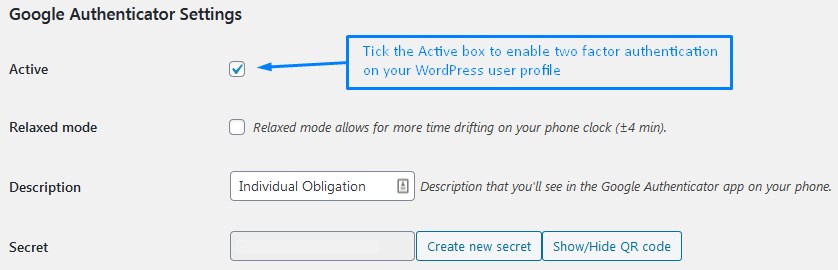
This will generate a new code and a square barcode too.
Click Update Profile but keep the screen open so you can scan the barcode later.
Installing The Google Authenticator App On Your Smartphone
You will then want to install the Google Authenticator app on your smartphone. This is available for Windows, Android and Apple smartphones.
You can use these shortcuts to find the right app for your device:
- iPhone Google Authenticator App
- Google Authenticator App for Android
- Google Authenticator App for Windows Phone
Click Install and then ensure you have the right device selected.

Click Continue if you are happy to allow the app access. This will start the download and install onto your selected device.

You’ll then get a confirmation message that the app is being installed. This can take a few minutes.

If it doesn’t start automatically. You may need to enable a wifi connection depending on your smartphone’s data settings.
Once it is installed open up the Google Authenticator app on your phone.

Tap the Begin button to start.
The app will then take you through an overview. You can either tap through the screens using the > button. Or tap Skip instead.

The final screen will look like the below. Click on Finished to move on to configuring the app settings.

How To Add An Account To Google Authenticator + Link This To WordPress
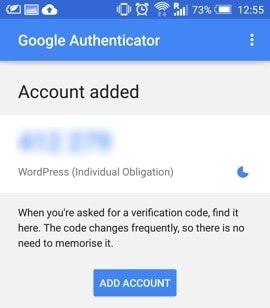
You’ll now be prompted to add an account. Tap Scan a barcode.

Now, you’ll need to point your phone’s camera at the barcode that was generated in WordPress. (After you clicked on Create new secret.)
The code should scan easily. If not you may need to manually enter the code from WordPress into the app on your phone instead.

Click Activate once the app recognizes either your barcode or code.
Then once done your Google Authenticator app will be showing a 6 digit number.
This will change every time the blue icon completely disappears. The circle indicates a 30-second timer for how long there is until the code expires.
So you’ll need to be quick in entering your code.
Now, whenever you log into WordPress. You will be asked to enter your code from the Google Authenticator. In addition to your username and password.
All you need to do is enter the 6 digits from the phone app into the extra box provided on your login screen
Pretty quick and straightforward right?

Alternative Two-Factor Authentication Plugins:
The Google Authenticator plugin is the simplest option that is completely free.
However, if you would rather not use the Google Authenticator plugin. There are a few alternatives you can use instead.
Mistakes To Avoid When Using WordPress (2FA) Two-Factor Authentication On Your Blog

Before you go off to using your new two-step verification on your blog. Keep in mind the below points. As they will save you a lot of headache further down the line.
Especially, if you ever decide to make changes. Or have any issues like the dilemma of losing the device with your app installed. (It happens.)
- Write down the Secret code that WordPress gives you when you first setup. You can find it under Users > Your Profile > Google Authenticator Settings.
- Do NOT delete the app on your smartphone. Before removing 2-factor authentication from your blog first. Otherwise, you won’t be able to log in.
- If you manage to lose your phone or the device that generates your 2-step authentication code. Then you can likely disable the authentication in an emergency. By deleting the plugin folder using your FTP.
Recap Of Using WordPress (2FA) Two-Factor Authentication To Secure Your Blog

This WordPress guide has given you a simple tutorial. That can be used to enable WordPress (2FA) two-factor authentication on your blog.
Whilst there are many different plugins out there that you can use.
The Google Authenticator plugin is a simple and completely free option. That has all the features you need to make your login security more robust.
Whilst avoiding the limitations of using SMS authentication.
Just be mindful if you ever need to make changes. Always disable your 2-step verification on your blog first. Otherwise, you could end up locked out of your WordPress dashboard.
Also, enabling 2-factor authentication on your blog. Is just one of many ways to improve the security and safety of your hard work. So be on the look out for more ways to improve your WordPress security.
So, what are you waiting for?
Now that you know just how simple it is to do this. It’s time to do it on your blog!
How secure do you feel your blog is? Does adding two-factor authentication to WordPress help you feel more secure?
? Enjoyed this post? Then pin this post to your best Blogging or WordPress tips board! ?