This post contains affiliate links. Which means I will make a commission at no extra cost to you should you click through and make a purchase. Read the full disclosure here.

Traffic is the lifeblood of any blog.
If you’re not familiar with what SEO is, then this stands for search engine optimization. And it’s basically how you configure your blog to get traffic from places like Google.
There’s a lot that goes into search engine optimization, including things like:
- Your keywords
- Blog content
- Backlinks
- And many other factors
In fact, some plugins you can use on your WordPress blog. Focus on over 70 different factors that can count into your ranking on Google.
Today, I want to focus on your Google Image SEO.
Because it’s often an area that’s overlooked.
If you don’t know by now, images are essential for every blog.
Content with relevant images gets 94% more views than content without.
QuickSprout.com
Using images on your blog can also improve the readability of your content and help to keep your readers engaged. Meaning they stay on the page longer.
But not only this, you can optimize your images so that they show up in image searches on Google.
Depending on your type of blog. This can result in a significant amount of traffic coming to your blog. That you wouldn’t otherwise get if you neglected to optimize your images for SEO.
There are many different things you can do to optimize your images for SEO. Including things like:
- Filenames of your image
- Titles and descriptions
- And especially the alt text (also known as alternate text)
You may have noticed when you upload images, there are sections. To add this information, but you may not have known what goes into these fields.
- So, What is Alternate Text Or Alt Text For Images Exactly?
- How To Tell If An Image Has Alt Text On Your WordPress Blog
- How To Add Alt Text To Images In WordPress Manually
- Best Practices For How To Write Alt Text Images
- What To Do If You Need To Update The Alt Text On Many Images?
- What Is The Image SEO Plugin For WordPress?
- WordPress Image SEO Plugin – How To Install
- How To Setup The Image SEO Plugin Settings
- Image SEO Plugin’s Credit System
- Image SEO’s Social Media Card Generator
- How To SEO Optimize Image Alt Text & Filenames Using Image SEO
- How To Optimize A Single Image Using The Image SEO Plugin
- Using Image SEO To Automatically Bulk Optimize Images
- Optimizing Images For Pinterest Using Image SEO
- Pros & Cons Of Using Automatic Alt Text Generation From The Image SEO Plugin
- Recap On Using The Image SEO Plugin As A Blogger + Pros & Cons
So, What is Alternate Text Or Alt Text For Images Exactly?
One of the main uses of alternate text or alt text that you set for your images. Is often screen readers.
These read outloud the text and alt text that is displayed on your blog posts. For people who might have issues with using your blog or seeing it.
Because of this adding alt text to your images can significantly help improve the usability of your blog for these people.
Also, they can also be beneficial if your images for some reason stopped displaying altogether on your blog. (Think typos, errors, or connection problems.)
If this happens then people can still see that there was meant to be an image. And what that image was meant to show. As the alt text will be shown instead.
However, the main focus of this blog post. Is to look at how you can use your alt text to optimize your images for search engine optimization. So you can get more traffic to your blog.
In this respect, Google actually looks at your alt text and the image file name to determine what the image is about. And based on that, it will show your blog images in Google Image Search for search phrases that Google thinks your image is relevant to.
Now Google can’t see your images exactly. So, they mostly rely on the alt text and the image file name to work out what your image is about.
Because of this, it makes it extremely important that when you upload images to your WordPress Media Library. Or any other website platform. That you name your images with relevant filenames that make sense to it.
For example, when you take photographs with a digital camera. It will likely name it something along the lines of IMAG0202.jpg.
Now, if Google sees this it’s not going to know what your image is about, right?
Whereas, if you named your image, something like “black-cat.jpg”. Then, Google is going to know that your image has something to do with a black cat.
You can go even further with this using your alt text. As writing something like “A black cat sleeping on a bench” will give Google more information on what your image is about.
So, if someone was looking for pictures of “black cats sleeping”. Google would be much more likely to show this image to them. And if they clicked on your image it would take them to your blog.
And bam! that’s extra traffic to your blog right there!
📌 In a rush? Pin this post to your Blogging or WordPress board to read it later! 📌

How To Tell If An Image Has Alt Text On Your WordPress Blog
You might be wondering – how do you know if your image has an alt tag or alt text?
Well, if you are logged into WordPress. And you go to Posts > All posts and Edit a post that you have already written.
Once you have your blog post open. You can find an image that you added to your blog post already.
If you click on any image you have in the WordPress Gutenberg editor. On the right side it should have highlighted that you have clicked on an image block.
And if you scroll through those settings. There should be a section for Image settings and directly underneath this should be an alt text box.
In this box, there should be some text. Which is what WordPress will use for your alt text on the blog post itself.
If it’s empty, then you don’t have any alt text set to that image. So you should probably set one.
You can do this by manually entering a descriptive sentence about what is shown in your image.
Now if you haven’t been aware about using alt text on your blog or you’ve been using it incorrectly. Then you may want to go through all your blog images and correct this.
How To Add Alt Text To Images In WordPress Manually
The main way that you can add alt text to your images for SEO. Is to go into your blog posts. Select your image blocks and input some text into the box for alt text.
If you go into your media library you may have noticed there is an area where you can enter this information as well.
However, if you go into the media library, and add alt text to your images. It won’t update in the blog post. So you need to make sure you’re going into your actual blog posts.
Now, if you’re wondering why bother putting alt text into your media library.
This is because when you first upload an image. You can import this information, and then when you add that image to the blog post. WordPress will use the alt text you have added to your media library automatically.
So you don’t have to go in and write it each time you use the image.
Unfortunately, this doesn’t work backwards. So, if you’re missing alt text you need to manually go into your posts and change it.
Overall, this sounds time consuming, especially if you have lots of blog posts like me. I have hundreds and hundreds of images.
So, at this point, for me to go back in and edit my alt text would be an absolute nightmare.
Best Practices For How To Write Alt Text Images
If you’re wondering how best to write SEO friendly alt text for an image. The best thing to keep in mind is that your alt text should describe what the image is about.
If you can include some keywords that are relevant to your blog post, then that will be beneficial to you. But you should try to avoid using tons of keywords back-to-back.
And you should also try to make sure that it’s accurate as to what the image is about. This is especially important if you’re in a blog niche that’s strongly visual such as a craft blog.
As you want to make sure that your images are showing for the right search terms on Google.
So if you have an image related to how to create polymer jewelry.
You want to make sure you use keywords like polymer and jewelry. And also, those about what kind of jewelry it is.
If you’re in a less visual niche like I am. Then you may have difficulty trying to write your alternative text in this way.
For example, if the image is largely just text. Such as a pin image with text overlayed. Then you could just enter what text is displayed in the image as your alt text.
Since this is the important point of the image that you want your readers to take away.
What To Do If You Need To Update The Alt Text On Many Images?
But what if you have lots of alt text images that you want to update?
Or you want to save yourself time with having to name your blog images for search engine optimization. Every. Single. Time. You add an image to your blog post, and then have to set an alt text as well.
Even if you don’t have any alt text descriptions that you need to go back and update. On a blog by blog basis. You might find the whole process of optimizing your images for Google Image SEO is quite time consuming.
Especially if you like to include lots of images in your blog posts.
If it takes you 2-3 minutes per image. And you are adding 10 images to your blog post. Then that could be 20 to 30 minutes of just changing filenames and optimizing your alt text.
So what if you could add alt text to your WordPress images automatically?
Well, there is a plugin that I’m going to review below. That can automatically name your images and create alt text for you.
That plugin is called ImageSEO.
What Is The Image SEO Plugin For WordPress?
So what does the Image SEO plugin do exactly?
Well, if you have images you’ve already uploaded to WordPress that aren’t optimized for SEO. Then you can use the bulk optimization tool in the plugin to go through all your current images to add alt text and create newly renamed files.
You can also set up the plugin to automatically generate these new filenames and add alt text for you.
So, whenever you upload any new images to WordPress. They can be optimized on the go.
The Image SEO plugin is able to do this by analyzing the information in the image itself.
And using what’s called an API to automatically assign words and phrases to your images.
The Image SEO plugin also has the option to automatically create social media cards for sharing onto the various platforms. Like Facebook, Twitter and LinkedIn.
In addition, it can also help you to optimize your pin images for Pinterest. By allowing you to set things like your:
- Descriptions
- Post URL
- Images source
- And pin ID
WordPress Image SEO Plugin – How To Install
So how can you use the ImageSEO plugin for your own blog?
Well, to start with, you will need to log into your WordPress dashboard and install the plugin. By going to Plugins > Add new.
If you then search for ImageSEO.
Then the plugin should appear in the list, which you can then click Install now and then Activate.

Once the Image SEO plugin has been installed. It will redirect you to your installed plugins page and near the top. You should have the option to Go to the settings for configuring the plugin.

Once you’re in the main settings for the Image SEO plugin. You will notice there is a welcome screen at the top.
If you scroll down further then there is the option for you to create an account.

You will have to enter an email address and create a password.
If you enter these and then click on Register.
It will automatically create your account and set an API key for you. Which you will need to do any optimization of your images.
You can click on Close for the confirmation screen. And then you will need to click on Validate your API key.


Again click on Close for the completed message that will display.

Once you have your API keys set up. You are then ready to start optimizing your images!
How To Setup The Image SEO Plugin Settings
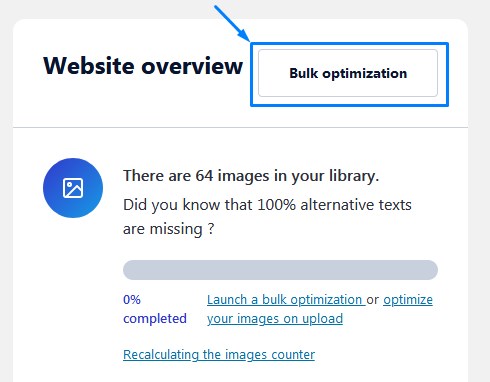
Right, so next to the API key section you will find a Website overview of your blog’s images.
Here you can see how many images you already have in your WordPress media library that need optimizing.
In this example, there are 64 images in the WordPress media library. That don’t have any alt texts or optimization applied to them.
We’ll come back to this area later.
As before we do any optimization, I want to talk about the Image SEO settings.
Because with any new plugin install. You should always go through the settings to make sure things are set up the way you want. Before you actually start to run the plugin.
So, looking at the Settings further down the page. There is a section for Settings – On-upload optimization.

These settings will apply to your images, when you upload any new images.
In this section of the settings, you only have options to:
- Automatically fill out ALT texts when you upload the image
- Automatically rename your files when you upload a media
In order, to get the most out of this plugin. You will likely want to have both of these enabled. And for the majority of cases you should leave the language as English.
It’s worth noting, however, that if your website isn’t in English. There are different language settings available that you can use instead.
Image SEO Plugin’s Credit System
One important point to make is that for every image you upload. With these two options enabled it will consume 1 image credit.
If you’re wondering how this credit system works. You might be familiar with the system from another plugin, I’ve talked about called ShortPixel.
And you can either have a monthly subscription, which will give you a certain amount of credits per month. Or you can pay a one-off fee for a bundle of credits.

The main thing you need to know for now, is that you get 10 free credits per month.
And if you want to use any more credits above this you’ll need to buy credits.
So for example, earlier I mentioned that this example blog has 64 images in the media library that haven’t been optimized.
If I wanted to optimize all of those images using the ImageSEO plugin, it would use a total of 64 credits.
Image SEO’s Social Media Card Generator
Next, let’s look at the settings for the Social Media Cards generator.
The main setting you’ll want to look at here. Is whether you want Social media cards to be generated for your posts and pages.
The generated Social media cards will work on networks such as Twitter, Facebook and LinkedIn.
And once you have set whether you want these generated for posts and pages. You will also need to go in and set up the template to be used.
For now, I would suggest just leaving posts enabled or disabling altogether if you don’t want to use this particular feature. As it does use up additional credits.
If you have enabled the generation of social media cards. Then you will need to make sure you save your changes on the current page.

Then the next step is to click on Go on Social Media Cards. So that we can set up a template.
On the Social Card Optimizer settings, you will see some options on the left hand side. And a preview of what your card will look like on the right.

As a blogger, I recommend for the Data displayed section. That you only enable Reading time or Number of reviews and the Display the author avatar.

If you scroll down, there is also a section for Look and feel.
You can set the social media card to display with a left layout, or right layout. You can also change the text alignment to top, center or bottom.

You can also set the text color and background color for your social media cards.
The last section allows you to set images for your blog’s logo. And the default background image. If your article or post doesn’t have one. Although this should never be the case.
It doesn’t hurt to set it up in case something goes wrong with the images added to the post.
Once you’ve changed your template settings. You’ll want to make sure you save your configuration. And then click close on the confirmation message.
How To SEO Optimize Image Alt Text & Filenames Using Image SEO
Now that all your settings are configured the way you want them.
If you go back to the Image SEO tab in your left menu in the WordPress dashboard. You can then consider wherever you want to do a bulk optimization of the images you already have uploaded.
However, I would like to show you how to optimize images on an individual basis. As well as how to create your social cards first.
So that you can test it out on one or two images yourself before committing to use a bunch of credits.
So, if you go to Posts > All posts
From your list of blog posts there should be a new column for Social.
First, you will want to make sure that you have an image set for the particular blog post you want to create a social media card for.
Then from the All Posts screen you will want to click the Generate button next to the blog post to create your card. (Remember this will use 1 image credit!)
Once you’ve clicked on Generate the Image SEO plugin will take a few minutes to process the request.
If you then reload the page, it will generate the social media card as an image in your media library like this:

If you then go in to edit the blog post. You can see the social media card set for the blog post. By going to the right hand menu and looking under the section for Social media coverage.
This usually consists of the featured image on one side of the card and the title of your blog post on the opposite side. Followed by an estimate of the time to read the blog post. And then a small avatar icon at the bottom.
Note: You can also generate these social media image cards from within the blog post itself.
How To Optimize A Single Image Using The Image SEO Plugin
I recommend testing one image. Before you go ahead with a bulk optimization. So that you can make sure that you are happy with the results.
But also because the free plan only gives you 10 credits. So it’s important to make sure you’re getting the most out of the starting credits before you need to think about getting more credits.
So, if you want to use the plugin to optimize individual images, you will want to go to Media > Library from the WordPress dashboard.
Drag and drop your image into the media library to upload it. (Make sure you have followed all the steps previously to enable the optimization on-upload settings.)
So, for this example I am going to use a stock image from Stock Unlimited. They are a paid resource for stock images that I use for my blog. Because paid images seem to perform better on Pinterest.
Once the image is uploaded by WordPress. Switch the the list view

Here you should see two new columns that are controlled by the Image SEO plugin. One for alt text and another for the newly generated filenames.

For the image you have just uploaded, both of these two new columns should be filled out with information that relates to the image.
In this particular example, the alt text “Biscotti – Cafe” was generated and the filename “biscotti”.
Now, you might notice that the original filename is still being used. But this is because the ImageSEO plugin doesn’t directly change your filenames. As this could cause plugin conflicts.
Instead it creates a mirror image with the new filename and then when your blog posts are viewed live. The Image SEO plugin replaces the non-optimized image filenames with those that have been.

This means Google will see your SEO optimized images and you can safely optimize your blog’s images without having to worry about breaking anything.
After all, the whole idea is to save you from having to go through all your existing images to make changes!
Using Image SEO To Automatically Bulk Optimize Images
When you’re happy with the results. You can move on to use the bulk optimization settings to optimize all of your images for SEO.
This is particularly useful if you have lots of images already uploaded into your WordPress Media Library.
So, if you go to your WordPress dashboard and then click on Image SEO.
From here you can then click into the Bulk optimization.
Here you will be presented with some settings that you need to select before you run the bulk optimization.
If this is the first time that you are running the bulk optimization. You may want to tick the first option, that says I want to validate the results manually.

By default, you’ll want to leave the language set to English. And then you have the option to optimize:
- All images
- Or only featured images
The ALT text settings section lets you adjust more settings. You’ll need to tick I want to fill out and optimize my ALT Texts for SEO and Accessibility. Then you’ll have the options of either:
- Optimizing all alt text
- Or only those that are empty

You also have the option to format how these new alt texts are generated.
You can choose whichever format, best suits your needs. But the recommended format to use to improve SEO is the first option for [keyword_1] – [keyword_2]

The last option you’ll want to set is the image name settings.

Before you start the optimization you’ll also want to note that the plugin estimates how many image credits, you will need to run this bulk optimization. And how many you currently have left.
So keep in mind that you will want to consider these two numbers, because you may find that you do not have enough credits.
Once you have all the settings set the way you would prefer. Then, at the bottom of the page you’ll want to click on Start a new bulk optimization.
Optimizing Images For Pinterest Using Image SEO
It’s worth noting that this plugin has an awesome extra feature that’s useful for Pinterest marketing. As it has options to optimize your blog images for Pinterest.
If you upload images to the media library in WordPress. Make sure to switch to the grid view in the media library. If you are still using the list view for earlier.
If you then expand to view the full details of an image by clicking on it. Then on the right handside, if you scroll down. There should be new fields you can fill in for creating a pin.

You can use these Pinterest pin image fields to add:
- A Pinterest description with keywords and hashtags
- Pinterest URL to set where the links to
- Pin ID to help Pinterest track repins more accurately
- Pinterest Media to set a specific image you want sent to Pinterest. (You can use this to set smaller images in post and high-quality images for Pinterest.)
You can read more here on the best ways to use these fields to get the most out of your pins and descriptions.
So, with the Image SEO plugin, once you have all these Pinterest fields filled out the way you want.
You can then go to your blog post. And if you select the image that you set up with the Pinterest fields from the media library.
Then you should be able to pin that image from your blog post without having to edit any code. And it will have the correct description and meta data already attached to it.
How cool is that?
Pros & Cons Of Using Automatic Alt Text Generation From The Image SEO Plugin
The Cost Of ImageSEO Credits & Limited Free Version

The main cons of the ImageSEO plugin for WordPress is that it’s an extra additional cost. And compared to other plugins like ShortPixel.
It’s a little bit more pricey per image in my opinion. For example, the price for 500 image credits is €19.99.
The free plan is extremely limited at only 10 free credits per month. Which for a small blogger will be lucky enough to cover one blog post.
And if you are just starting out, then really you should be posting at least once per week.
So, this free plan isn’t going to last long, even as a beginner blogger who is potentially not making any money yet.
So it’s unlikely beginner bloggers would be able to benefit from this plug in, without having to pay for credits, which at that particular point, likely isn’t in the budget to begin with.
Also, in order to be able to use the free version of the plugin. You have to sign up with your email address. Something I know some people like to avoid because they don’t like to be spammed.
Unfortunately this plugin requires you to sign up using your email before you can get access to the API.
Some Blog Niches Will Benefit More Than Others
Depending on your blog niche, some bloggers will benefit more from using this plugin than others.
The time it can save you will vary a lot depending on:
- How many images you add per blog post
- Your usage over the month
- Whether you use the social media cards or not
- And the types of images you use
Why do I say the types of images can affect how much this plugin benefits you?
Well, firstly some blogs are less visual. Specifically, my blog about WordPress and blogging is not visually easy to categorize. So, optimizing desktop screenshots and generic flatlay photos don’t benefit much from this tool.
For example, my pin images. Don’t really classify as something, an API can figure out. Since it’s just text. Meaning the alt text that is generated is just “logo – branding”. Not ideal, sadly.
Compare this to if you are a blogger who writes about more visual things such as:
- Crafts
- Pets
- Gadgets
- Or food
Then the API can easily recognize key features and it comes up with much better alt text descriptions for those. Like the mug and biscuit image I used as an example earlier.
Image SEO Can Help Save Time & Boring Tasks

So, overall, this plug in can help to save here some time and hassle with optimizing your images for SEO.
SEO is important for any blog to diversify their traffic. Especially after you get past the newbie blogger status where Google largely ignores you.
So optimizing your images now rather than later. Will help you out in the long run. Because over time you’ll add more images. And if you need to go back and optimize them, it can become a task that gets bigger over time.
Oh and not to mention, optimizing images for SEO is boring. I mean if you can skip out on doing it. You probably would, right?
You Can Optimize For Pinterest & Image SEO With A Single Plugin
One of the major benefits of using Image SEO. Beyond optimizing your blog images for Google Image search. Is that you can optimize your images for Pinterest too.
Since the plugin adds extra fields to all your images in the Media Library. So you can add things like your Pinterest description, URLs and different image sizes. Using Pinterest core meta-tags without having to write any code.
All you need to do is fill in the fields in the Media Library and then add that image to your blog post. And you’re done!
Recap On Using The Image SEO Plugin As A Blogger + Pros & Cons

The ImageSEO WordPress plugin has the benefit of being able to save you a lot of time. If optimizing your images for SEO is important to you.
As doing it manually requires you spending a few minutes on each image. So you can optimize the filename and alt text for SEO. And this can quickly add up if you use many images.
(Hint: The best blog posts have plenty of visuals to help keep your audience engaged!)
Overall, this plugin focuses on a SEO area that is often neglected by bloggers. Many of us either leave the alt text blank or overly keyword stuff it. Which may not be the best practice for getting our images to rank high in Google Images.
The fact that you can set it to automatically generate your alt texts and filenames whenever you upload images. Means that you won’t have to worry about manually renaming your images or setting your alt text when you create new content. Since it can all be done automatically.
Plus the idea of bulk optimization makes it easy to go back if you currently have lots of images without alt text. And get those optimized as well.
In particular, if you are as forgetful as I am when it comes to renaming your files before you upload them. This could definitely save you from the small annoyance.
Since it requires even more time because you have to delete the file from WordPress. Rename it, and then re-upload it.
So, what are your thoughts on this plugin? Would you use it on your blog and how much time do you think it will save you?
? Enjoyed this post? Then pin this post to your best Blogging or WordPress tips board! ?


Could you write another post on this going into a little bit more detail? I had some questions that weren’t answered here but I liked what you had to say on the subject. Love to hear more of your perspective.
Hi Brian,
Thanks for commenting. If you let me know what exactly you would like me to go into more detail about? I’d be happy to update the post with more info.