This post contains affiliate links. Which means I will make a commission at no extra cost to you should you click through and make a purchase. Read the full disclosure here.
Everything They Can Do For Your Pinterest Marketing
Are you trying to get to grips with Pinterest marketing for your blog?
Well, here’s one important but simple step you need to tackle on your way to Pinterest mastery.
Care to guess what it is?
Well, let me tell you – it’s the Pinterest Rich Pins feature.
And more specifically, I want to cover:
- What’s a Rich Pin?
- The 6 kinds of Rich Pins that Pinterest offers
- Why you should use them
- How to make Rich Pins
- How to validate Rich Pins
- + How to turn them off if you need to
So, let’s start, shall we?

What’s A Rich Pin?
A Rich Pin is a special type of Pinterest pin. That pulls additional information from the source website. To be displayed within Pinterest alongside the pin.
For example, blog posts are usually article rich pins. Which can show extra information including the meta-description. Normally, the meta-description is used by Google under a page’s search result.
But with an article rich pin, this information. As well as the blog post’s title and a direct link to your post’s URL. Is all shown when clicking into a pin on
What Are The Six Kinds Of Rich Pins That Pinterest Offers?
Did you know? There six different kinds of Rich Pins on Pinterest, that all work slightly differently. These are:
- Article
- Recipe
- Product
- Movie
- Place
- App
In general, it is quite rare to see the movie, place and app types.
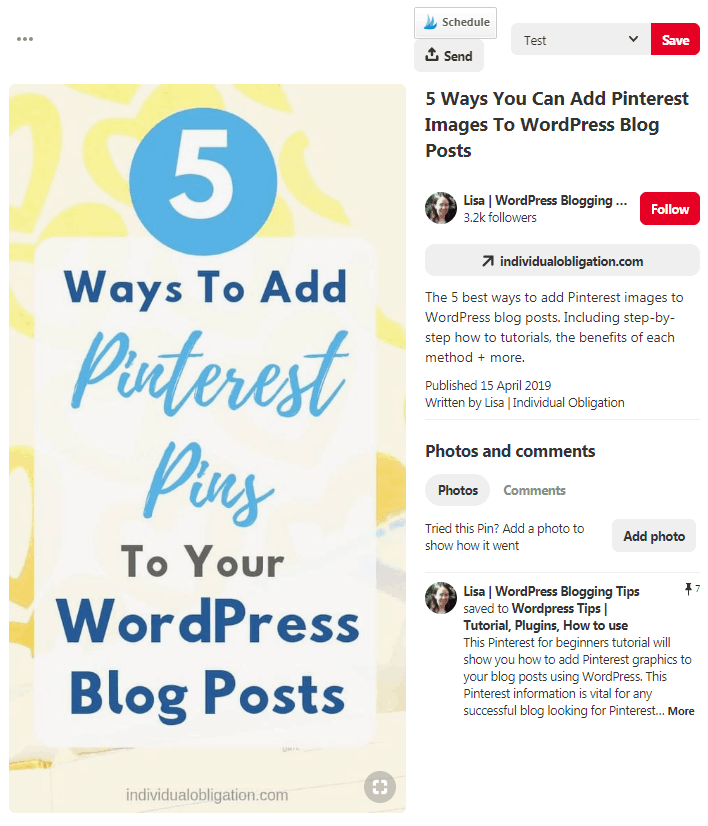
What Is An Article Pin?
If you look at the example below, which is an article Rich Pin. You can see the extra details of the:
- Title
- Meta-description
- Published date
- + Author details.
Here’s another example of what a pin looks like without the Rich Pin information.

What Is A Recipe Pin?
And here’s an example of a recipe Rich Pin.
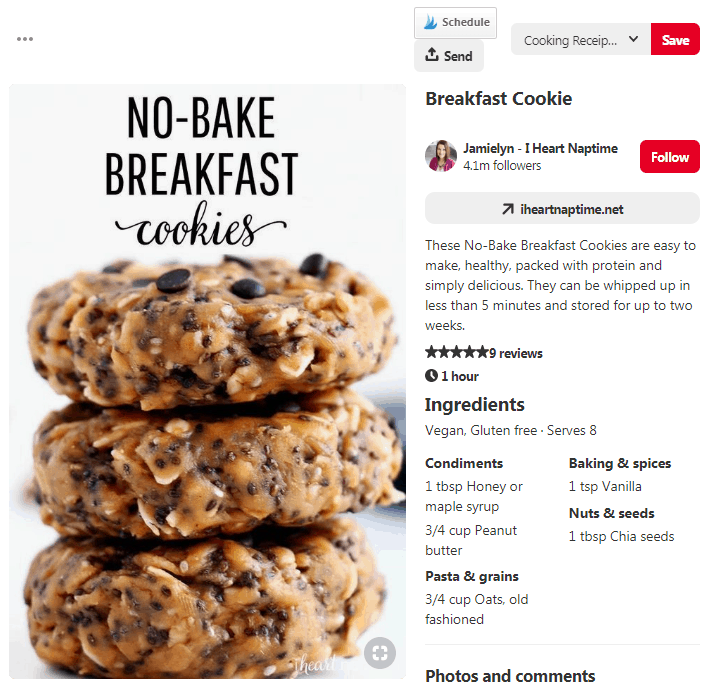
As you can see a recipe pin includes different additional information, such as:
- Post title
- Description
- Reviews
- Time to prepare
- Ingredients
- Type of recipe
- + Amount of servings
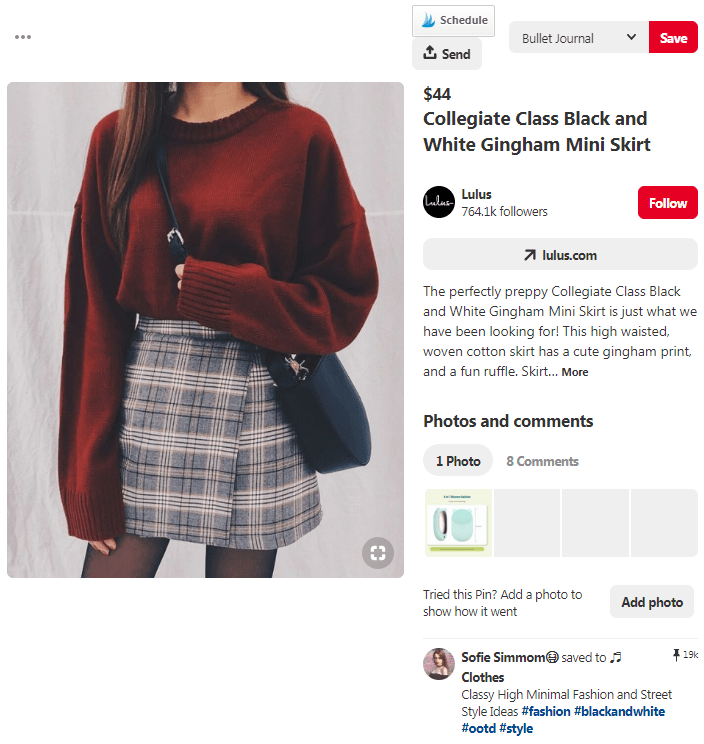
What Are Product Pins?
Product pins are a popular Rich Pin used in niches such as fashion. You can recognise these pins in the smart feed or your Pinterest search by the little tag icon underneath them. Like this:

When the pin is clicked to expand it. You will see extra information such as the price of the product, description and images.
Why Should I Use Rich Pins?
Okay, so if you’re wondering why you should bother with Rich Pins. Then here are some valuable reasons for you.
Firstly, they add extra enticing information on your pins. Which can make them more clickable. Thus driving more traffic back to your blog.
Rich Pins are also simple to setup and do not take much time. Which is a fair trade for better click-through rates and enticing call to actions.
The information included on a Rich Pin varies and is customized depending on the choice of your pin’s URL. What this means is that often if you update information. Such as the meta-description of your blog post then the pin will reflect these changes too.
Finally, and most importantly. They can help get your pins distributed more. Because bloggers who have used Rich Pins and then remove them for whatever reason. Have often found that their traffic stats have dropped.
How Do You Make A Rich Pin?
Have I convinced you that adding Rich Pins to your blog could be a huge benefit to you?
If so then you’ll want to know next how to setup rich pins on your blog, right?
Well, to make a Rich Pin you need to install and setup some coding on your WordPress blog. Now, whilst this might sound complicated. It actually is quite simple. And I’ll show you exactly how here.
Firstly we need to install the WordPress plugin Yoast SEO.
If you are not familiar with how to install plugins then you should check out the WordPress plugins guide here. And if you are still getting your head around the basics of WordPress. Then this guide will help you understand the dashboard in more detail.
Right, so once you’ve got the WordPress Yoast SEO plugin installed. On the menu along the left side of the screen should be a new option called SEO. Hover over this and then click on the Social option that appears.

On the next screen that appears there should be several tabs at the top. You want to find and click on the Facebook one.
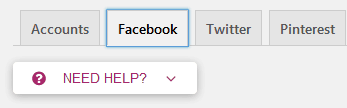
Under the Facebook settings. There should be the option to enable or disable the Add Open Graph metadata. Make sure this option is set to Enabled.

Then make sure to click Save changes at the bottom of the page.
Next, we’ll need to validate the Rich Pins for your blog.
How Do You Validate A Rich Pin?
Firstly, you’ll need the link of one of your blog posts. Copy the blog post link and then go to the Rich Pins Validator here.
Now, in the box to the left of the blue Validate button. Paste in your blog post URL.

Click the blue Validate button. If everything works as expected you should see some results similar to this:

If everything looks like you would expect. Then ensure you have selected HTML tags under your URL. And click on the Apply now button. After clicking Apply now your Rich Pins should become active on your entire blog within an hour or so.
If you get an error message like the below. Then you’ve likely forgotten to save the setting we changed in the Yoast SEO plugin. So make sure this is done before trying again.

How Do I Turn Off Rich Pins?
Okay, so on the rare occasion you might find you need to disable Rich Pins on your blog. Honestly, I don’t recommend doing this at all. Since most of the time, it results in a significant drop in Pinterest traffic.
But I also recognise that some food bloggers swear by not using them.
Why? Because on
As for example, a Pinterest user might click on your recipe pin, take a quick look at the ingredients. And decide, the recipe isn’t for them. If this recipe pin did not have Rich Pins enabled. Then this Pinterest user has to click through to the blog to see these details. And upon seeing the full blog post, the end result might differ.
It’s really a matter of opinion with this though. As every blogger’s audience differs.
I recommend having Pinterest Rich Pins enabled. But, just in case you decide you want to turn off Rich Pins. Here are a few ways on how to do it:
Turn Off The Open Graph Metadata (Not Recommended!)
Remember how we enabled the Open Graph metadata in Yoast SEO? Well, if we go back into the WordPress dashboard. And hover over the SEO option in the left side menu to then select the Social submenu.
From here we can go back into the Facebook tab. And click Disabled to remove the Open Graph metadata.
Now, the only major problem with this. Is that you will likely have this enabled for other reasons outside of Pinterest Rich Pins. After all, it is used for generating information when your blog post is shared to Facebook. Among some other social networks.
Unless you plan to never use Facebook and you don’t care about people sharing your blog posts to Facebook. This option should really be left Enabled.
So, if we shouldn’t disable this, then what?
Copy & Paste This Simple Code Snippet To Turn Off Rich Pins On WordPress
Again, with the WordPress dashboard look for the Appearance > Customize option.
A preview on your live blog should appear with another menu on the left.
Look for an option called Theme Settings > Header/Footer Scripts
In the top box, directly below Header Scripts paste in this code:
<meta name="pinterest-rich-pin" content="false" />
And publish your changes to save everything. Which should leave your blog with Rich Pins disabled.

If for some reason you cannot find the options for Theme Settings > Header/Footer Scripts. Then you may need to use one of these alternative methods to add this code snippet to your WordPress header.
How To Add Rich Pins Is An Important Step For Creating A Strong Pinterest Strategy
So, there you have it. Everything you could possibly want to know about using Rich Pins on your blog. Including what Rich Pins are, how they work, why you should use them and how to add or remove them from your blog.
In most cases, if you are not a food blogger. Then you should have Rich Pins enabled on your blog. As it will give your pins more context, improve their value to Pinterest. And help you get more traffic back to your blog.
Rich Pins are super easy to install and should only take a few minutes if you follow my guide. So there’s really no excuse not to go and get them installed now. So you can start benefiting from them too!
So, tell me – what are your thoughts on Rich Pins? Have you noticed these different types of pins before? Do you find them
If you found this blog post useful then please consider taking a few seconds to share it to your favorite social media platform!
