This post contains affiliate links. Which means I will make a commission at no extra cost to you should you click through and make a purchase. Read the full disclosure here.

Looking to customize your WordPress blog? So it can be more unique by adding custom fonts in WordPress?
You’d be surprised just how much of a difference a quick change of fonts can do for any website or blog.
But when it comes to changing fonts on your website. The question is how to add custom fonts to your WordPress blog. That is easy to do and won’t require having to buy expensive font licenses separately.
This WordPress guide will show you:
- Different ways to add custom fonts to WordPress
- One method that requires zero code
- Tools to find ideal font combinations
- + Where to find tons of fonts that you can use for free
- Why Change Fonts?
- How To Find Fonts?
- How To Find Font Pairs For Your WordPress Blog?
- What Is Google Fonts?
- 1. Use The Easy Google Fonts Plugin
- How To Install The Easy Google Fonts Plugin
- How To Change Your WordPress Fonts Using The Easy Google Fonts Plugin
- Options For Changing The Font Size, Font Color & Positioning Of Your WordPress Fonts
- Repeat Adding WordPress Fonts For Additional Headings & Paragraphs
- Benefits & Limitations Of Adding Custom Fonts To WordPress Using The Easy Google Fonts Plugin
- 2. How To Change Fonts Using Google Fonts & CSS (Coding Required)
- 3. How To Add A Custom Font Not Included In Google Fonts
- Editing Your CSS To Use Your New Fonts
- Recap Of The Methods For Adding Custom Fonts To WordPress
Why Change Fonts?
The reasons for changing your fonts can vary. However, adding custom fonts in WordPress is usually related to customizing a theme. As this can help to make it stand out even more. In addition, brands may want to use their specific fonts. In order to make their website more recognizable.
If you are new to building a website or blog. It is important to understand not to go overboard with additional fonts. Like most things when it comes to websites – speed is crucial and less is usually more.
In short, keep your custom font selection to 1-3 different types. So you can prevent the potential and detrimental slow down of your blog.
📌 In a rush? Pin this post to your Blogging or WordPress board to read it later! 📌


How To Find Fonts?
Finding fonts for your blog can feel like going down a rabbit hole. As there are at least 550,000+ fonts available in some of the largest catalogues.
When choosing fonts you’ll also want to consider how they look when used in combination with each other. As often you’ll want headings and titles to stand out differently compared to the main body of text.
For adding custom fonts in WordPress. One of the best ways to find fonts for your blog is to look for font pairs. Then you can use these suggestions to see if they are available in places like Google Fonts. So you can add custom fonts in WordPress without having to pay for hefty font licensing fees.
How To Find Font Pairs For Your WordPress Blog?

The perfect amount of fonts is usually two.This is called font pairing.
By using the same two fonts. You can help create a uniform and consistent design. That is appealing to your readers rather than overwhelming and excessively busy.
Whilst still creating a clear distinction between the body text of your blog. In comparison to your headings that should help to break up the text.
Font pairs try to compliment each other. For example a simple font could work well with a more detailed and script-like font. Whereas two script fonts would be overwhelming.
With there being so many potential font combinations it can be difficult to decide on just two fonts. So, here’s a list of tools to help you quickly find font pairs that work well together:
What Is Google Fonts?
Google Fonts is a huge catalogue of 960+ free and open-source fonts. That is designed to make it easier to use a wide range of fonts on websites easier. Without
The platform was launched in 2010 and is still actively supported by Google.
1. Use The Easy Google Fonts Plugin
So, how can you go about adding custom fonts to WordPress?
Well, let’s start with the Easy Google Fonts plugin. This plugin will let you pick from over 600+ Google Fonts to add to your blog.
Plus it has the massive advantage of letting you preview how these different fonts will look on your live blog. By allowing you to set them through the WordPress customizer.
How To Install The Easy Google Fonts Plugin
To use this plugin to add custom WordPress fonts. Go to Plugins > Add New
Search for the Easy Google Fonts Plugin
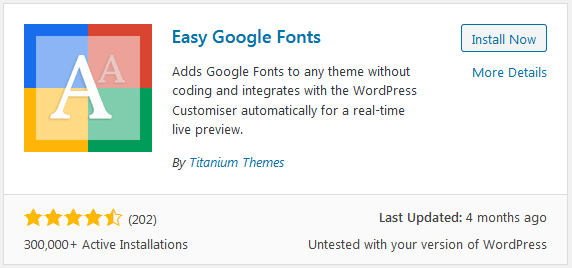
Install and Activate the plugin
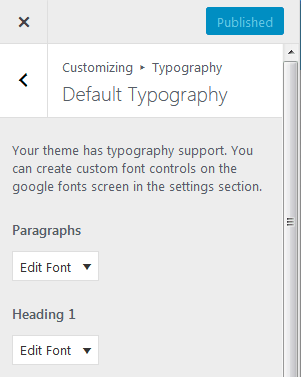
Then go to Appearance > Customize > Typography > Custom Typography
Here you’ll see a list of buttons to edit the fonts for your blog. I recommend using 1 font for your paragraphs and a different font for all of your headings.
How To Change Your WordPress Fonts Using The Easy Google Fonts Plugin
Let’s start with how to use a custom font in WordPress for your paragraphs as an example. The process is identical for changing your heading fonts.
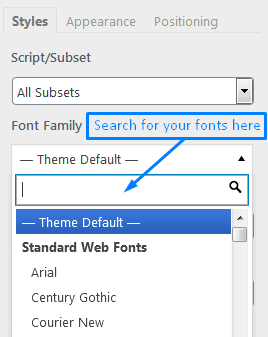
First, click on Edit Font. The button will expand to give you more options.

Click on Font Family and then search for your font. Once you’ve found it click on it and the name above the list should update.

If you want to further customize this font. You can also adjust the options for:
- Font weight/style – this will alter how bold the font is.
- Text Decoration – Set the font to use underlining, line-through, overline or nothing.
- Text Transform – Set the font to always be capitalized, all upper-case, all lower-case or none.
For you paragraph fonts you should stick to using:
- Font weight/style: Regular
- Text Decoration: None
- Text Transform: None
Options For Changing The Font Size, Font Color & Positioning Of Your WordPress Fonts
This is all the settings for the Styles tab. There is also an Appearance and Positioning tab we can use to make further adjustments.

Okay, so the Appearance tab will let you adjust things like the font colors, font size and line height.
Pick a default Font Color that will be used for all your paragraph text.
Leave the Background Color as blank.
Set the Font Size to at least 18px for easy reading on both desktop and mobile devices.
Set the Line Height to at least 1.8 as this will improve readability and make your content more spaced out.
Letter spacing should be left blank or set to 0px. Again this is for readability.
For the options under Positioning, I would stick to your theme’s settings.
However, if your theme isn’t setup well. You can use this tab to adjust the whitespace between paragraphs and headings. Using the Margin and Padding settings.
The other options, such as adding Borders do not have much use for paragraphs. But you could for example use it to create headings like this:

Repeat Adding WordPress Fonts For Additional Headings & Paragraphs
You’ll want to repeat this process for each setting. Depending on whether you want to just change the font for your paragraphs. Or all your different heading levels too.
Once you have all your settings done. It is a good idea to use the live preview of your blog on the right side of the customizer to browse around.
This can give you a clear idea of what your blog will look like once you publish your new font changes.
Check places like your homepage, blog posts, archives and any other pages you have setup. Because what looks perfect on your blog posts. Might not look that appealing on your homepage.
Remember to click Publish to save and apply any font changes you want to keep!
Benefits & Limitations Of Adding Custom Fonts To WordPress Using The Easy Google Fonts Plugin

Overall, if you plan to use the Easy Google Fonts plugin for adding custom fonts to WordPress. Keep in mind these benefits and limitations:
- + Easy to use
- + No code required
- + Compatible with any theme
- + Preview you font on your live blog using the customizer
- + Separate to theme so if you update or change your theme you won’t lose changes
- – Additional plugins can slow your blog. So if you are looking to optimize WordPress speed consider using alternative methods
- – Reliant on the plugin working and being updated. But you never know when a plugin might become unsupported.
This method is ideal for bloggers looking for quick changes to their WordPress fonts. Who don’t want to edit their theme CSS. Or use any code to change their fonts.
2. How To Change Fonts Using Google Fonts & CSS (Coding Required)
If you are looking to avoid some of the disadvantages of using the Easy Google Fonts plugin. Then going down the route of using Google Fonts with some CSS is the next best option.
To start you’ll want to find your choices within Google Fonts. I recommend using the search bar at the top of the screen.
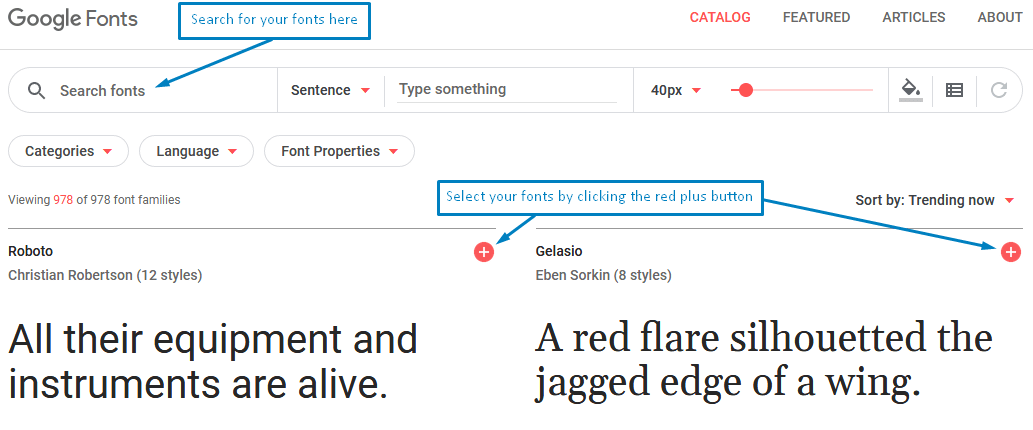
Once the correct font shows, click on the red plus button next to the font.
A black rectangle should appear near the bottom of the page. Click this to expand it.

Within the expanded window. You’ll want to copy the code from the Standard box.

This code needs to be pasted into your blog’s header. You can use one of the methods from this blog post. For step-by-step instructions. As well as a breakdown of the benefits and limitations of each method.
For the easiest ways. Go to Appearance > Customize > Theme Settings > Header/Footer Scripts. Where you can then paste the code in.
Or if this option isn’t available for your theme. Then you can always add the Insert Headers and Footers plugin instead.
Whilst doing this step adds the font to your blog. We still need to do some more work to replace your current font to the new one. Click here to skip to this step.
You’ll want to repeat the above steps for your second font before moving on.
Benefits & Limitations Of Adding Custom Fonts To WordPress Using Google Fonts & CSS
In summary, using Google Fonts to change your WordPress fonts. Requires significantly more work compared to using a plugin.
- + Less impact on your blog speed compared to an extra plugin.
- + No longer dependant on the plugin to work.
- – Requires editing some code and understanding the code would be an advantage.
This method is ideal for those who want to customize their fonts and blog. Whilst keeping their blog optimized in the best possible way.
3. How To Add A Custom Font Not Included In Google Fonts
Whilst it is recommended to stick to the above methods. If you have a specific font in mind that you absolutely must-have on your blog. Then you can use this method to add custom fonts to your WordPress blog.
Convert Your Font To Web Format Using Font Squirrel
To start with you’ll need to make sure your font is in a format suitable for your blog. If you are not sure, then you can run your font through the convertor on the Font Squirrel website.
Using the convertor you will want to Upload the font you want to convert. Then select the setting for Optimal. And finally tick to confirm if the fonts you are using are legal.

Once all this has been done. You should be able to click on the Download Your Kit button. That appears in the bottom right-hand corner.

Upload The Custom WordPress Fonts Using Your FTP
Next, you’ll need to upload the converted web font using your FTP login details.
Usually you will want to upload it into a Fonts folder within your current theme. As this is where designers will save fonts when creating a theme.
By keeping things in their expected place. It can make troubleshooting much easier later on.
Add CSS Code To Your Blog To Load The Custom Fonts In WordPress

Then within your WordPress dashboard. You can go to the Appearance > Customize > Additional CSS menu.
Here you can add the following code:
@font-face {
font-family: TypeYourFontFamilyHere;
src: url(https://www.yourwebsite.com/wp-content/themes/YourThemeFolder/fonts/YourFontFileName.ttf);
font-weight: normal;
}
With this code you’ll want to make sure to change:
- The TypeYourFontFamilyHere to your font’s family name.
- www.yourwebsite.com to your blog url.
- YourThemeFolder to the folder name of where you created your Fonts folder
- YourFontFileName.ttf should be changed. So it matches the full name of the font file you uploaded through your FTP.
Benefits & Limitations Of Using @Font-Face To Add Custom Fonts To WordPress

To recap, using this method will allow you to use custom fonts not found on Google Fonts. It also is a similar process, meaning it has the same limitations and benefits:
- + Less impact on your blog speed.
- + Does not rely on a WordPress plugin to work.
- – Requires adding and editing code which isn’t completely user-friendly.
The code you added above will only allow your blog to load the font on your blog.
The next step, just like the previous method of adding custom fonts to WordPress using Google Fonts. Will be to edit your blog’s CSS to replace your old fonts with the new ones.
Once this step has been completed you’ll be able to see the fonts on your live blog.
Let’s look at this next!
Editing Your CSS To Use Your New Fonts

If you used methods #2 or #3 in this WordPress guide. Then you’ll need to take further steps to update your CSS to replace the old fonts with your new ones.
You can either go to Appearance > Edit Theme > Styles.css
Or I personally recommend using the Appearance > Customize > Additional CSS.
Here you’ll want to set your CSS, like this:
h1,
h2,
h3,
h4,
h5,
h6 {
font-family: 'Arimo', sans-serif;
font-weight: bold;
}
This will make all your headings use the font Arimo. You can replace Arimo with the custom font you’ve added into WordPress using one of the above methods.
p {
font-family: 'Open Sans', sans-serif;
font-weight: bold;
}
This CSS snippet will do the same thing as the headings snippet. But instead this time it applies the font to your paragraphs.
If you are not sure about how to write this. Then you can always refer to the CSS that Google Fonts gives you. Like this:

Recap Of The Methods For Adding Custom Fonts To WordPress

So, at this point you should have 3 clear ways for adding custom fonts to WordPress using either:
- Easy Google Fonts
- Google Fonts + CSS
- Or @font-face + CSS (for fonts not included in Google Fonts)
By far using the Easy Google Fonts plugin is the most user-friendly. As it requires zero code to use and includes a live preview of your font changes.
But it does introduce dependencies on another plugin that needs to be updated. Whilst possibly not being the most optimized tool if WordPress speed is important to you.
If you are new to blogging and WordPress. Then the Easy Google Fonts plugin would be my recommendation.
As you can look at optimizing your WordPress blog for speed later. When you are more familiar and confident with it. Or by outsourcing to someone else the optimization of your blog.
So, which method will you be using for adding custom fonts to WordPress? Leave your thoughts in the comments below:
📌 Enjoyed this post? Then pin this post to your best Blogging or WordPress tips board! 📌