This post contains affiliate links. Which means I will make a commission at no extra cost to you should you click through and make a purchase. Read the full disclosure here.

Did you know? The Google Search Console can give you lots of information on how your blog or website is doing in Google search.
So, if you’re looking to get more traffic from Google, then the Google search console is a must-have for any blogger.
But how exactly can you get one for your blog with the minimum fuss, and effort? So you can get back to working on your blog and creating amazing content.
Well, this blog post aims to show you 3 easy ways to connect your WordPress blog with the Google Search Console.
But before we get onto that. Let’s talk a little bit more about what exactly the Google Search Console is.
- What Is The Google Search Console?
- What Are The Benefits of Google Search Console?
- How To Access Google Search Console + Connect It To Your WordPress Blog Or Website
- Google Search Console Overview
- How To Submit Your XML Sitemap To Google Using the Search Console
- Recap On How To Connect Google Search Console With Your WordPress Blog
What Is The Google Search Console?
The Google Search Console, also known as GSC, is one of several web-based tools that Google has created for website owners to monitor their site. Like Google Analytics, PageSpeed Insights and Google Tag Manager.
The main difference between Google Search Console, and Google Analytics, is that the Search Console gives you more detailed information as to how your website is performing in the search engine itself.
Whilst Google Analytics will give you information on your blog traffic. The main purpose of the Google Search Console is for you to be able to analyze and monitor your traffic directly from Google search. Rather than your social media platforms or other search engines such as Bing.
The most unique part about the Google Search Console, is that you can actually see the kinds of keywords that your blog posts are ranking for and how much traffic those keywords are sending you.
Meaning that the Google Search Console can be a powerful tool to help you track your Search Engine Optimization (SEO) in-depth. By seeing what keywords are driving your traffic and where your blog is ranking in search.
Related: How To Setup Google Analytics On Any WordPress Blog
📌 In a rush? Pin this post to your Blogging board to read it later! 📌

What Are The Benefits of Google Search Console?
As touched upon earlier, the Google Search console has many benefits for website or blog owners.
Because the Google Search Console gives you in-depth data and feedback on how your blog is performing in Google’s search engine.
More specifically, the benefits are:
- Tools to help track your SEO progress
- Knowing what keywords drive traffic to your blog
- Click through rate (CTR), so you can analyze titles and meta description performance + make tweaks to improve
- Where you are ranking in Google search for certain keywords
- Reports on any issues Google has when monitoring, crawling or indexing your blog
- Insights into how fast Google thinks your blog is.
- Ability to upload XML Sitemaps to help Google explore all your blog pages better and faster. (Especially useful for brand new blogs.)
- Information on traffic from Google Discover (Google’s personalized search suggestions for mobile browsers.)
Oh, and if you’re wondering – how much does the Google Search Console cost? Well, you’ll be glad to know that you can get all these benefits and powerful features for free.
So, no need to worry about having to pay extra to use this tool!
How To Access Google Search Console + Connect It To Your WordPress Blog Or Website
Create A Google Search Console Account
So how do you get the Google Search Console set up on your blog?
Well the first thing you need to do is you need to sign up for a Google Search Console account.
To sign up for your own account, you will need to go here.
Click on Start now.

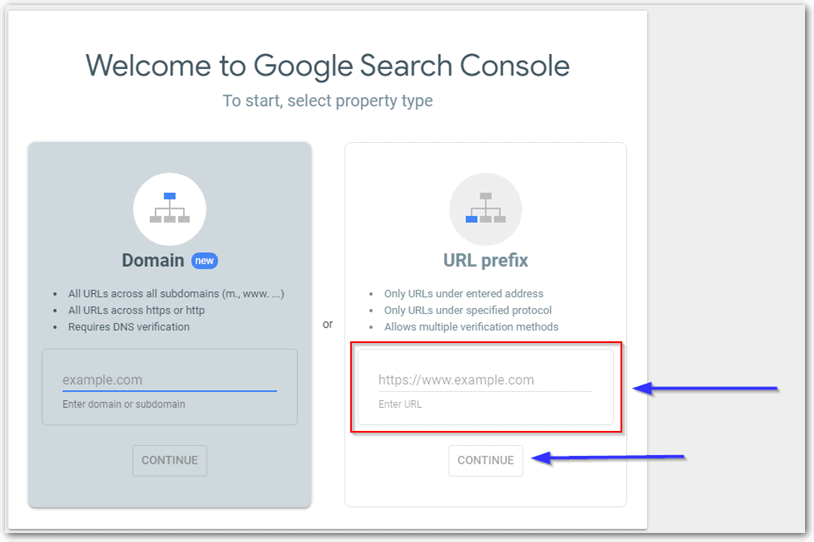
And the Search Console will ask you to enter your blog details.
You will be given 2 options – URL Prefix and Domain.
If you use the Domain option, you will only have one way to verify your website using your web hosting Domain Name Servers (DNS).
These are not the easiest things to edit if you are a new blogger. As accessing the DNS records for your web hosting can vary greatly from web host to web host.
Making it impossible to give a step by step guide that everybody could follow regardless of who they were using for their web hosting.
Because of this, I’m going to suggest that you use the older method of verifying your blog using URL prefix. As it will give you a few different options that you can use, depending on how comfortable you feel with them
So, make sure you have URL prefix selected.
Now, before you input your blog or website URL, here are a few things to consider:
If you’re using HTTPS, on your blog. Then you will want to use the https:// version of your blog URL. You can find more information about how to set your blog HTTPS up and why it is a must-have here.
Why? Because this is the URL we will be directing all the traffic to. And the one that we want Google to prioritize as being seen.
Next, consider whether your blog is using, www. or not. You need to decide which version you want to use for your blog or website URL.
There are no real significant differences or benefits from either choice. So feel free to pick the one that you like the appearance of the most. The non-www. is just a more recent variation, as www. is not required for URLs to work properly. Some people choose it because it looks simpler.
So, make your choice between which you want to use on your blog. But realize that you need to use this for the remaining life of your blog. As it is incredibly difficult to change this further down the line.
With these 2 things in mind, you will want to enter your blog URL into the box and then click Continue.
Related: How To Setup HTTPS For Your Blog + Why It Matters
Verify Ownership Of Your Domain URL In Google Search Console
Next, Google will request for you to verify your ownership.
Google will provide you with several different methods you can use to verify your ownership of your blog.
In the below steps, I’m going to give you a method that will verify your blog, through WordPress plugins.
As you will likely have on them your blog anyways, if you want to optimize for Search Engine Optimization (SEO). Such as Yoast SEO and Rank Math SEO.
However, if you would prefer not to use the plugin method, there will be instructions on how to do this manually too.
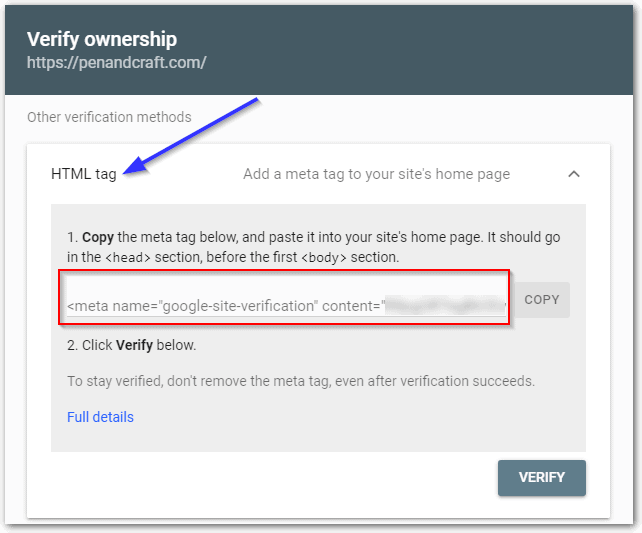
So, on the Verify Ownership screen.
If you scroll further down under the other verification methods. There should be an option to verify ownership using an HTML tag.
With the HTML tag verification method, you will be given a piece of code that you need to copy and paste into your blog.
For now, keep this page open. As we will come back and copy the code later.
There are two main SEO plugins that I would suggest you start with as a beginner blogger.
The first is Yoast SEO. This is a very popular plugin, but has several features that are restricted to the paid version.
The other option is Rank Math which has a lot more features compared to Yoast SEO. But is also a much newer plugin.
Let’s start by looking at how to use Yoast SEO to install your HTML tag:
How To Use Yoast SEO To Verify Ownership For The Google Search Console
Right, so what you need to do is go to your WordPress dashboard and open Plugins > Add new and look for Yoast SEO.
Click Install now and Activate.

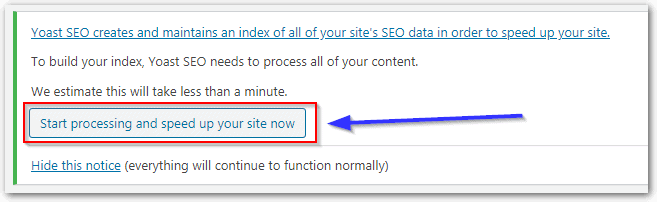
If this is your first time installing Yoast SEO, it will prompt you with a message for optimizing Yoast for website speed. I recommend clicking on the Start processing to speed up your website now.
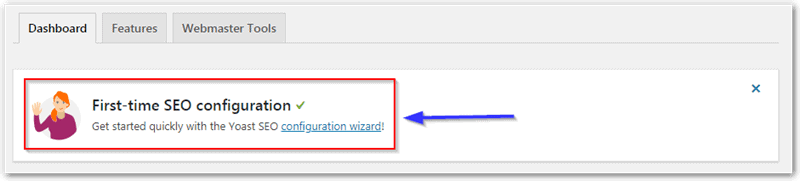
Once this is done, go to Yoast SEO > General and first time plugin users should run the first time SEO configuration.
You can find more details on the settings you should use in this tutorial here.
Once you have Yoast SEO installed and set up.
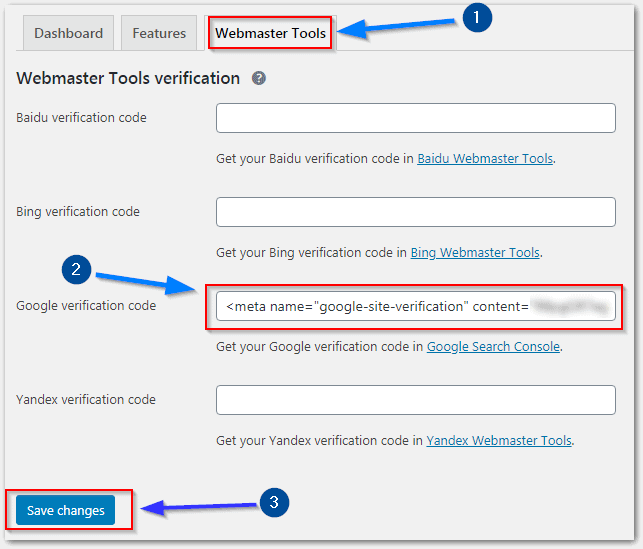
You should head to the Webmaster Tools under the Yoast SEO > General.
Within this screen, you will be given several boxes where you can import verification codes.
At this point you can return to the Google Search Console screen that you had open earlier,
Click on Copy next to your HTML tag code and then paste this code into the Google verification code box within Yoast.
If you then click on Save changes. This will apply your Google Search Console code to your blog in the right places.
How To Use Rank Math SEO To Verify Ownership For The Google Search Console
If you would prefer to use the Rank Math plugin for the extra features available. Then you will need to install and set it up first. You can find further details on how to do this here.
Once Rank Math is installed. Go to Rank Math > General Settings > Webmaster Tools from the WordPress dashboard
Here, you can copy and paste your Google Search Console code into the box provided.
Remember to click Save changes after you have input your code. And this will apply it to your website in all the required places.
How To Verify Ownership For Google Search Console Without A Plugin By Uploading A HTML File
The third option you can use to verify ownership and connect the Google Search Console to your blog. Would be to upload a HTML file to your web hosting.
You can use this option if you would prefer to not to use a WordPress plugin.
To use this option you will need to Download the HTML file provided by Google. Then log into your blog’s FTP.

If you’re not familiar with how you can set up or use your website FTP then you should follow this guide here for more detailed instructions.
Once you are logged into your FTP you will need to upload the file provided to the default folder for your blog.
This should be a folder called public_HTML

Once you have added the verification code or uploaded the HTML file using one of these methods. It’s now time to verify your blog!
Head back to the Google Search Console and depending on which method you used to verify your blog. Make sure you click on the Verify button for the particular method you completed.
Google should be able to verify your blog instantly and give you access to your new shiny Google Search Console dashboard!

Related: Fool-Proof Guide On How To Setup + Use Your WordPress Blog’s FTP
Google Search Console Overview
Here’s a quick overview of the different places included with your new Google Search Console dashboards.
Overview – Will show you the overall performance your blog has for search in terms of clicks, the amount of pages covered and any errors flagged.
Search Results – A more in-depth graph of your blog results for the default Google Search. Including details on:
- Impressions
- Clicks
- Click through rate
- Rank Position
This page is also where you can find a breakdown of keywords and phrases that are used to find your blog.
Discover – Is a similar in-depth graph and table of your website’s results. But this is for the mobile personalized version of Google Search.
Coverage – A report of the pages Google can see and any errors you need to solve.
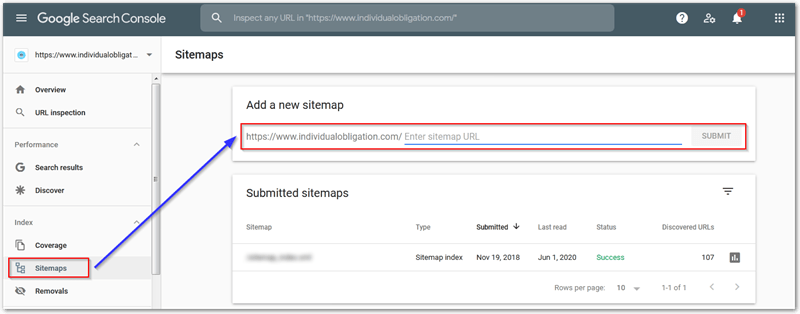
Sitemaps – A map generated for your blog to help Google understand your blog better.
Removals – Submit URLs you don’t want Google to see or use in search results.
Core Web Vitals – A series of reports that monitor your blog’s speed and will be used as a ranking signal likely in 2021. These reports use special speed measures called LCP, CLS and FID.
Mobile Usability – A report of any issues Google thinks your blog has for mobile devices. Such as your fonts being too small or cutting off the page.
Breadcrumbs, Logos, Sitelinks searchbox – Reports that cover whether these features are found on your blog. Plus any errors Google finds.
Security & Manual Actions – Cover areas Google will use to flag any issues related to security or actions you need to take.
Legacy tools and reports – Covers shortcuts to links and tools from the older version of Google Search Console.
Links – A breakdown of external and internal links for your blog.
Settings – Verification, user permissions, change of address and website property settings.
How To Submit Your XML Sitemap To Google Using the Search Console
One of the most important things you should do as soon as you get your Google Search Console setup. Is to go and add your website or blog XML sitemap.
If you’re not familiar on where to get your sitemap from. Then the Yoast and Rank Math SEO plugins are also incredibly useful for adding this as well.
If you have the Yoast SEO plugin installed. You can find this option on the Yoast SEO > General > Features tab and then toggling on XML sitemaps.

And if you’re not sure where to find your sitemap from Yoast SEO. Then you can click on the question mark next to your XML sitemap.
And then click on See XML sitemap. As this will give you the URL you need to put into the Google Search Console setting.

If you are using Rank Math, then you can find similar options under Rank Math > Dashboard > Sitemap.
To find your sitemap location, you can click on Settings underneath the Sitemap module and there will be a link at the top of the page.
Add the link to your sitemap into the Google Search console. Then click Submit and this will send the information to Google so that it can start indexing your blog faster and more intelligently.

Recap On How To Connect Google Search Console With Your WordPress Blog
That’s it! The Google Search console should now be connected to your blog. So you can now start using it to track any new traffic that you get from Google search.
And over time, the dashboard will be populated with valuable information on your keywords, how you rank in Google, click through rates and so much more.
Which methods do you think are the easiest to set up your blog with the Google Search Console? Are there any WordPress SEO plugins you prefer to use that are not included in this guide? Let me know in the comments below.
📌 Enjoyed this post? Then pin it to your best Blogging tips board! 📌